Author: Sam Visnic

Unlock Your Potential With These Top Functional Core Exercises

Have you ever felt like there’s more to your physical capabilities than what you’re currently able to achieve? That feeling of being held back, limited by the constraints of one’s own body can be frustrating.

But fear not, I am here to tell you that unlocking your potential is possible with the right training and exercises.

Functional core exercises are a key component in releasing your full potential. These exercises focus on developing strength and stability in the muscles surrounding your spine and pelvis. By improving this region, you can enhance overall performance in daily activities and sports-specific movements, reduce the risk of injury, and even alleviate chronic pain.

In this article, we will explore some top functional core exercises that are sure to help unlock your true potential for movement freedom.

Top Functional Core Exercises

What Are Functional Core Exercises?

Functional core exercises are an integral part of any fitness program. These exercises focus on building strength and stability in the core muscles, which is essential for daily activities such as lifting and bending.

Functional core exercises activate not only the abdominal muscles but also the surrounding muscle groups that support the spine. Functional core exercises incorporate movements that mimic real-life situations or sports-specific actions to improve overall athletic performance.

By engaging multiple muscle groups simultaneously, functional core exercises have been shown to be more effective than traditional isolation exercises in improving muscular endurance, strengthening bones, preventing injury, and promoting weight loss.

Incorporating these movements into your fitness routine can help you unlock your potential by enhancing your physical capabilities while reducing your risk of injury.

Benefits Of Functional Core Exercise

A fitness enthusiast’s dream is to have a strong and functional core, which can be achieved through regular training and adherence to the right nutritional principles. The benefits of functional core exercises are numerous and advantageous for those who seek freedom in their daily lives.

Firstly, these exercises improve overall posture by strengthening the muscles that support our spine. Functional core exercises such as planks or bird dogs help activate deep abdominal muscles that stabilize the torso during movement. This increased stability reduces strain on the lower back, improving posture and reducing the risk of injury.

Secondly, they also enhance athletic performance by increasing power transfer from the center of the body to its extremities. With stronger core muscles, athletes can generate more force with each movement they make, leading to improved speed and agility.

Additionally, they can provide a sense of balance and control over one’s own movements. They require coordination between different muscle groups working together simultaneously while engaging in various planes of motion.

When we engage in activities like running or lifting weights, this type of coordinated effort becomes essential for avoiding injuries caused by poor form.

Overall, incorporating functional core exercises into your workout routine will lead to more than just aesthetic changes; it will create lasting improvements in strength, stability, and mobility necessary for living an active life with confidence!

Top Functional Core Exercises To Include

Pallof Press

If you’re looking to unlock your potential and improve functional core strength, the Pallof press is an excellent exercise to include in your routine.

This movement targets multiple muscle groups in the core area and challenges stability through anti-rotational movements.

By resisting rotation throughout the exercise, you’ll engage muscles that are often neglected by traditional ab exercises.

The Pallof press can be performed with a cable machine or resistance band, making it accessible for most gym-goers.

Incorporating this exercise into your workouts will not only strengthen your core but also enhance overall body control and balance during daily activities or sport-specific movements.

Give yourself the freedom to move better and try out the Pallof press today!

Overhead Carries

Another top functional core exercise to include in your routine is the overhead carry.

This movement involves holding a weight, such as a dumbbell or kettlebell, above your head while walking.

The overhead carry challenges not only your core muscles but also your shoulder stability and overall body control.

By maintaining proper posture and engaging your core throughout the exercise, you’ll improve both strength and endurance in these important areas.

Overhead carries can be done with various weights and distances, making them adaptable for all fitness levels.

Incorporating this exercise into your workouts will give you the freedom to move better and enhance your daily activities or sport-specific movements.

Hanging Exercises

In addition to overhead carries, hanging exercises are another top functional core exercise that should be included in your routine.

Hanging exercises involve suspending yourself from a bar or other apparatus and engaging your core muscles to maintain stability and control.

These movements not only target the core but also improve grip strength, shoulder mobility, and overall body awareness.

By incorporating hanging exercises such as leg raises or pull-ups into your workouts, you’ll develop greater freedom of movement and enhance your ability to perform daily activities with ease.

Whether you’re an athlete looking to improve performance or simply seeking greater physical autonomy, adding hanging exercises to your training program can help you achieve those goals.

Sample Functional Core Workout

Now that you know the top functional core exercises to include in your workout, let’s take a closer look at a sample routine.

This 20-minute functional core training session targets all angles of the core from different planes of motion, resulting in increased strength and stability.

By targeting not only the abs but also lower back muscles, obliques, glutes, hip flexors and shoulders this routine helps improve overall coordination while reducing injury risk. By incorporating these functional core workouts into your fitness regimen regularly will help unlock your potential by improving mobility and balance which ultimately leads to more freedom in daily life activities like carrying groceries or lifting weights at the gym.

Warm-up: Perform each exercise for 30 seconds, with no rest in between.

  1. Marching in Place
  2. Arm Circles
  3. High Knees
  4. Jumping Jacks

Functional Core Workout: Perform each exercise for 45 seconds, followed by a 15-second rest before moving on to the next exercise.

  1. Pallof Press
  2. Crocodile Breathing
  3. Overhead Carries (switch sides after 22 seconds)
  4. Hanging Knee Raises or Leg Lifts (use a pull-up bar or TRX straps)
  5. One-Arm Farmer Carry (switch sides after 22 seconds)
  6. One-Arm Overhead Carry (switch sides after 22 seconds)
  7. Deadbug with Alternating Arms and Legs
  8. Bird Dog
  9. Side Plank with Clamshell (switch sides after 22 seconds)
  10. Squat with Pallof Press

Repeat the above exercises for a total of 2 rounds.

Cool Down and Mobility: Perform each exercise for 30 seconds.

  1. Animal Walks (bear crawl, crab walk, or frog jump)
  2. Dynamic Rotation Forms (hip circles, trunk twists, or windmills)
  3. Heavy Carries (walking lunges with dumbbells or kettlebells)
  4. Sport-Specific Strength Exercises (choose an exercise related to your sport or daily activities)

Conclusion

Functional core exercises have become increasingly popular in recent years, and for good reason. These types of exercises focus on movements that mimic everyday activities, such as bending over to pick up groceries or twisting to reach something behind you.

By incorporating functional core exercises into your workout routine, you can improve your balance, stability, and overall strength. One key benefit of functional core exercises is that they engage multiple muscle groups at once. This not only makes your workout more efficient but also helps prevent injury by strengthening the muscles that support your spine and pelvis.

Additionally, these exercises can help improve posture and reduce the chances of developing lower back pain from weakness. It’s important to note that proper form is crucial when performing these exercises to avoid strain or injury.

Top 5 Exercises for Rhomboids: Strengthening Your Upper Back Muscles

If you’re looking to improve your posture, prevent injury, and boost your athletic performance, then it’s time to focus on strengthening your rhomboid muscles.

These muscles play a crucial role in scapular stability and upper back strength, making them essential for maintaining good posture and preventing shoulder injuries.

Fortunately, there are plenty of exercises you can do to target your rhomboids and build a strong, resilient upper back.

In this article, we’ll introduce you to the top 5 exercises for rhomboids that are effective, safe, and easy to perform. The various and best rhomboid exercises include:

  1. Prone Y Raises
  2. Scapular Retractions
  3. Seated Cable Rows
  4. Bent Over Rows
  5. Face Pulls

So, let’s dive in and discover how to strengthen your upper back muscles for a healthier, happier you!

The Importance of Rhomboids

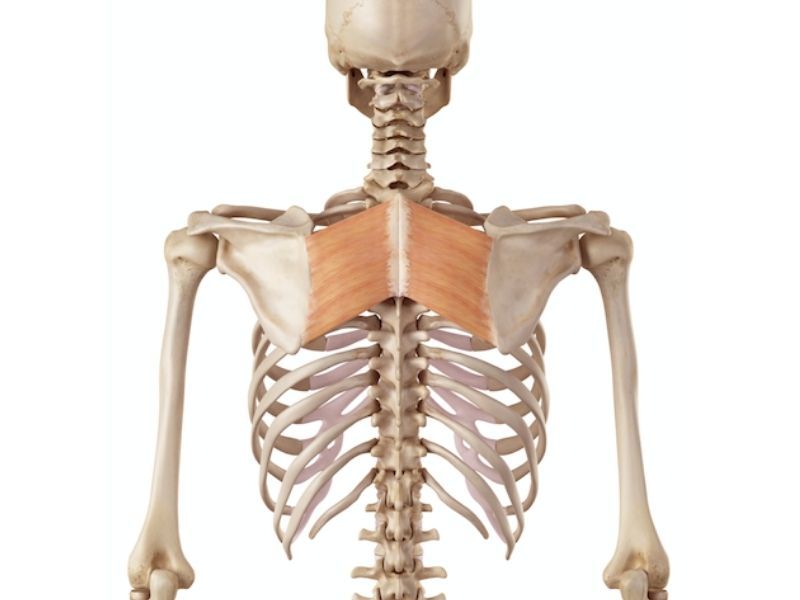
When it comes to upper back strength and stability, the rhomboid muscles play a crucial role. These small but mighty muscles, located between the shoulder blades, are responsible for several important functions that are essential to proper shoulder and upper back movement.

Exercises for rhomboids

The rhomboid muscles work to retract the scapulae (shoulder blades) and rotate them downward. This movement is necessary for several everyday activities, such as reaching overhead or pulling objects towards the body.

In addition to shoulder blade movement, the rhomboids also play a role in maintaining proper posture and spinal alignment. Strong rhomboid muscles help to stabilize the scapulae and maintain a neutral position of the shoulder joint and spine, reducing the risk of injury and pain.

If the rhomboid muscles are weak, it can lead to several issues, including bad posture, shoulder pain, and upper back pain. Poor posture, in particular, is a common problem associated with weak rhomboids.

When the rhomboids are weak, the shoulders tend to round forward, leading to a slouched posture. This posture can contribute to shoulder pain and upper back pain over time.

In addition, weak and undertrained rhomboids can also cause other muscles in the upper back and shoulders to overcompensate, leading to further imbalances and potential injuries.

Strengthening the rhomboids is therefore essential for overall upper body health and injury prevention. Let’s dive into that in the next section.

5 Best Exercises for Rhomboids

Having strong and healthy rhomboids is crucial for maintaining good posture, preventing shoulder injuries, and improving overall upper body strength. Here are the top 5 best exercises for rhomboids:

Prone Y Raises

This exercise involves lying on your stomach and raising your arms and upper body to form a “Y” shape. It targets the rhomboids and the lower traps, helping to improve posture and scapular stability.

  • Lie on your stomach with your arms stretched overhead in a Y shape
  • Lift your chest and arms off the ground while squeezing your shoulder blades together
  • Hold for a few seconds and lower back down
  • Aim for 3 sets of 10-12 reps

Scapular Retractions

This simple rhomboid exercise involves squeezing your shoulder blades together at the rhomboid minor area while keeping your arms straight to create tension. It can be done throughout the day often to build coordination and endurance.

  • Sit or stand with your arms at your sides
  • Squeeze your shoulder blades together and hold for a few seconds before going to the starting position
  • Release and repeat for 3 sets of 10-12 reps

Seated Cable Rows

This cable row exercise involves sitting on a bench and pulling a cable towards your upper body pressing exercises up, while keeping your back straight and shoulders down. It targets the rhomboids and other upper back muscles, as well as the biceps and forearms.

  • Sit in front of a cable machine with your feet on the platform and your knees slightly bent
  • Grab the cable handles with your arms extended in front of you
  • Pull the handles back towards your chest while squeezing your shoulder blades together
  • Slowly reverse, release and repeat for 3 sets of 10-12 reps

Bent Over Rows

This exercise involves bending forward at the waist with a weight in your hands and pulling it towards your chest. It targets the rhomboids, as well as the lower back, biceps, and forearms.

  • Hold a dumbbell in each hand with your palms facing down
  • Hinge forward at the hips with a slight bend in your knees
  • Pull the dumbbells up towards your chest while squeezing your shoulder blades together
  • Slowly lower and repeat for 3 sets of 10-12 reps

Face Pulls

This exercise involves pulling a cable toward your face while keeping your elbows high and shoulders down. It targets the rhomboids and other upper back muscles, as well as the rear delts and rotator cuff.

  • Attach a rope handle to a cable machine at face height
  • Grab the rope with your palms facing down and step back
  • Pull the rope towards your face while squeezing your shoulder blades together
  • Slowly release and repeat for 3 sets of 10-12 reps

Incorporating these exercises such as pulling exercises, bench press, pull ups into your upper body workout routine can help strengthen your rhomboids and improve your overall posture and shoulder health.

Remember to start with lighter weights and gradually increase as you get stronger, and always maintain proper form to prevent injury.

Tips for Effective Rhomboid Exercises

The rhomboids are essential muscles for maintaining good posture and shoulder stability. Strengthening these muscles through targeted exercises can improve your overall upper body strength and help prevent injury.

However, performing rhomboid exercises incorrectly can lead to limited results or even injury. To maximize the effectiveness and range of motion of your rhomboid exercises, consider the following tips:

  1. Focus on scapular retraction and depression: To properly activate the rhomboids, it’s important to focus on pulling your shoulder blades back and down throughout the exercises. This will help target the muscles and prevent compensations with other muscles.
  2. Engage the core during all exercises: Engaging your core muscles during rhomboid exercises will help stabilize your spine and maintain proper form. This can help you avoid injuries and maximize the benefits of the exercises.
  3. Use a slow and controlled motion: Performing rhomboid exercises with a slow and controlled motion ensures that you are targeting the correct muscles and not using momentum to complete the movement. This can also help prevent injuries.
  4. Prioritize quality over quantity of repetitions: The quality of your reps is more important than quantity. Focus on performing each repetition with proper form, scapular retraction, and a controlled motion. Doing fewer reps with good form is more beneficial than performing more reps with poor form.
  5. Progressively increase resistance and/or volume: As you become stronger, it’s important to continue challenging your rhomboid muscles to see continued progress. Increase the resistance by using heavier weights or resistance bands, or increase the volume by performing more sets or reps. However, progress slowly and ensure you can perform each exercise with proper form before increasing the resistance or volume.

Integrating Rhomboid Exercises into Your Workout Routine

Integrating rhomboid exercises into your workout routine can help improve your posture, scapular stability, and overall upper body strength.

Here are some suggestions on how to incorporate the rhomboid muscle exercises into your routine:

Frequency:

  • Aim to train your rhomboids 2-3 times per week
  • Allow at least 48 hours of rest between sessions to allow for muscle recovery

Sets and Reps:

  • Perform 2-3 sets of each exercise
  • Aim for 10-15 reps per set
  • Increase the weight or resistance gradually as you get stronger

Rest Periods:

  • Rest for 30-60 seconds between sets
  • Allow for longer rest periods (1-2 minutes) between exercises that involve heavier weights

Example Workout Plan:

Upper Body Day 1:

  • Prone Y Raises – 3 sets of 12 reps
  • Seated Cable Rows – 3 sets of 12 reps
  • Dumbbell Shoulder Press – 3 sets of 10 reps
  • Bicep Curls – 3 sets of 10 reps

Upper Body Day 2:

  • Scapular Retractions – 3 sets of 15 reps
  • Bent Over Rows – 3 sets of 12 reps
  • Tricep Pushdowns – 3 sets of 12 reps
  • Hammer Curls – 3 sets of 10 reps

Note: It’s essential to engage your core during all exercises to maintain proper form and avoid injuries.

As you progress, gradually increase the resistance and/or volume of your rhomboid exercises to continue challenging your muscles.

Also, make sure to take rest days and listen to your body to avoid overtraining.

Top 5 Exercises for Rhomboids: Strengthening Your Upper Back Muscles: Frequently Asked Questions

  1. How often should I perform exercises for rhomboids?

It’s recommended to perform rhomboid exercises 2-3 times a week. This allows enough time for the muscles to recover while still providing enough stimulus for strength and growth

  1. Can these exercises help with posture correction?

Yes, rhomboid exercises can help correct poor posture by strengthening the upper back muscles, which helps maintain better posture and proper alignment of the shoulders and spine.

  1. Are rhomboid exercises beneficial for injury prevention?

Yes, strengthening the rhomboid muscles can help prevent injuries by improving scapular stability and reducing the risk of shoulder impingement and other upper back injuries.

  1. How long does it take to see results from rhomboid exercises?

Results can vary depending on individual factors such as frequency of exercise, intensity, and consistency. However, with regular practice and a proper diet, visible improvements in strength and posture can be seen in 4-6 weeks.

  1. Can rhomboid exercises help with neck pain?

Yes, rhomboid exercises can indirectly help with neck pain by improving upper back posture, which can relieve tension on the neck muscles. However, it’s important to consult with a healthcare professional for an accurate diagnosis and treatment plan for any neck pain issues.

Conclusion

In conclusion, the rhomboid muscles play a crucial role in maintaining proper posture, scapular stability, and injury prevention.

By incorporating the top 5 exercises for rhomboids – Prone Y Raises, Scapular Retractions, Seated Cable Rows, Bent Over Rows, and Face Pulls, rowing exercises – into your workout routine, you can strengthen your upper back muscles, improve your bad posture, and reduce the risk of injury.

Remember to focus on scapular retraction and depression, engage your core, use slow and controlled movements, prioritize quality over quantity, and progressively increase resistance and/or volume.

By doing so, you can maximize the benefits of these postural exercises and see results in as little as a few weeks.

Don’t forget to consult a healthcare professional if you experience any pain or discomfort. So, start incorporating these exercises into your workout routine and enjoy the benefits of a stronger and healthier upper back!

The Ultimate Guide to Tensor Fascia Lata Stretch: Improve Flexibility and Relieve Pain

The Tensor Fascia Lata (TFL) muscle is a small muscle located on the outside of the hip that plays a crucial role in supporting our body during everyday activities and sports.

This muscle is responsible for stabilizing the hip and knee joints, which are essential for walking, running, jumping, and other physical activities.

However, a tight TFL muscle can lead to a variety of issues, including lower back pain, hip pain, knee pain, and IT band syndrome. This is why it’s crucial to keep this muscle flexible and mobile through regular stretching, especially if you’re an active weekend warrior.

Tensor Fascia Lata Stretch

In this guide, we will discuss the benefits of performing TFL stretches and provide you with some of the best stretches that you can incorporate into your daily routine.

By practicing these stretches, you can improve your mobility, reduce your risk of injury or tfl pain, and enhance your overall performance in daily activities and sports.

So, let’s get started!

Anatomy of Tensor Fascia Lata Muscle

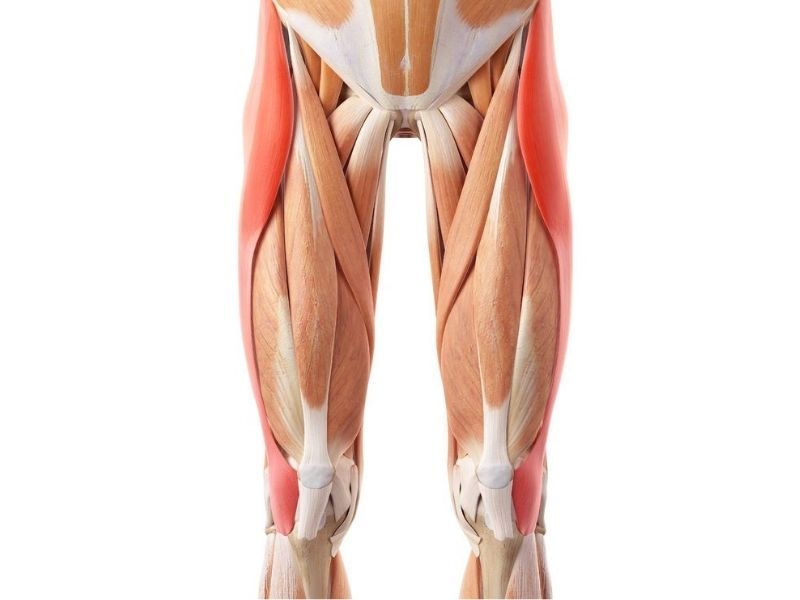
The tensor fascia lata (TFL) muscle is a small but mighty muscle located on the lateral side of outer leg below the hip. It originates from the anterior superior iliac spine (ASIS) of the pelvis and inserts into the iliotibial band (IT band), a thick band of connective tissue that runs down the outside of the thigh and attaches to the knee.

The main function of the TFL muscle is to assist in the stabilization of the hip and knee joints during movement. It works in conjunction with other muscles in the hip and thigh, such as the gluteus medius and minimus, to control hip abduction (movement away from the midline of the body) and rotation.

The TFL muscle is also closely related to the IT band via its direct connection, which is a critical structure for both hip mobility and knee stability during weight-bearing activities.

The TFL helps to support and tension the IT band, which assists in the stabilization of the knee during activities such as running, jumping, and squatting.

In addition to its role in hip and knee stability, the TFL muscle also plays a role in pelvic stability and posture. A tight or overactive TFL muscle can contribute to imbalances in the hips upper knee and pelvis, leading to postural issues and even low back pain.

Signs and Symptoms of Tensor Fasciae Latae Pain

When the tensor fasciae latae muscle becomes tight or painful, it can lead to a range of issues chronic pain and discomforts. Here are some of them:

Hip pain and hip tightness.

The TFL muscle is responsible for stabilizing the hip joint during movement, and when it becomes tight or strained, it can cause pain and discomfort in the hip area. This can make it difficult to perform activities such as running, walking, and climbing stairs.

IT band syndrome.

The TFL muscle is connected to the iliotibial band (IT band), a thick band of connective tissue that runs down the outside of the thigh. When the TFL muscle becomes tight or overworked, it can put pressure on the IT band, causing pain and inflammation. This can lead to a condition known as IT band syndrome, which is characterized by pain and tenderness in the outer part of the knee.

Lower back pain 

When the TFL muscle is tight or overworked, it can cause the pelvis to tilt forward (anterior pelvic tilt), leading to an excessive arch in the lower back. This can put stress on the lower back muscles and lead to pain and discomfort.

Knee pain 

As mentioned earlier, tightness in the TFL muscle can lead to IT band syndrome, which can cause pain and inflammation in the outer part of the knee. In addition, the TFL muscle also plays a role in stabilizing the knee joint during movement, and when it becomes tight or strained, it can cause pain and discomfort in the knee area.

Finally, compensatory muscle imbalances can occur when the TFL muscle is tight or painful. These imbalances can cause other muscles to become overworked and strained, leading to pain and discomfort in other areas of the body.

Top Tensor Fascia Lata Stretches to Improve Flexibility and Reduce Pain

Here are some of the top TFL stretches that you can incorporate into your stretching routine to reduce or eliminate painful tfl.

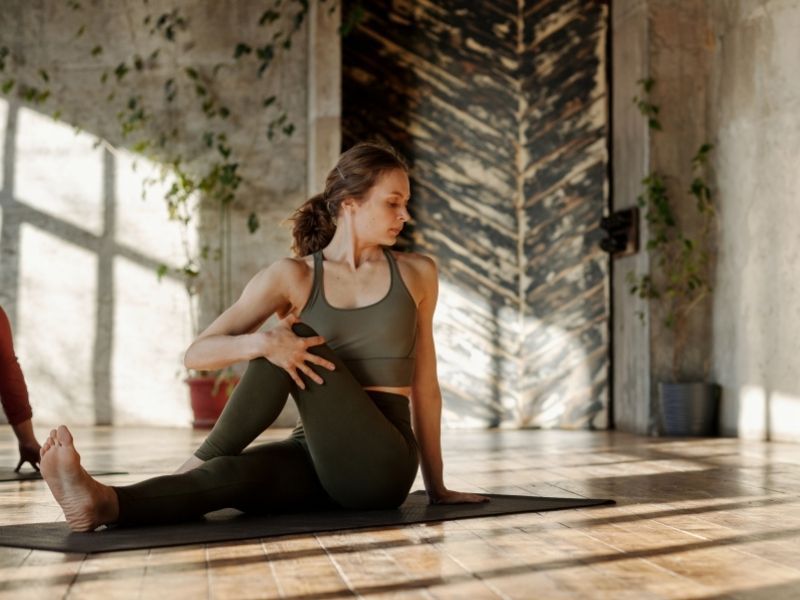
  1. Seated TFL stretch


  • Sit on the ground with your legs straight out in front of you
  • Cross your right ankle over your left knee, placing your right foot flat on the ground
  • Place your right hand behind your back, and your left hand on your right knee
  • Gently twist your torso to the right, using your left hand to guide your knee toward your chest
  • Hold the stretch for 30 seconds, then switch sides
  • Standing TFL stretch

  • Stand with your feet hip-width apart
  • Cross your right ankle over your left ankle, and place your right hand on your hip
  • Reach your left arm over your head and toward the right
  • Hold the stretch for 30 seconds, then switch sides
  • Side-lying TFL stretch

  • Lie on your right side with your legs straight
  • Bend your left knee and bring your left foot towards your buttocks
  • Reach back with your left hand and grab your ankle
  • Gently pull your ankle towards your buttocks to feel a stretch in your TFL muscle
  • Hold the stretch for 30 seconds, then switch sides
  • Foam roller TFL stretch

https://vimeo.com/user8510249/review/234224819/5d00af6631

  • Lie on your right side with a foam roller under your right hip
  • Cross your left leg over your right leg and place your left foot on the ground
  • Use your left foot to roll the foam roller up and down your hip and outer thigh
  • Spend extra time on any tender spots
  • Repeat on the other side

Tips for proper form and technique while stretching

  • Keep your back straight and your shoulders down throughout each stretch
  • Breathe deeply and relax into the stretch
  • Only stretch to the point of mild discomfort, never pain
  • If you have a history of hip or knee injuries, consult with your healthcare provider before attempting these stretches

Modifications for varying fitness levels

  • If you have limited mobility, use a yoga strap or towel to help guide your knee toward your chest in the seated TFL stretch
  • For a deeper stretch in the standing TFL stretch, reach your hand towards the ceiling or hold onto a sturdy object for support
  • If the side-lying TFL stretch is too intense, prop yourself up on your elbow or use a pillow for support
  • If the foam roller TFL stretch is too intense, use a tennis ball instead of a foam roller or skip this stretch altogether.

Additional TFL Stretches and Exercises

To prevent and alleviate tensor fascia lata pain issues, incorporating additional TFL stretches and exercises into your workout routine can be beneficial. In this article, we will cover the following:

Dynamic TFL stretches for warming up: These stretches involve moving through a range of motion to warm up the TFL muscle and surrounding muscles before exercise. Examples include walking lunges with a torso twist and side shuffles.

a. High knee walks: Start by standing upright with your feet hip-width apart. Raise your right knee toward your chest and grab it with both hands. Hold for a few seconds, then release and step forward. Repeat with the left knee and alternate for 10-12 repetitions.

b. Lateral lunge with reach: Stand with your feet hip-width apart and step out to the side with your left leg, bending your left knee and keeping your right leg straight. Reach your left arm down towards your left foot and hold for a few seconds. Return to your starting position and repeat on the other side. Alternate for 10-12 repetitions.

Strengthening exercises for the TFL muscle and surrounding muscles: Strengthening exercises help to balance the TFL muscle with other muscles in the hip and upper leg together. Examples include lateral band walks, clamshells, and squats.

a. Clamshell exercise: Lie on your side with your knees bent and feet together. Keeping your feet touching, lift your top knee as high as you can without moving your pelvis or lower back. Lower back down and repeat for 10-12 repetitions. Switch sides and repeat.

b. Bridge with one leg and lift: Lie on your back with your knees bent and feet flat on the floor. Lift your hips off the ground, keeping your shoulders and feet on the ground. Hold for a few seconds, then lift your right leg towards the ceiling, keeping it straight. Lower it back down and repeat with the left leg. Alternate for 10-12 repetitions.

Yoga poses that target the TFL muscle: Yoga poses can help to stretch and strengthen the TFL muscle. Examples include Pigeon Pose, Half Moon Pose, and Warrior II Pose.

a. Low lunge with twist: Start in a lunge position with your left foot forward and your right leg back. Place your right hand on the ground next to your left foot and twist your torso towards your left, knee bent back, reaching your left arm up towards the ceiling. Hold for a few breaths, then release and switch sides.

b. Pigeon pose: Start on all fours with your hands directly under your shoulders and your knees under your hips. Bring your right knee towards your right hip extension your hand and extend your left leg behind you. Lower down onto your forearms and hold for a few breaths. Release and switch sides.

Pilates exercises for TFL muscle balance and flexibility: Pilates exercises can help to improve TFL muscle balance and flexibility. Examples include the side-lying leg lift and the side-lying clamshell.

a. Single leg circle: Lie on your back with your legs extended toward the ceiling. Keep your left leg still and circle your right leg clockwise, then counterclockwise, making sure to keep your hips forward pelvis stable. Repeat with the left leg.

b. Mermaid stretch: Sit on the ground with your legs to the side, knees bent and feet behind you. Place your left hand on the ground behind you and reach your right arm up toward the ceiling. Side bend towards your left hand and hold for a few breaths. Release and switch sides.

Frequently Asked Questions (FAQ)

  1. How often should I perform tensor fascia lata stretches?

The frequency of performing tensor fascia lata (TFL) stretches depends on individual needs and goals. However, to improve flexibility and reduce pain, it is recommended to perform TFL stretches at least two to three times per week. It is important to avoid overstretching and to gradually increase the intensity and duration of the stretches.

  1. What is the best time to perform TFL stretches?

There is no one best time to perform TFL stretches, as it depends on individual schedules and preferences. Some people may prefer to perform stretches before a workout to warm up the muscles, while others may prefer to stretch after a workout to cool down and prevent muscle soreness. Some may also choose to stretch during a break in their workday to alleviate tension and discomfort. The key is to find a time that works for you and to consistently incorporate TFL stretches into your routine.

  1. Can TFL stretches help prevent injury?

Yes, TFL stretches can help prevent injury by improving flexibility and reducing muscle tension in the hip, thigh, and knee areas. A tight TFL muscle can contribute to imbalances in the lower body, leading to overuse injuries such as IT band syndrome, knee pain, and hip pain. Incorporating TFL stretches into your routine can help prevent these injuries by promoting muscle balance and reducing tension in the surrounding muscles.

  1. Are there any precautions or contraindications for TFL stretching?

It is important to listen to your body and avoid overstretching or forcing the stretch beyond your comfortable range of motion. If you have a history of hip, knee, or lower back injuries, or have undergone surgery in these areas, it is recommended that you consult with a healthcare professional before performing TFL stretches. Additionally, pregnant women should consult with their healthcare provider before performing any stretching or exercise program.

Tips for Maintaining TFL Muscle Health

Maintaining the health of the tensor fascia lata (TFL) muscle is essential for overall mobility and athletic performance.

Here are some tips for keeping your TFL muscle in optimal condition.

Firstly, it’s important to maintain flexibility and strength in the TFL muscle through regular stretching and strength training exercises. Incorporating a variety of stretches, such as those mentioned earlier, into your daily routine can help improve your TFL muscles’ flexibility and reduce the risk of injury.

Proper footwear is also essential in maintaining TFL muscle health. Wearing shoes with proper arch support can help reduce the strain on the TFL muscle and prevent pain and tightness. Avoid shoes with high heels, as they can put extra pressure on the TFL muscle and exacerbate any existing issues.

Incorporating TFL stretches into your daily routine can be beneficial for maintaining muscle health. Simple stretches like the seated TFL stretch and the foam roller TFL stretch can be done at home and can help keep your TFL muscle loose and flexible.

Finally, it’s important to seek professional guidance from physical therapists and trainers. They can provide you with personalized advice on how to properly stretch and strengthen the TFL muscle, as well as address any issues or imbalances that may be present.

Conclusion

In conclusion, maintaining the health of the tensor fascia lata muscle is crucial for daily activities and sports performance.

Incorporating regular TFL stretches and exercises can help improve flexibility, reduce pain and prevent injury.

Remember to maintain a balance of strength and flexibility, wear proper footwear, and seek professional guidance when needed.

By making TFL stretches a part of your daily routine, you can improve your overall physical health and well-being.

Effective Techniques to Alleviate and Prevent Rhomboid Muscle Pain

Rhomboid muscle pain is a common condition that affects many people, especially those who lead sedentary lifestyles or engage in repetitive activities.

The rhomboid muscles are located in the upper back between the shoulder blades and are responsible for pulling the shoulder blades together. They also play a crucial role in maintaining proper posture and shoulder mobility.

The constant discomfort and pain in the rhomboid muscle can lead to decreased productivity, limited mobility, and even depression. That’s why it’s important to learn how to alleviate and prevent rhomboid muscle pain, which can improve your overall health and well-being.

By the end of this post, you will have the knowledge and techniques to take control of your rhomboid muscle strain, improve your mobility, and live a pain-free life. So, let’s dive in and learn how to say goodbye to rhomboid muscle pain once and for all!

Understanding Rhomboid Muscle Pain

Rhomboid muscles are a pair of muscles located in the upper back between the shoulder blades. They are diamond-shaped, which is why they are called rhomboid muscles. The rhomboid muscles play a crucial role in shoulder blade stabilization and proper posture maintenance.

The function of the rhomboid muscles is to pull the shoulder blades together, helping to maintain good posture and shoulder mobility. They are also involved in shoulder blade elevation and rotation, making them essential for proper upper body movement.

There are several common causes of painful rhomboid muscle, including poor posture, repetitive movements, heavy lifting, and trauma. Poor posture, such as slouching or hunching over a desk for extended periods, can cause rhomboid muscles, leading to pain and discomfort. When you spend long hours sitting or standing with poor posture, the rhomboid muscles become overworked, leading to tension and pain.

Repetitive movements, such as typing or carrying heavy objects, can also cause overuse of the rhomboid muscles, resulting in pain. When you perform the same movements repeatedly, such as reaching or lifting, it puts a lot of strain on the rhomboid muscles, leading to inflammation and pain.

Heavy lifting, especially when done with improper form, can cause significant rhomboid muscle strain. This can cause tight muscles to become strained, leading to pain and discomfort. When you lift heavy objects, make sure to use proper form to avoid injuring the rhomboid muscles.

Trauma, such as a car accident or fall, can also cause rhomboid muscle pain. Injuries to the upper back can cause strain on the rhomboid muscles, neck pain leading to pain and discomfort. If you have experienced trauma to the upper back, it is important to seek medical attention to prevent further complications.

Symptoms of rhomboid muscle pain can vary from person to person. Common symptoms include:

  • Aching or burning pain in the upper back and shoulder blade area,
  • Limited range of motion, and tightness or stiffness in the affected muscles.
  • In severe cases, the pain can radiate down the arm or cause headaches.

Reasons for Rhomboid Pain Development

Rhomboid muscle pain can be caused by several factors, including poor posture, overuse and strain from certain activities, injuries and accidents, and underlying medical conditions.

Poor Posture and its Effects

Poor posture, such as slouching or hunching over a desk for extended periods, can cause strain on the rhomboid muscles, leading to pain and discomfort. When you spend long hours sitting or standing with poor posture, the rhomboid muscles become overworked, leading to tension and pain. Poor posture can also cause misalignment of the spine, leading to additional strain on the rhomboid muscles and other muscles in the upper back.

Overuse and Strain from Certain Activities

Repetitive movements, such as typing or carrying heavy objects, can also cause overuse of the rhomboid muscles, resulting in pain. When you perform the same movements repeatedly, such as reaching or lifting, it puts a lot of strain on the rhomboid muscles, leading to inflammation and pain. Heavy lifting, especially when done with improper form, can also cause significant strain on the rhomboid muscles.

Injuries and Accidents

Trauma, such as a car accident or fall, can also cause rhomboid muscle pain. Injuries to the upper back can cause strain on the rhomboid muscles, leading to pain and discomfort. If you have experienced trauma to the upper back, it is important to seek medical attention to prevent further complications.

Underlying Medical Conditions

In some cases, rhomboid muscle pain may be a symptom of an underlying medical condition. For example, arthritis or fibromyalgia can cause pain and inflammation in the muscles and joints, including the rhomboid muscles. Spinal conditions such as cervical herniated discs or spinal stenosis can also cause pain in the upper back, including the rhomboid muscles.

Early intervention can prevent further complications and help you manage the pain more effectively. Let’s have a look at some of the recommended exercises and stretches for rhomboid pain relief.

Exercises and Stretches for Rhomboid Pain Relief

Rhomboid muscle pain can be debilitating, but there are exercises and stretches you can do to alleviate the pain and prevent it from happening again. Here are some effective exercises and stretches for rhomboid pain relief:

Scapular Retraction:

Scapular retraction is an exercise that strengthens the muscles between your shoulder blades and improves your posture. To perform this exercise:

  • Stand or sit with your arms at your sides and your shoulders relaxed.
  • Squeeze your shoulder blades together, pulling them back and down towards your spine.
  • Hold for 5-10 seconds, then release.
  • Repeat for 3 sets of 10 repetitions.

Doorway Stretch:

https://www.youtube.com/watch?v=rT7rgXQtDcI

The doorway stretch is an effective stretch to relieve tension in the rhomboid muscles. To perform this stretch:

  • Stand in a doorway with your arms outstretched and your palms on the door frame.
  • Lean forward until you feel a stretch in your chest and shoulders.
  • Hold for 20-30 seconds, then release.
  • Repeat 3-5 times.

Neck Retraction Exercise:

https://vimeo.com/698685644

The neck retraction exercise strengthens the muscles in the back of your neck and improves your posture. To perform this exercise:

  • Sit or stand with your shoulders relaxed and your head in a neutral position.
  • Slowly tuck your chin towards your chest, keeping your eyes level.
  • Hold for 5-10 seconds, then release.
  • Repeat for 3 sets of 10 repetitions.

Child’s Pose:

The Child’s Pose stretch is an effective way to stretch the muscles in your upper back, including the rhomboids. To perform this stretch:

  • Start on your hands and knees with your hands shoulder-width apart.
  • Lower your hips back towards your heels while reaching your arms out in front of you.
  • Rest your forehead on the floor and relax your shoulders.
  • Hold for 30 seconds to 1 minute, then release.

Foam Rolling:

Foam rolling is a great way to relieve tension and soreness in the rhomboid muscles. To foam roll your rhomboids:

  • Lie on your back with a foam roller placed horizontally between your shoulder blades.
  • Place your hands behind your head to support your neck.
  • Roll up and down along your upper back, focusing on any areas of tightness or pain.
  • Continue rolling for 1-2 minutes, release and come back to your starting position.

Incorporating these exercises and stretches into your daily routine can help alleviate rhomboid muscle pain and prevent it from happening again in the future. Remember to always listen to your body, take frequent breaks and stop any exercise or stretch if you experience pain or discomfort.

Preventive Measures for Rhomboid Muscle Pain

Rhomboid muscle pain can be prevented by taking proactive measures to maintain good posture and prevent muscle strain. Here are some effective preventive measures for rhomboid strain and shoulder pain:

Maintaining Proper Posture

Maintaining good posture is crucial for preventing rhomboid muscle pain. To maintain proper posture:

  • Sit with your back straight and your shoulders relaxed.
  • Keep your feet flat on the ground.
  • Use a lumbar support pillow if needed to avoid breaking your rib cage.
  • Avoid slouching or leaning forward.

Regular Exercise and Stretching

Regular exercise and stretching can help keep your muscles healthy and prevent muscle strain. Here are some exercises and stretches that can help:

  • Scapular retraction exercise
  • Doorway stretch
  • Neck retraction exercise
  • Child’s pose
  • Shoulder rolls
  • Upper back stretch

Ergonomic Workspace Setup

Setting up an ergonomic workspace can help prevent muscle strain and reduce the risk of rhomboid muscle pain. Here are some tips:

  • Adjust your chair and desk to the right height reaching your lower neck.
  • Use an ergonomic keyboard and mouse.
  • Place your computer screen at eye level.
  • Take frequent breaks and move around every 30 minutes.

Taking Breaks and Avoiding Excessive Strain

Taking regular breaks and avoiding excessive strain can help prevent muscle fatigue and reduce the risk of rhomboid muscle pain. Here are some tips:

  • Take regular breaks to stand up and stretch.
  • Avoid sitting or standing in the same position for long periods of time.
  • Avoid lifting heavy objects without proper form.
  • Use proper body mechanics when performing physical activities to avoid more serious injury.

Incorporating these preventive measures into your daily routine can help reduce the risk of developing rhomboid muscle pain and shoulder blade pain. Remember to listen to your body and seek medical attention if you experience any persistent or severe pain.

Frequently Asked Questions

1. What is the best way to sleep with rhomboid muscle pain?

Finding a comfortable sleeping position can be challenging when experiencing rhomboid muscle pain or upper back pain. Here are some tips to help you sleep more comfortably:

  • Sleep on your back with a pillow under your knees to reduce pressure on your back.
  • Use a pillow to support your head, neck and rib cage.
  • Avoid sleeping on your stomach as this can cause strain on your neck and back muscles.
  • Consider using a supportive mattress and pillows.

2. How long does it take for rhomboid muscle pain to heal?

The healing time for rhomboid muscle pain or shoulder pain can vary depending on the severity of the muscle injury and the underlying cause of the pain. Generally, mild to moderate rhomboid muscle pain can take several days to a few weeks to heal. Severe pain or injuries may take several weeks to several months to heal. Proper rest, stretching, and exercise can help speed up the healing process or give you instant relief.

3. Can rhomboid muscle pain cause headaches?

Yes, rhomboid muscle pain can cause headaches. When the rhomboid muscles become tight and painful, they can cause tension in the neck and shoulders, leading to tension headaches. Headaches caused by rhomboid muscle pain are usually felt in the back of the head and neck. Proper stretching and exercise can help relieve tension in these muscles and reduce the frequency of tension headaches.

4. When should I see a doctor for my rhomboid pain?

If your rhomboid muscle pain is severe, persistent, or accompanied by other symptoms such as numbness, tingling, or weakness, you should seek medical attention for physical therapy. You should also see a doctor if your pain is caused by an injury, such as a fall or car accident. Additionally, if your pain is affecting your daily activities or is not improving with home treatment, it is important to consult with a physical therapist to determine the underlying cause of your pain and receive proper treatment.

Conclusion:

Rhomboid muscle pain can be a frustrating and debilitating condition, but it doesn’t have to control your life. By understanding the causes and symptoms of rhomboid muscle pain, you can take proactive steps to alleviate nerve pain and prevent future episodes.

We’ve covered a range of effective techniques in this article, from exercises and stretches to preventive measures, that can help you manage your pain, loosen tight muscles and live a healthier, more active life.

Don’t wait until your Myofascial pain syndrome becomes unbearable before seeking help. Take action today by implementing these strengthening exercises and preventive measures.

Remember, if your pain persists or worsens, it’s essential to consult with a healthcare professional to determine the underlying cause and receive proper treatment.

By taking care of your rhomboid muscles, you can improve your overall health and well-being, and enjoy a pain-free life.

The Ultimate Guide to Gluteus Minimus Exercise: Strengthen Your Hip Muscles

The gluteus minimus muscle is a small but important muscle located in the leg and hip region that helps us undertake our daily activities such as walking, running, and climbing stairs. Despite its size, the gluteus minimus plays an important role in stabilizing the hip joint and preventing injury.

Weak gluteus minimus muscles can lead to imbalances in the body, which can cause pain and discomfort in the hips, lower back, and knees.

That’s why you’ll need targeted exercises for the gluteus minimus, which can help strengthen this muscle and improve overall hip stability, balance, and mobility.

In this ultimate guide to gluteus minimus exercise, we will explore the anatomy of the gluteus minimus muscle, its importance in daily activities, and the benefits of targeted exercises for this muscle.

We will also provide step-by-step instructions and modifications for various gluteus minimus exercises, as well as tips for incorporating these best gluteus minimus exercises into your workout routine.

Ready to learn? Let’s get started…

Anatomy of the Gluteus Minimus

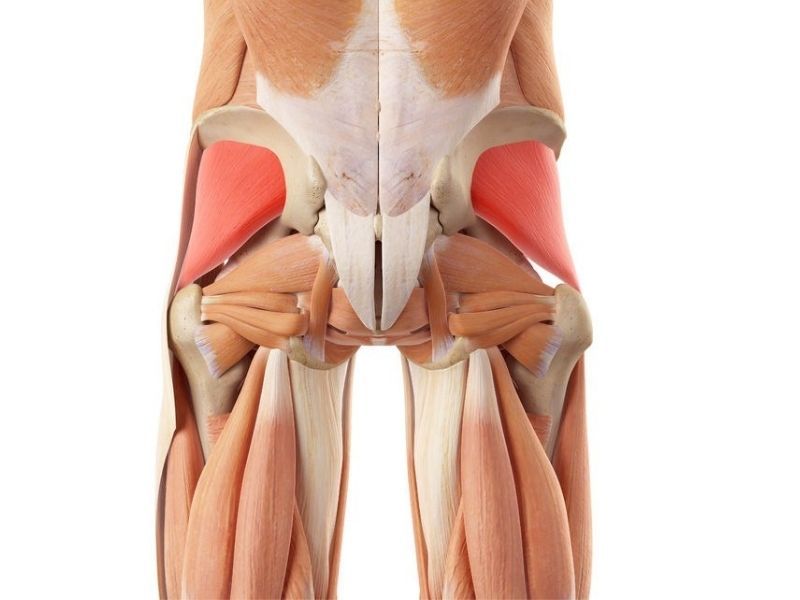
The gluteus minimus is a crucial muscle located in the buttocks region. It originates from the external surface of the ilium, which is the largest bone of the pelvis, and inserts onto the greater trochanter of the femur, which is the large bony protrusion at the top of right foot above the thigh bone. The gluteus minimus muscle is part of the hip abductor muscles, which also includes the gluteus maximus, and gluteus medius.

The primary function of the gluteus minimus along with other hip abductor muscles is to stabilize the hip joint and assist in hip abduction, which is the movement of the leg away from the midline of the body.

In addition, the gluteus minimus works in conjunction with other hip abductor muscles to maintain pelvic alignment during movements such as walking, running, and jumping.

Because of its important role in hip stability and movement, the gluteus minimus muscle is often targeted in exercises designed to strengthen the hips and prevent injuries.

Weakness or imbalances in the gluteus minimus muscle can lead to various hip and lower extremity injuries, such as iliotibial band syndrome, hip impingement, and patellofemoral pain syndrome.

glute-minimus-exercises

Benefits of Gluteus Minimus Exercises

Engaging in exercises that target this muscle can lead to a variety of benefits, including improved hip stability right knee,, reduced risk of injury, enhanced athletic performance, and better posture and alignment. Let’s have an in-depth look at the benefits:

Improved hip stability. 

This muscle is responsible for maintaining the proper alignment standing position of the hip joint, which is essential for all movements involving the lower body. By strengthening the gluteus minimus, individuals can improve their ability to stabilize their hips, reducing the risk of falls and other injuries.

Reduced the risk of injury. 

Weak or tight hip and gluteal muscles can contribute to a variety of injuries, including IT band syndrome, patellofemoral pain syndrome, and hip bursitis. By strengthening the often weak gluteus minimus muscles, individuals can improve their overall hip function.

Enhanced athletic performance.

The gluteus minimus is particularly important for activities that involve side-to-side movements, such as running, jumping, and cutting. By strengthening this muscle, individuals can improve their ability to generate power and control during these movements, leading to enhanced athletic performance.

Improve posture and alignment. 

This muscle is connected to the pelvis and femur, and plays a key role in maintaining proper alignment of the lower body. Including gluteus minimus targeted workouts can help individuals maintain good posture and alignment, which can improve overall upper body and mechanics and reduce the risk of injury.

Top 5 Exercises for Gluteus Minimus

  1. Clamshells

How to perform:

  • Lie on your side with your legs bent at a 90-degree angle and your feet together.
  • Keep your heels touching and lift your top knee up while keeping your feet together keeping your entire upper body intact.
  • Pause at the top of the movement and slowly lower your knee back down to the starting position.
  • Return to the starting position for several repetitions before switching sides to the opposite leg.

Common mistakes and how to avoid them:

  • Avoid rolling your left hip back during the movement, as this can shift the focus from your gluteus minimus to other muscles.
  • Keep your feet in contact with each other throughout the movement and focus on lifting your knee using your gluteus minimus muscles.
  1. Side-lying leg lifts

Also known as side lying hip abduction, is a bodyweight gluteus minimus exercise.

How to perform: 

  • Lie on your side with your legs straight and stacked on top of each other.
  • Keeping your bottom leg on the ground, lift your right leg up as high as you can while maintaining proper form.
  • Engage your core and glutes to lift your top leg as high as you can while keeping your hips stacked and facing forward.
  • Slowly lower your leg back down to the starting position and repeat for several repetitions before switching sides.

Common mistakes and how to avoid them: 

  • Avoid leaning your body forward or backward during the movement, as this can shift the focus away from your gluteus minimus.
  • Keep your hips stacked and maintain proper alignment throughout the side lying hip abduction exercise.

    3. Fire hydrants

Another great exercise is the fire hydrant is a simple bodyweight gluteus minimus exercise that targets the gluteus medius.

How to perform:

  • Start on all fours with your hands directly under your shoulders and your knees under your hips.
  • Keeping your knee bent, lift left leg/foot straight out to the side while keeping your hip and knee at a 90-degree angle.
  • Pause at the top of the movement and then lower your leg back down to the starting position.
  • Repeat for several repetitions before switching sides.

Common mistakes and how to avoid them:

  • Avoid lifting one leg or the top leg too high, which can shift the focus away from your gluteus minimus.
  • Keep your movements slow and controlled, and maintain a neutral spine throughout the exercise.
    1. Single leg glute bridges

How to perform: 

  • Lie on your back with your knees bent and your feet flat on the ground.
  • Lift your right foot up off the ground and extend it straight out in front of you.
  • Keeping your other left foot flat on the ground, push your hips up toward the ceiling until your body forms a straight line from your shoulders to your knees.
  • Pause at the top of the movement and then slowly lower your hips back down to the starting position.
  • Repeat for several repetitions before switching sides.

Common mistakes and how to avoid them:

  • Try incorporating hip thrusts into your routine to focus on your gluteus minimus and avoid pushing your hips up too high, which can detract from the intended target area.”
  • Keep your movements slow and controlled, and focus on using your gluteus minimus to lift your hips.

    5.Lateral band walks

Lateral band walks are a popular exercise that targets the gluteus medius and minimus muscles.

How to perform:

  • Place a resistance band around your ankles and stand with your feet hip-width apart.
  • Take several steps to the side, keeping your knees bent and your feet pointing forward.
  • Take several steps in the other direction to complete one repetition.
  • Repeat for several repetitions.

Common mistakes and how to avoid them:

  • Avoid letting your knees collapse inward or outward during the movement, which can shift the focus away from your gluteus minimus. Always ensure you keep athletic stance.
  • Keep your feet pointing straight ahead and maintain proper alignment throughout the exercise.

Incorporating Glute Minimus Exercises into Your Workout Routine

Incorporating glute exercises into your workout routine is essential for building strong, stable hips, hip extension and improving athletic performance. When it comes to how often to perform these exercises, it is recommended to start with 2-3 times per week, gradually increasing frequency and intensity as your strength improves.

To create a well-rounded workout, you can combine gluteus minimus exercises (hip abduction exercises using hip abduction machine) with other hip and glute exercises. For example, you can alternate between sets of clamshells, single leg exercises, a side plank with hip-lying single leg squat, lifts, fire hydrants, single leg glute bridges, and lateral band walks with exercises like dumbbell bulgarians split squat, standing cable hip abduction, lunges, single leg hip thrust and deadlifts.

It is important to allow for proper rest and recovery between workouts to prevent injury and maximize results. Additionally, incorporating stretching and foam rolling into your routine can help release any tension in the muscles, as well as address glute minimus trigger points, and improve flexibility.

Progression and Variations of Gluteus Minimus Exercises

Once you’ve mastered the basics of gluteus minimus exercises, it’s important to continue challenging your glute muscles to promote growth and prevent plateauing.

Here are some tips on how to progress and add variety to your gluteus minimus exercises:

  1. Increase resistance: One way to progress is to add resistance to your exercises. You can do this by using resistance bands, dumbbells, ankle weights, or even a barbell. For example, you can hold a resistance band around your thighs while doing clamshells or lateral band walks.
  2. Increase range of motion: Another way to progress is to increase the range of motion of your exercises. For instance, you can increase the height of your leg lifts or the depth of your squats.
  3. Incorporate balance challenges: Adding a balance component to your gluteus minimus exercises can help improve stability and increase difficulty. You can try standing on one leg while doing leg lifts, single leg squat or holding a single leg glute bridge for an extended period.
  4. Try new exercises: There are several variations of gluteus minimus exercises that can challenge your muscles in new ways. Some examples include seated leg lifts, clamshell pulses, curtsy lunges, and lateral lunge walks.

Frequently Asked Questions (FAQ)

  1. Can gluteus minimus exercises help with hip pain?

Yes, gluteus minimus exercises may help with chronic hip pain too. The gluteus minimus is one of the main stabilizing muscles of the hip joint, and strengthening it can help improve hip stability and alleviate pain caused by hip instability. In addition, gluteus minimus exercises can also help to address muscular imbalances and weaknesses that may contribute to hip pain.

  1. What is the difference between gluteus minimus and gluteus medius exercises?

The gluteus minimus and gluteus medius are two separate muscles, but they work together to stabilize the hip joint. Gluteus minimus exercises typically focus on strengthening the side of the hip, while gluteus medius exercises may target the muscle on the upper part of the glute muscles in the hip. Both muscle groups are important for hip stability and should be included in a well-rounded exercise program.

  1. How long does it take to see results from gluteus minimus exercises?

The time it takes to see results from gluteus minimus exercises can vary depending on various factors such as your fitness level, consistency in performing the exercises, and intensity of the workout. Generally, it can take anywhere from 4-8 weeks to see noticeable improvements in hip stability, strength, and endurance. It is important to be patient and consistent with your workout routine to see the best results.

  1. Are there any precautions or contraindications for these exercises?

As with any exercise program, it is important to consult with a healthcare provider before starting gluteus minimus exercises, especially if you have any pre-existing medical conditions or injuries. Additionally, if you experience any pain or discomfort during the exercises, it is important to stop and consult with a healthcare provider. It is also important to use proper form and technique during the exercises to avoid injury.

Conclusion

In conclusion, the gluteus minimus is a small but important muscle that plays a crucial role in hip stability and movement.

By incorporating targeted exercises into your fitness routine, you can improve hip stability, reduce the risk of injury, enhance athletic performance, and improve posture and alignment.

Remember to start with the basic exercises and gradually increase the difficulty as you get stronger, and always listen to your body and avoid any exercises that cause pain or discomfort.

By regularly performing gluteus minimus exercises, you can achieve better hip health and function, allowing you to move with ease and confidence in your daily life.

So, what are you waiting for? Start incorporating these exercises into your routine and experience the benefits for yourself!

Unlocking the Secrets of Quadratus Lumborum Stretches: A Comprehensive Guide to a Pain-Free Back

The Quadratus Lumborum (QL) muscle is a small yet crucial muscle located in the lower back.

This muscle plays a crucial role in maintaining back health by stabilizing the spine and pelvis during movement, as well as assisting with breathing.

However, it’s often overlooked, leading to issues such as lower back and hip pain, and discomfort.

Back pain may limit social activities. The proportion of adults with back pain reporting any limitations related to social, recreational, or family activities is more than three times the proportion of adults without any such serious low back pain.

At the end of the day, the buck stops at us. While people are bound to have back and neck pain if they don’t do certain things right, we also need to actively search for proactive and active solutions.

That’s where the importance of Quadratus Lumborum stretches comes in. By targeting this muscle, you can alleviate lower back pain, improve your posture, and increase your overall mobility.

This article serves as an example of research-backed solutions to pain-free back. By the end of the article, you’d have positioned yourself in a perfect fitness routine that will save your health. So what are you waiting for?

Let’s get started…

quadratus lumborum stretches

The Quadratus Lumborum: Anatomy and Function 

Understanding the anatomy and function of the QL muscle is key to maintaining back health and preventing lower back pain.

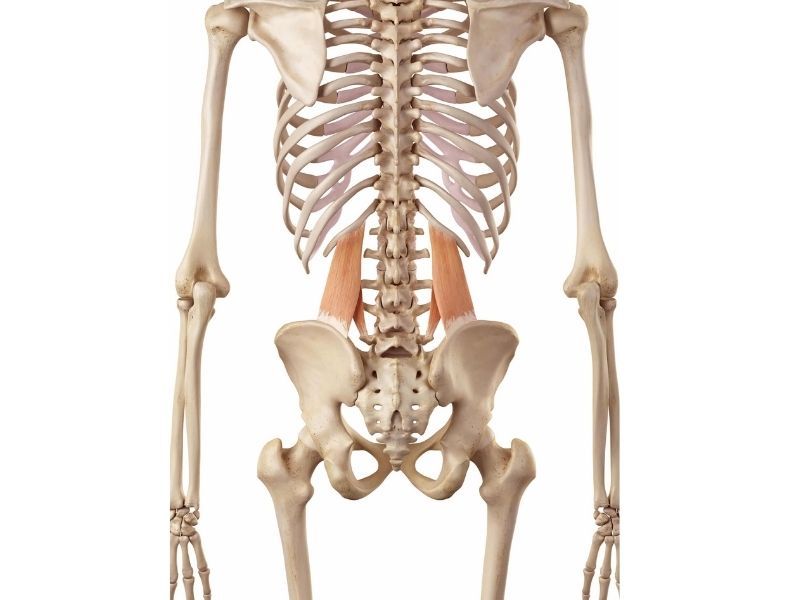
The Quadratus Lumborum (QL) muscle is a deep, thick muscle located on either side of the lumbar spine in the lower back region. It runs from the iliac crest, which is the top of tail bone underneath the hip bone, to the bottom rib and the lumbar vertebrae.

The QL muscle has a quadrangular shape with fibers that run both vertically and horizontally, which gives it a unique structure. It’s one of the largest muscles in the lower back, and its size and position make it a key muscle in maintaining back health.

One of its primary functions is lateral flexion of the spine, which means it allows you to bend forward and sideways. This movement is important for everyday activities such as twisting, bending, and reaching.

The QL muscle also plays a crucial role in stabilizing the spine and pelvis during movement. It helps to maintain proper posture and alignment, preventing excessive movement or strain on the spine.

Additionally, the QL muscle is involved in hip elevation, which means it helps lift the hip on the same side as the muscle. This movement is essential for activities such as walking, running, and jumping.

Common QL Problems and the Benefits of Stretching

The Quadratus Lumborum (QL) muscle can be susceptible to a range of issues that can cause discomfort and pain in the lower back area.

One common problem is muscle imbalances, which can occur when one side of the muscle is stronger or tighter than the other. This can lead to an uneven distribution of weight and pressure on switch sides of the spine, which can result in lower back pain.

Another common issue related to the QL muscle is trigger points, which are tight “knots” that form within the muscle fibers. These trigger points can cause “referred” pain, meaning that the pain can be felt in other areas of the body, such as the hips or thighs.

Fortunately, quadratus lumborum stretches can help to alleviate these issues and provide several benefits for overall back health.

Stretching the QL muscle helps to increase its flexibility, which can reduce muscle imbalances and prevent trigger points from forming.

Stretching the QL muscle can also help to improve posture and reduce the risk of lower back pain. Since the QL muscle is responsible for stabilizing the spine and pelvis, maintaining its flexibility and strength can improve your overall alignment.

Additionally, it can reduce pressure on the spine and alleviate pain.

Quadratus lumborum stretches can also help to improve your range of motion and increase your overall mobility.

This can be particularly beneficial for athletes or individuals who engage in physical activity regularly, as it can improve their performance and prevent injuries.

Top 5 Quadratus Lumborum Stretches for Optimal Relief 

In the previous section, we explored the common problems related to the QL muscle and the importance of stretching to alleviate lower back pain and muscle imbalances.

Now, we will guide you through five effective Quadratus Lumborum stretches that can be easily done from anywhere with no special equipment needed.

These stretches are designed to provide targeted relief to the QL muscle, helping you to improve your range of motion and alleviate pain.

Let’s get started and unlock the secrets of these effective stretches!

a. Modified Side Plank Stretch

Step 1: Start by lying on your side with your elbow directly under your shoulder blades and your forearm flat on the ground. Your legs should be straight, with one leg stacked on top of the other.

Step 2: Lift your hips off the ground, so your body forms a straight line from head to toe.

Step 3: Reach your top arm towards the ceiling and hold the position for 15-30 seconds.

Step 4: Lower your hips back down to the ground and repeat on the other side.

b. Kneeling QL Stretch with Lateral Reach

Step 1: Kneel on your left knee with your right foot planted on the ground in front of you.

Step 2: Place your left hand on your left hip and raise your right arm straight up.

Step 3: Reach your right arm over your head to the left side, feeling a stretch in your right QL muscle.

Step 4: Hold for 15-30 seconds and repeat on the other side.

c. Seated QL Stretch with Rotation

Step 1: Sit on the ground with your legs extended straight out in front of you.

Step 2: Cross your right leg over your left, placing your right foot flat on its side bending the ground.

Step 3: Place your left hand on your right knee and your right hand on the ground behind you.

Step 4: Twist your torso to the right, feeling a stretch in your left QL muscle.

Step 5: Hold for 15-30 seconds and repeat on the other side.

d. Supine QL Stretch with Leg Cross

Step 1: Lie flat on your back with your arms extended straight out to the sides.

Step 2: Bend your knees and plant your feet flat on the ground.

Step 3: Cross your right ankle over your left knee.

Step 4: Use your hands to pull your left knee towards your chest, feeling a stretch in your right QL muscle.

Step 5: Hold for 15-30 seconds and repeat on the other side.

e. Prone QL Stretch with Arm Extension

Step 1: Lie on your stomach with your arms extended straight out in front of you.

Step 2: Place your left hand flat on the ground and bend your right elbow, bringing your right hand up to your side bend your shoulder.

Step 3: Roll onto your right side, using your left hand to support your upper body.

Step 4: Reach your right arm straight up towards the ceiling, feeling a stretch in your left QL muscle.

Step 5: Hold for 15-30 seconds and repeat on the other side.

Incorporating advanced techniques like PNF stretching or using yoga blocks can provide several benefits for your QL stretching routine.

  • Increased flexibility: PNF stretching and using yoga blocks can help increase your range of motion and flexibility, allowing you to go deeper into your stretches and achieve better results.
  • Enhanced muscle activation: PNF stretching involves alternating between contracting and relaxing your muscles, which can improve muscle activation and engagement during stretching.
  • Reduced risk of injury: Using yoga blocks can help support your body during stretches and prevent you from overstretching or straining your muscles. PNF stretching can also help reduce the risk of injury by gradually and safely increasing your range of motion.

To safely implement these techniques, it is important to start slowly and gradually increase the intensity and duration of your stretches.

When using yoga blocks, make sure to choose the appropriate height and position them in a stable and secure manner. With PNF stretching, it is important to follow proper techniques and avoid overstretching or pushing your body too far.

It is also recommended that you consult with a healthcare professional or a certified fitness trainer before incorporating advanced stretching techniques into your routine. This will ensure that they are appropriate for your individual needs and fitness level.

Complementary Exercises for a Strong and Balanced Core

A strong and balanced core is essential for overall health and wellness. While the Quadratus Lumborum (QL) muscle plays a crucial role in maintaining back health, it is just one piece of the puzzle when it comes to core strength.

To achieve a well-rounded workout, it’s important to incorporate exercises that target other core muscles, such as the rectus abdominis, transverse abdominis, and obliques.

In this section, we will introduce you to complementary exercises that will help you build a strong and balanced core. These exercises are designed to work on different areas of your core muscles, providing a complete core workout.

Side Plank Variations: Start in a traditional side plank position, then lift your top leg and hold for 10–20 seconds. Repeat on the other side. This exercise targets the obliques and helps improve stability and balance.

Bird Dogs: Begin on all fours, with your hands directly under your shoulders and knees under your hips. Slowly lift your right arm and your left arm and leg, then lower them back down and repeat with the opposite arm and leg. This exercise targets the transverse abdominis and helps improve coordination and spinal stability.

Dead Bugs: Lie on your back with your arms and legs extended toward the ceiling. Slowly lower your right arm and left leg towards the ground, then return to the starting position and repeat with the opposite arm and leg. This exercise targets the rectus abdominis and helps improve core strength and stability.

Tips for Maintaining QL Health and Preventing Future Pain

Maintaining good QL health is crucial to preventing future pain and ensuring long-term back health. Here are some practical tips to keep your QL muscles healthy:

  1. Practice good posture: Maintaining proper posture throughout the day can help prevent unnecessary strain on the QL muscles. Keep your shoulders back, chest up, and spine straight while standing or sitting.
  2. Use ergonomics: Whether you’re sitting at a desk or driving a car, it’s important to ensure that your posture and work environment are ergonomically sound. Adjust your seat, desk, and computer monitor to maintain proper posture and avoid unnecessary strain on your back muscles.
  3. Stay active: Regular exercise can help keep your QL muscles healthy and strong. Incorporate exercises that target the core muscles, including the QL, into your workout routine.
  4. Stretch regularly: Regular stretching can help prevent QL muscle tightness and promote flexibility. Incorporate the QL stretches discussed earlier into your stretching routine.
  5. Practice stress management: Stress can cause tension in the QL muscles, leading to pain and discomfort. Engage in stress-reducing activities such as meditation, yoga, or deep breathing exercises.

Conclusion

In conclusion, the quadratus lumborum muscle is a crucial muscle for maintaining back health and preventing lower back pain. Incorporating regular stretching and complementary exercises can help keep the QL and other core muscles strong and balanced.

By following the tips and techniques discussed in this article as well as following up with quadratus lumborum release techniques, you can prevent future QL issues and ensure long-term back health. It’s important to make these stretches and exercises a part of your daily routine and listen to your body to avoid overexertion.

So why not take the first step towards a health back and start incorporating these QL stretches and exercises into your daily routine?

With consistency and dedication, you can maintain a healthy and pain-free back for years to come.

Unlock Your Hips: 10 Essential Exercises for Strengthening Hips and Alleviating Pain

Strong hips are crucial for maintaining good posture, balance, and mobility. Strong hips provide stability for your lower body and play a vital role in athletic performance.

When you neglect your hip muscles, it can lead to various issues, such as lower back pain, poor posture, and limited mobility.

According to statistics released by the National Center for Health Statistics, nearly 2 out of 5 U.S. adults suffer from back pain, which may be contributed to by weak hips.

That’s why it’s important to incorporate hip-strengthening exercises into your fitness routine to improve your physical health.

In this guide, we will introduce you to 10 exercises that target your hips and help you build strength, flexibility, and mobility. These exercises are designed to work on different areas of your hip muscles, providing a complete hip workout.

So whether you are an athlete, fitness enthusiast, or just looking to improve your overall health, these exercises are perfect for you. Let’s dive in and unlock your hips!


The Role of Hips in Overall Body Strength and Stability

The hips are one of the largest and most crucial joints in the body, serving as a bridge between the upper and lower body. They connect the pelvis to the femur bone of the thigh and are responsible for various functions such as supporting the weight of the body, providing stability and balance, and facilitating movement in all directions.

Strong hips are essential for maintaining good posture and alignment, reducing stress on the lower back, and preventing injuries in the legs and knees. When the hips are weak or tight, the entire body is affected, leading to compensations and imbalances in other muscles and joints. This can result in issues such as lower back pain, knee pain, hip impingement, and reduced mobility.

On the other hand, when the hips are strong and flexible, they provide a solid foundation for the body, allowing for smoother and more efficient movement. Strong hips can also improve athletic performance, enabling better running, jumping, and agility.

Common Causes of Hip Weakness and Pain

Having looked at the importance of the hips in your overall well being, let’s have a look at what causes hip weakness and pain. Some of the common causes include:

Sedentary lifestyle: One of the most common causes of hip weakness and pain is a sedentary lifestyle. If you sit for extended periods without moving, your hip muscles can become weak and tight, leading to discomfort and mobility issues.

Improper exercise techniques: Another factor that can contribute to hip weakness and pain is improper exercise techniques. When you incorrectly perform exercises, compensation is common, which leads to reduced emphasis on the muscles that need to get stronger.

It’s important to learn proper exercise techniques and gradually increase your intensity to prevent compensation, hip pain, and injuries.

Age-related factors: Lastly, age-related factors can also affect the health and strength of your hips. As we age, our hip muscles can naturally weaken and become stiffer, making us potentially more susceptible to hip pain and injuries.

The Importance of Hip Flexibility and Mobility

Your hips are crucial factors in maintaining a healthy and active lifestyle. Let’s dive into how hip strength, flexibility, and mobility are interconnected.

Firstly, hip strength and flexibility go hand in hand. Strong hip muscles are essential for proper movement and stability, while flexible hips allow for a broader range of motion.

When the hip muscles are both strong and flexible, the body can move with ease and prevent injuries from occurring.

Secondly, mobility is crucial to the overall health and performance of the hips. When the hip joint is mobile, it allows for smoother movements and improves transfer of forces. This is especially important for athletes or people who engage in physical activities that require quick and explosive movements.

Thirdly, the relationship between flexibility, mobility, and hip strength is a two-way street. Poor hip flexibility and mobility can lead to weak hip muscles in specific ranges of motion, and weak hip muscles can cause decreased flexibility and mobility. Therefore, it’s essential to focus on both aspects to keep the hips strong, mobile, and flexible.

Discuss 10 Exercises for Strengthening Hips and Alleviating Pain

In our previous section, we discussed the importance of hip strength and flexibility and how they can affect the entire body. We also talked about common causes of hip weakness and pain.

Now, we will dive into 10 essential exercises for strengthening hips and alleviating pain. These exercises are designed to target the hips and can be done in the comfort of your own home with little to no equipment. Let’s get started!

  1. Seated Leg Circles

This exercise focuses on strengthening the hip flexors and glutes.

Step-by-step instructions: 

  • Sit on a mat or a comfortable surface with your legs extended in front of you.
  • Place your hands on the ground behind you for support.
  • Lift your right leg off the ground and extend it straight out in front of you.
  • Make small circles with your right leg, moving your leg in a clockwise direction.
  • After 10 circles, switch directions and move your leg counter clockwise.
  • Repeat with your left leg.

This exercise increases flexibility and strengthens the hip flexors and glutes.

  1. Side-Lying Leg Raises

This exercise targets the hip abductors and glute medius.

Step-by-step instructions: 

  • Lie on your side with your legs stacked on top of each other.
  • Prop yourself up on your elbow and place your hand on your hip for support.
  • Lift your top leg up towards the ceiling, keeping your toes flexed.
  • Lower your leg back down to the starting position.
  • Repeat for 10-12 repetitions and then switch sides.

This exercise will help you strengthen the hip abductors and glutes and improve balance and stability.

  1. Fire Hydrants

This exercise targets the glutes and hip abductors.

Step-by-step instructions

  • Begin on your hands and knees, with your wrists under your shoulders and your knees under your hips.
  • Keeping your knee bent, lift one leg out to the side, then lower it back down.
  • Repeat for 10-12 repetitions and then switch sides.

Fire hydrants help strengthen the glutes and hip abductors, improving hip mobility.

  1. Standing Hip Abduction

This exercise targets the hip abductors.

Step-by-step instructions

  • Stand with your feet hip-width apart.
  • Place a resistance band around your ankles for added resistance.
  • Lift one leg out to the side, keeping your knee straight.
  • Hold for a few seconds, then lower it back down.
  • Repeat for 10-12 repetitions and then switch sides.

This exercise helps strengthen the hip abductors and improve hip stability and balance.

  1. Hip Flexor Stretch

This stretch targets the hip flexors.

Step-by-step instructions

  • Kneel on the ground with one foot forward and the other knee on the ground.
  • Place your hands on your hips for support.
  • Lean forward into your front knee, feeling a stretch in the hip of the back leg.
  • Gently press your hips forward until you feel a stretch in your right hip flexor.
  • Hold for 30 seconds and repeat on the other side.

This exercise stretches the hip flexors and improves hip mobility and posture.  Combine this with targeted techniques like psoas release.

  1. Single-Leg Deadlifts

This exercise targets the glutes and hamstrings.

Step-by-step instructions: 

  • Stand with your feet hip-width apart and place all your weight on your left foot. Slightly bend your left knee and lift your right leg behind you.
  • Hinge at your hips and lower your torso towards the ground, keeping your back straight and arms extended down.
  • As you lower, raise your right leg behind you until it is parallel to the ground.
  • Pause and hold for a moment, then return to your starting position.
  • Complete the desired number of repetitions on one side, then switch to the other leg.

The main target of this exercise is to strengthen the glutes and hamstrings and improve hip stability.

  1. Reverse Clamshells

This exercise targets the glutes and hip abductors.

Step-by-step instructions

  • Lie on your side with your legs bent at a 90-degree angle and your feet together.
  • Lift the top knee while keeping your feet together, then lower it back down.
  • Hold the position momentarily, then slowly lower your leg back to its starting position.
  • Complete the desired number of repetitions on one side, then switch to the other leg.

This exercise strengthens the glutes and hip abductors and improves hip stability and mobility.

  1. Bulgarian Split Squats

This exercise targets the quads and glutes.

https://www.youtube.com/watch?v=BfUtXxI8cLM

Step-by-step instructions

  • Stand with your back to a bench or chair, and place your left foot on top of it.
  • Stand in a lunge position with one foot elevated on a bench or step behind you.
  • Keeping your weight on your right foot, lower your left knee towards the ground until it is almost touching the floor.
  • Pause and hold for a moment, then raise your left leg back to its starting position.
  • Complete the desired number of repetitions on one side, then switch to the other leg.

This exercise strengthens the quads and glutes and improves hip stability and balance.

  1. Pigeon Pose

The pigeon pose is a yoga pose that helps to stretch the hip flexors, glutes, and lower back.

Step-by-step instructions

  • Begin in a tabletop position on your hands and knees.
  • Slide your right knee forward and place it behind your right wrist.
  • Straighten your left leg behind you.
  • Make sure your right foot is flexed and your left leg is extended straight behind you.
  • Slowly lower your body down to the ground, placing your forearms on the ground in front of you.
  • Hold the stretch for 30 seconds and then switch sides.

Benefits:

  • Stretches the hip flexors and glutes
  • Relieves tension in the lower back
  • Improves overall hip mobility
  1. Frog Stretch

The frog stretch is an excellent exercise for stretching the inner thighs and hips.

Step-by-step instructions

  • Begin on your hands and knees with your hands directly under your shoulders and your knees under your hips.
  • Slowly move your knees apart as wide as you can comfortably go.
  • Turn your feet outward so that the inside of your ankles are touching the ground.
  • Shift your hips back towards your heels, keeping your arms extended out in front of you.
  • Hold the stretch for 30 seconds.

Benefits:

  • Stretches the adductors and hips
  • Improves hip mobility
  • Reduces tension in the lower back and hips

Additional Tips for Maintaining Hip Health

Maintaining hip health involves more than just doing exercises. Here are some additional tips that can help:

  1. Balanced Diet

Eating a balanced diet can help reduce inflammation in the body, which can be a contributing factor to hip pain. Incorporating foods that are rich in omega-3 fatty acids, such as salmon and flaxseeds, can help reduce inflammation.

  1. Regular Physical Activity

Regular physical activity can help maintain hip strength and mobility. This doesn’t have to be limited to hip-focused exercises. Any type of physical activity, such as walking or cycling, can help keep your hips healthy.  Massage therapy can also be extremely helpful for hip health.

  1. Hip-Friendly Activities

Certain activities can be more beneficial for hip health than others. Activities such as yoga and swimming can help improve hip mobility and flexibility without putting too much stress on the joints.

Maintaining a healthy weight, avoiding smoking, and reducing stress levels can also contribute to overall hip health.

By incorporating these additional tips into your lifestyle, along with the hip-strengthening exercises discussed earlier, you can improve your hip health and reduce the risk of hip pain and injury.

Wrapping Up

In conclusion, hip strength and flexibility are essential for maintaining overall health and mobility. Strong and flexible hips can help reduce the risk of injury, alleviate pain, and improve performance in daily activities.

The 10 exercises we discussed earlier are an excellent starting point for anyone looking to strengthen their hips and alleviate pain. By incorporating these exercises into your routine, you can improve your hip strength and flexibility, which can have a significant impact on your overall quality of life.

So, what are you waiting for? Take the first step towards better hip health and start incorporating these exercises into your daily routine. Your hips will thank you for it! Remember to start slowly, listen to your body, and gradually increase the intensity and frequency of the exercises over time.

With a little dedication and consistency, you can achieve strong and flexible hips and enjoy the countless benefits that come with them. Here’s to healthy hips and a healthy you!

Levator Scapulae Stretches: Unlock the Secret to Pain-Free Shoulders and Neck

Hey there, folks! Do you often suffer from nagging neck and shoulder pain? You’re not alone. Many people experience discomfort in these areas, and one of the main culprits is the levator scapulae muscle. In this blog post, we’ll delve into the world of levator scapulae stretches and explore the various ways to loosen this stubborn muscle. So, buckle up, and let’s get started!

We all know that stretching is essential for maintaining flexibility and preventing injury, but did you know that some stretches are more effective than others for certain muscles? That’s right! When it comes to the levator scapulae, there are specific stretches designed to target this muscle but also to address the surrounding muscles, providing the best possible relief from pain and discomfort.

How To Loosen the Levator Scapulae

There are several effective levator scapulae stretches that can help alleviate tightness and pain in this muscle. Here are a few of our favorites:

Modified Levator Scapula Stretch

With your hand placed behind your back, gently tilt your head forward and to the side, feeling the stretch in your neck and shoulder.

Seated Levator Scapula Stretch

While seated, hold onto the bottom of your chair with one hand and gently tilt your head to the opposite side. This helps isolate the levator scapulae muscle.

Supine Levator Scapula Stretch

Lie down on your back with your knees bent. Place your hands behind your head and gently pull your head forward, feeling the stretch along your neck and upper back.

Causes Of Tight Levator Scapulae Muscles

There are several factors that can lead to tight levator scapulae muscles:

Poor posture while working can contribute to tight levator scapulae stretches-min

  1. Poor Posture: Slouching or hunching over a computer for extended periods can strain the muscles in your neck and shoulders, including the levator scapulae.
  2. Stress: When we’re stressed, our body tends to tense up, and the levator scapulae muscle is no exception.
  3. Sedentary Lifestyle: Lack of movement and exercise can lead to muscle tightness, particularly in the levator scapulae. Sitting for long periods without stretching or moving can contribute to this issue.
  4. Overuse: Repetitive movements or heavy lifting can overwork the levator scapulae, causing it to become tight and painful.
  5. Injury: Trauma to the neck or shoulder region can result in tightness and discomfort in the levator scapulae muscle.

Effects Of A Tight Levator Scapulae

When the levator scapulae muscle is tight, it can lead to several issues, including:

  1. Pain: Pain in the neck, shoulders, and upper back can be attributed to tight levator scapulae muscles.
  2. Headaches: Tension in the levator scapulae muscle can cause tension headaches, particularly at the base of the skull.
  3. Limited Range of Motion: A tight levator scapulae can restrict your ability to move your neck and shoulders, impacting your daily activities.
  4. Muscle Imbalances: Tight levator scapulae muscles can create imbalances in surrounding muscles, leading to further discomfort and potential injuries.

FAQs:

Q: How often should I perform levator scapulae stretches?

A: Aim to stretch the levator scapulae muscle at least once a day, particularly if you have a sedentary lifestyle or experience frequent neck and shoulder pain.

Q: Can I perform levator scapulae stretches at my desk?

A: Absolutely! Many levator scapulae stretches, such as the seated stretch, can be done at your workstation throughout the day.

Q: How long should I hold each stretch?

A: Hold each stretch for 15-30 seconds, and repeat 2-3 times on each side. Be sure to breathe deeply and maintain a gentle, consistent stretch.

Conclusion

Incorporating levator scapulae stretches into your daily routine can make a world of difference when it comes to neck and shoulder pain. By targeting this often-overlooked muscle, you can alleviate discomfort, improve your range of motion, and prevent future issues.

Ready to take the next step in your journey to pain-free shoulders and neck? Consider booking a massage therapy session and incorporating corrective exercises into your routine. Head over to our Levator Scapulae Release page to learn more about our services and how we can help you feel your best. Don’t let tight muscles hold you back – start stretching and say goodbye to pain!

Levator Scapulae Pain: Unraveling the Mystery and Finding Relief

Ah, the levator scapulae. It’s a muscle you might not have even heard of, but boy does it make itself known when it’s unhappy. If you’ve been experiencing pain in this area, you know just how much of a nuisance it can be, affecting everything from carrying a purse to using a mouse at the computer. So let’s delve into the nitty-gritty of pain in levator scapulae, figure out what’s causing it, and more importantly, how to relieve it.

Pain-In-Levator-Scapulae-Neck

Levator Scap on the Move

The levator scapulae muscle is responsible for elevating and rotating the scapula (shoulder blade), as well as stabilizing the neck and shoulders during movement. It’s a crucial player when it comes to carrying heavy bags, wearing a backpack, or even just holding your phone to your ear. With so many potential triggers, it’s no wonder that pain in this muscle can become a real thorn in your side (or, more accurately, your neck and shoulder).

How Do You Relieve Levator Scapulae Pain?

There are several strategies for relieving pain in the levator scapulae:

  1. Stretching: Gentle stretches, like the upper trapezius stretch, can help alleviate tension in the muscle. Check out our guide to upper trap stretches for more ideas.
  2. Heat and Cold Therapy: Applying heat or ice to the affected area can reduce inflammation and promote relaxation.
  3. Massage: A targeted massage can help release tightness and alleviate pain. Follow our step-by-step guide for a levator scapulae release.
  4. Posture Correction: Adjusting your posture, particularly when sitting or standing for long periods, can help prevent further strain on the muscle.

https://vimeo.com/659478477

What Causes Pain in the Levator Scapulae?

There are several factors that can contribute to pain in the levator scapulae:

  • Poor posture: Slouching or hunching over can place strain on the muscle and lead to pain.
  • Muscle imbalances: Weakness or tightness in other muscles can cause the levator scapulae to work harder, resulting in discomfort.
  • Overuse: Repetitive movements, like carrying heavy bags or using a computer mouse, can strain the muscle and cause pain.
  • Stress: Tension and stress can cause muscles, including the levator scapulae, to tighten and become painful.

What Does a Strained Levator Scapulae Feel Like?

A strained levator scapulae can cause a variety of symptoms, such as pain at the base of the neck, aching or stiffness in the shoulder area, and difficulty turning the head. It can also lead to headaches and a reduced range of motion in the neck and shoulders.

How Do You Release Trigger Points in Levator Scapulae?

Releasing trigger points in the levator scapulae can be done through a combination of self-massage, stretching, and professional treatment. Here are some steps to follow:

  1. Locate the trigger point: Feel for tender spots along the muscle, from the base of the neck to the shoulder blade.
  2. Apply pressure: Use your fingers, a massage ball, or a foam roller to apply gentle pressure to the trigger point.
  3. Stretch: Perform levator scapula stretches to help release the muscle and improve flexibility.
  4. Seek professional help: A qualified massage therapist or physiotherapist can provide targeted treatment to help release trigger points and alleviate pain.

Levator-Scapulae-Trigger-Points

FAQs

Q: Can poor posture cause levator scapulae pain?

A: Absolutely! Poor posture, particularly when sitting or standing for long periods, can place strain on the levator scapulae and contribute to pain.

Q: What are some common activities that can trigger levator scapulae pain?

A: Activities such as carrying a heavy purse, using a computer mouse, or even holding a phone to your ear can strain the levator scapulae and cause discomfort.

Q: Can stress contribute to levator scapulae pain?

A: Yes, stress can cause tension in the muscles, including the levator scapulae, which can lead to pain and discomfort.

Q: How can I prevent levator scapulae pain in the future?

A: To prevent pain in the levator scapulae, focus on maintaining good posture, regularly stretching and strengthening the muscle, and managing stress.

Conclusion

Don’t let pain in levator scapulae rain on your parade any longer! By understanding the unique causes and taking the necessary steps to relieve discomfort, you can get back to living your life pain-free. Whether it’s releasing trigger points, improving your posture, or seeking professional help like massage therapy and corrective exercise, there are plenty of ways to tackle that pesky levator scap pain.

Ready to take the plunge and find relief? Don’t hesitate to reach out to a qualified professional who can help you unravel the mystery of levator scapulae pain and guide you on the path to recovery.

Best Hamstring Exercises for Tendinopathy

Hamstring tendinopathy is a common issue among athletes and active individuals, particularly those involved in sports that require explosive movements or repetitive running and jumping. In this article, we will explore effective hamstring exercises for tendinopathy, focusing on strengthening the muscles to promote healing and prevent future injuries.  If you’re not sure if you’re ready, check out the 5 tips for returning to exercise after tendinopathy.

Best-Hamstring Exercises for Tendinopathy

Exercise 1: Nordic Hamstring Curls

Nordic hamstring curls are a popular and effective exercise for hamstring tendinopathy. They help to strengthen the muscles and tendons while also increasing flexibility and range of motion.  Warning! These are not for beginners.  Make sure you’re ready for these before attempting.  Additionally make sure you have adequate abdominal strength, which you can refer to this post about lower ab exercises.

How to perform Nordic hamstring curls:

1. Kneel on a soft surface with your knees hip-width apart.
2. Have a partner hold your ankles firmly, or anchor your feet under a heavy object.
3. Slowly lower your body towards the ground, keeping your core engaged and hips extended.
4. Use your hamstrings to control your descent as much as possible.
5. Push yourself back up to the starting position, using your arms for assistance if needed.

Sets and Repetitions: 3 sets of 4-6 repetitions, with a 2-minute rest between sets. As you become stronger, you can gradually increase the number of repetitions.
https://www.youtube.com/watch?v=k3R6LCLxAJs

Exercise 2: Swiss Ball Hamstring Curls

Swiss ball hamstring curls target the hamstring muscles and help to improve balance and stability.

How to perform Swiss ball hamstring curls:

  1. Lie on your back with your legs extended and heels resting on top of a Swiss ball.
  2. Place your arms flat on the ground by your sides for support.
  3. Engage your core and lift your hips off the ground, forming a straight line from your shoulders to your heels.
  4. Bend your knees and roll the ball towards your body using your hamstrings, while keeping your hips elevated.
  5. Slowly extend your legs and return the ball to the starting position.

Sets and Repetitions: 3 sets of 10-12 repetitions, with a 90-second rest between sets.

Exercise 3: Romanian Deadlifts

Romanian deadlifts are an excellent exercise for strengthening the hamstrings and glutes, which can help alleviate hamstring tendinopathy symptoms.  It is also a way to functionally stretch your hamstrings while strengthening.  For more on this learn why you should stop stretching your hamstrings in isolation.

How to perform Romanian deadlifts:

  1. Stand with your feet hip-width apart, holding a barbell or dumbbells in front of your thighs with a pronated grip (palms facing your thighs).
  2. Keep your chest lifted and shoulders pulled back, maintaining a neutral spine.
  3. Hinge at the hips and lower the weight towards the ground, keeping your legs slightly bent and the weight close to your body.
  4. Push your hips back as you lower the weight, feeling a stretch in your hamstrings.
  5. When you reach a comfortable stretch, engage your glutes and hamstrings to return to the standing position, extending your hips fully at the top.

Sets and Repetitions: 3 sets of 8-10 repetitions, with a 2-minute rest between sets.


Exercise 4: Single-Leg Hip Thrusts

Single-leg hip thrusts are a great exercise for isolating the hamstrings and glutes, which can contribute to hamstring tendinopathy recovery and prevention.

How to perform single-leg hip thrusts:

  1. Sit on the ground with your upper back against a bench, step, or sturdy surface.
  2. Plant one foot firmly on the ground with your knee bent, and extend the other leg straight out in front of you.
  3. Hold onto the bench or step for support, and engage your core.
  4. Press through the heel of your planted foot and lift your hips towards the ceiling, keeping your extended leg in line with your torso.
  5. Lower your hips back to the ground, maintaining control throughout the movement.

Sets and Repetitions: 3 sets of 8-10 repetitions per leg, with a 90-second rest between sets.

Progressing Exercises and Monitoring Symptoms

As you progress through your hamstring tendinopathy rehabilitation, it’s essential to monitor your symptoms and adjust your exercise routine accordingly. Here are some tips for progressing your exercises and tracking your recovery:

  1. Gradual progression: Increase the intensity, sets, or repetitions of the exercises slowly, allowing your body to adapt and recover. Avoid making large jumps in exercise difficulty or volume, as this may exacerbate your symptoms.
  2. Listen to your body: Pay attention to any discomfort or pain during and after exercise. Some mild discomfort during exercise may be acceptable, but if pain persists or worsens, consider reducing the intensity or modifying the exercise.
  3. Rest and recovery: Ensure you are giving your body enough time to recover between exercise sessions. Proper rest is crucial for tissue healing and can help prevent setbacks in your rehabilitation.
  4. Warm-up and cool-down: Always include a thorough warm-up before exercising, focusing on dynamic movements that target the hamstrings and surrounding muscles. A proper cool-down, including stretching and foam rolling, can help improve flexibility and reduce muscle soreness.
  5. Consult a professional: If you are unsure about your exercise progression or continue to experience persistent pain, consult a kinesiologist, physical therapist, or other healthcare professional for personalized guidance and recommendations.

By incorporating these hamstring exercises for tendinopathy into your routine and monitoring your symptoms as well as getting quality massage therapy, you can help promote healing and prevent future hamstring injuries. Always remember to progress gradually, listen to your body, and seek professional advice when needed.