
Author: Sam Visnic

Piriformis Trigger Points | How To Find And Self Treat

Dealing with persistent hip or buttock pain? You might be experiencing the effects of piriformis trigger points. These sensitive spots within the piriformis muscle, located deep in the buttock region, can cause a wide range of symptoms — from localized discomfort to radiating pain that mimics sciatica.

Armed with my personal experience as a neuromuscular therapist with over 25 years of expertise and practical knowledge at my clinic Release Muscle Therapy, I’ll guide you through everything you need to know: how to identify, self-treat, and prevent piriformis trigger points, deep gluteal pain, and related conditions.

This is the most comprehensive resource you’ll find on this topic — covering anatomy, self-release techniques, stretching protocols, diagnostic imaging, and the full spectrum of treatment options.


Piriformis Muscle Anatomy And Function

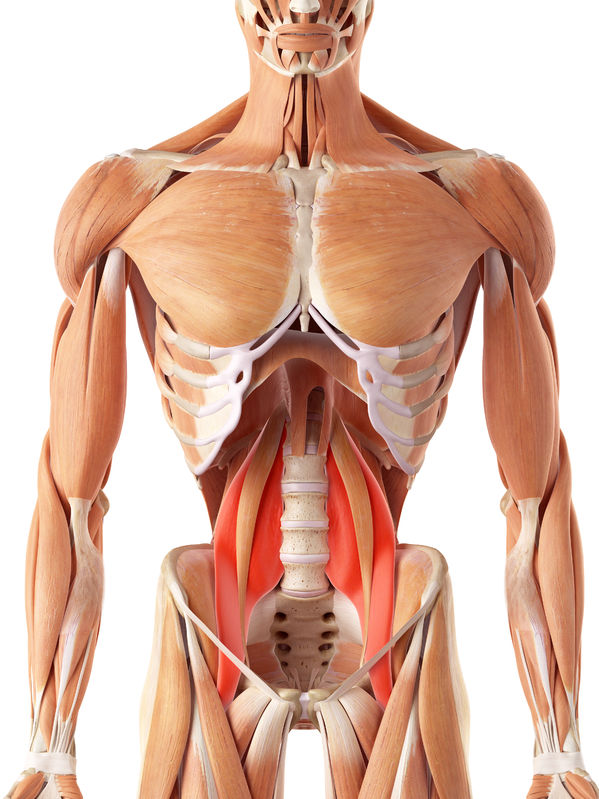
Location: The piriformis muscle is located deep within the buttock, situated beneath the gluteal muscles.

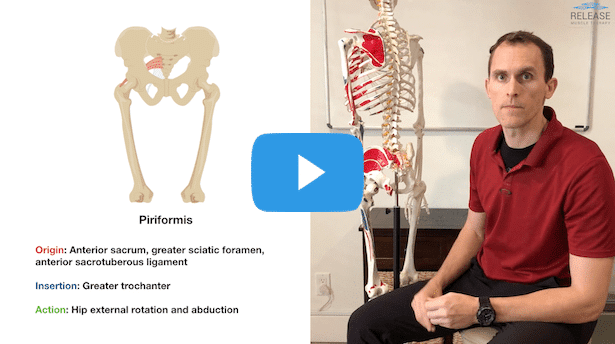
Origin: It originates from the anterior surface of the sacrum, which is the triangular bone at the base of the spine.

Insertion: The muscle fibers run from the sacrum and converge to attach to the greater trochanter of the femur — the large bony prominence located on the outer side of the upper thigh.

Relation to the Sciatic Nerve: The piriformis is closely associated with the sciatic nerve, which either runs beneath or, in some individuals, through the muscle. This close proximity is the reason why the piriformis is often implicated in sciatic pain.

Piriformis Trigger Points


Key Functions Of The Piriformis Muscle

Lateral Rotation of the Hip: When the hip is extended, the piriformis acts primarily to laterally rotate the femur (thigh bone) in the hip joint. This means it helps turn the leg and foot outward.

Abduction of the Thigh: When the hip is flexed to 90 degrees, the piriformis acts to abduct the thigh, meaning it helps move the leg away from the midline of the body.

Stabilization: The piriformis also plays a role in stabilizing the hip joint, especially during walking or running. It helps keep the head of the femur securely within the hip socket, preventing dislocation or excessive movement.

Restraining Medial Rotation: The piriformis helps control and limit the medial (inward) rotation of the thigh, especially during the early stance phase of gait when the foot first hits the ground during walking.

Given its role and its relation to the sciatic nerve, any dysfunction or tightness in the piriformis can lead to a range of symptoms, the most notable being “piriformis syndrome.” This syndrome arises when the muscle compresses or irritates the sciatic nerve, leading to symptoms like buttock pain that can radiate down the leg, mimicking classic sciatica.


Piriformis Muscle vs. Sciatic Nerve — Why It Matters

The piriformis muscle plays an instrumental role in stabilization of the pelvis and hips. Due to its ability to assist in decelerating internal rotation of the femur, it should also be assessed in dysfunctional hips, knee pain, and also mechanical issues as far down as the foot.

Piriformis syndrome is a very common diagnosis which is often confused with sciatic pain. While some symptoms can overlap, sciatic nerve pain originates from the spine and is associated with numbness or tingling down the leg.

Piriformis pain tends to stay localized to the buttocks and is often directly made worse with aggressive stretching or exercises involving the glutes.

It is important to note that the concept of trigger points and their relationship to pain is a point of high debate in the clinical community. Regardless, it appears helpful to address these sensitive areas with trigger point release techniques, at least for temporary relief. Specifically, piriformis trigger point release can be attained by using simple neuromuscular techniques such as positional release technique, ischemic compression, or muscle energy techniques.

Piriformis Muscle Anatomy


What Are Trigger Points And Why Do They Matter?

Trigger points, often referred to as “muscle knots,” are hypersensitive, tight areas or nodules within muscle fibers. They can be felt as small, tender lumps in the muscle and are usually the result of muscle overuse, strain, or injury.

There are two main types of trigger points:

Active Trigger Points: These cause pain at rest and when the muscle is used. The pain is usually felt at the site of the trigger point and can also radiate to other areas. This referred pain can sometimes follow specific patterns.

Latent Trigger Points: These are dormant and don’t cause spontaneous pain, but they can restrict movement and cause muscle weakness. When pressed or stretched, they can become painful.

Active trigger points are notorious for causing persistent pain, which can manifest as sharp, dull, burning, or aching sensations. This pain is sometimes so unique that it’s mistaken for other conditions, leading to potential misdiagnosis.

They can significantly impact the range of motion in joints due to the pain and muscle tightness they induce. Over prolonged periods, this limitation can escalate into joint stiffness and a noticeable decline in functionality.

Moreover, muscles plagued with active trigger points don’t operate at their best, resulting in muscle weakness and quick fatigue. One of the hallmark features of trigger points is their capability to refer pain to distant regions of the body — for example, those present in the neck might be the culprits behind recurring headaches.

Chronic presence of these trigger points, especially in pivotal muscles like those in the back and neck, can lead to postural anomalies as the body constantly tries to adjust and compensate for the pain and imbalance. The consistent pain and discomfort can also be a significant disruptor of sleep, causing conditions like insomnia or sporadic sleep patterns.


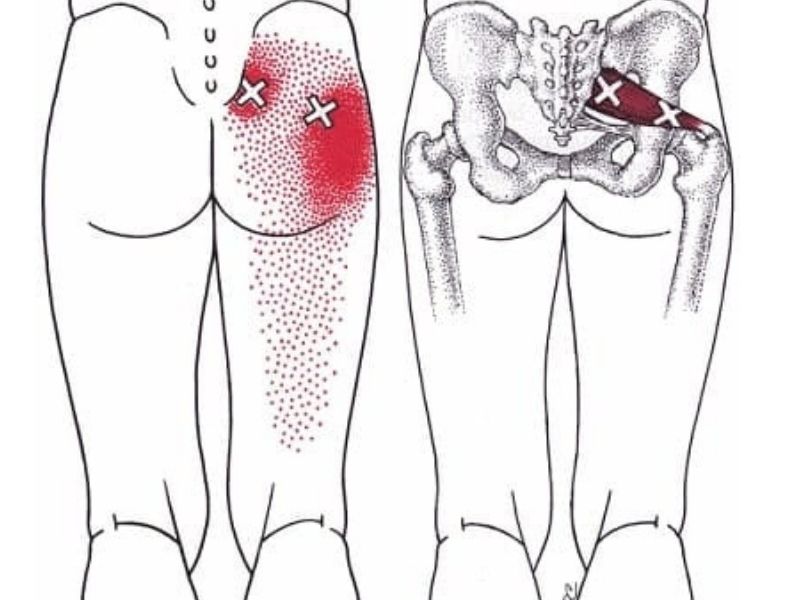
Piriformis Trigger Point Locations

Piriformis Trigger Points Diagram

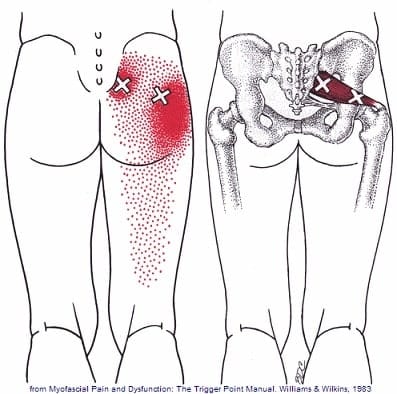
Image reference: David G. Simons, Janet G. Travell, Lois S. Simons. Myofascial Pain and Dysfunction: The Trigger Point Manual

The piriformis muscle, given its relatively small size but significant depth, can house multiple trigger points. The exact number and precise location can vary among individuals, but typically, the trigger points in the piriformis muscle are found in the following areas:

Medial Trigger Point: Located closer to the sacrum, this trigger point is found near the muscle’s origin on the anterior surface of the sacrum. It’s often the most medial of the piriformis trigger points.

Central Trigger Point: Positioned roughly in the middle of the muscle belly, this trigger point is typically the most prominent and can be the primary source of referred pain patterns associated with the piriformis.

Lateral Trigger Point: Located closer to the greater trochanter of the femur where the piriformis inserts, this trigger point is the most lateral and can sometimes be the source of pain that radiates down the leg.

When palpating (feeling) for these trigger points, one might feel taut bands or nodules within the muscle, which are hypersensitive to pressure. Applying pressure to these points can reproduce the pain or refer pain to other areas, a characteristic feature of trigger points.

It’s essential to approach piriformis trigger points with care, given the muscle’s proximity to the sciatic nerve. Proper assessment and treatment by trained professionals can ensure that the nerve is not inadvertently irritated during the process.


Main Complaints Related To Piriformis Trigger Points

Trigger points in the piriformis muscle can lead to a variety of symptoms and complaints. Due to its proximity to the sciatic nerve, the piriformis can have a profound impact when these trigger points become active:

Buttock Pain: One of the most common complaints is a deep, aching pain in the buttock on the affected side. This pain can sometimes be sharp or radiating.

Sciatica-like Symptoms: The sciatic nerve runs very close to or even through the piriformis muscle in some individuals. When the piriformis muscle becomes tight or inflamed due to trigger points, it can compress or irritate the sciatic nerve, leading to symptoms that mimic sciatica — radiating pain, tingling, or numbness that travels down the leg, sometimes reaching as far as the foot.

Reduced Range of Hip Motion: The tightness and discomfort caused by the trigger points can lead to a reduction in the range of motion of the hip joint, making movements like hip rotation painful.

Referred Pain: Trigger points in the piriformis can also cause referred pain to other areas, such as the lower back or the other regions of the buttock.

Difficulty Sitting: Due to the location of the piriformis, sitting for extended periods, especially on hard surfaces, can exacerbate the pain and discomfort.

Pain While Walking: Walking, especially for long distances, can become painful due to the involvement of the piriformis in hip stabilization and movement.

Pain During Certain Activities: Activities that put strain on the piriformis, such as climbing stairs, running, or even crossing legs, can become painful when there are active trigger points in the muscle.

Signs You May Have Piriformis Issues

  • Lower back pain
  • Sacroiliac joint pain
  • Sciatica-type symptoms
  • Hip pain
  • Posterior pelvic tilt
  • Pelvic pain
  • Difficulty lying on your back with legs straight
  • Sciatic-type sensations after sitting too long

Causes Of Piriformis Pain And Trigger Points

Piriformis pain and the development of trigger points in the muscle can arise from various causes:

Muscle Overuse or Strain — Often seen in athletes or individuals who engage in activities requiring repetitive hip rotation or sudden changes in direction.

Direct Trauma — Injury to the buttock area, such as from a fall or a car accident, can lead to inflammation and tightness in the piriformis, fostering the formation of trigger points.

Prolonged Sitting — Especially on hard or uneven surfaces, constant pressure on the muscle leads to discomfort and potential trigger point development.

Anatomical Variations — In some individuals, the sciatic nerve runs through the piriformis muscle rather than beneath it (approximately 16–17% of the population), making them more susceptible to piriformis syndrome.

Postural and Gait Imbalances — Issues in adjacent muscles or joints can place undue stress on the piriformis, contributing to pain and the onset of trigger points.

Asymmetry and Dominance Patterns — Asymmetry is normal in the human body, and we tend to be more right-side dominant when it comes to weight bearing. On a weight-bearing side, the hip is positioned into internal rotation. The opposite hip is in a relatively externally rotated position. This means the piriformis is at a slightly different length on each side, and stretching or strengthening may need a different approach depending on the symptomatic side.

Other Conditions — Lumbar spine issues or hip disorders can refer pain to the piriformis region, making it essential to obtain a comprehensive diagnosis to pinpoint the exact cause of the discomfort.


Deep Gluteal Pain Syndrome — The Bigger Picture

Piriformis trigger points don’t exist in a vacuum. They’re part of a larger clinical picture known as Deep Gluteal Pain Syndrome (DGPS) — a relatively new umbrella term that encompasses all conditions causing sciatic nerve entrapment in the deep gluteal space.

What Is Deep Gluteal Pain?

It’s a sensation of numbness or distinct pain in the buttocks that often causes radiating pain along the sciatic nerve distribution. Unlike regular buttock pain, deep gluteal pain is considered a sciatic nerve disorder. It is untethered from disc issues and features sciatic nerve entrapment in the deep gluteal space.

Deep gluteal pain is not a minor inconvenience. It can become a disabling problem in older adults and a performance killer in young people.

Causes Of Deep Gluteal Pain

The deep gluteal space is complex, and each component can be a pain trigger:

Entrapment Neuropathy — Pinching or pressure upon a nerve, which triggers pain. The piriformis muscle is one of the most common culprits.

Lesions and Fractures — Inflammation originating from an injury or fracture. Repetitive movements can cause micro-tears in the muscle tissue that swell and put pressure on nerve structures.

Enthesopathy and Tendinopathy — Tendon disorders such as tendinitis can cause deep gluteal pain. Potential culprits include the quadratus femoris muscle, piriformis muscle, and gluteus medius.

Uncommon Causes — Some patients develop deep gluteal pain during pregnancy or ovulation due to referred pain from intra-abdominal or intra-pelvic inflammatory processes. Endometriosis, irritable bowel syndrome, and even inguinal hernia may cause these symptoms. Trigger points in the gluteals may also be a contributing factor.

Symptoms Of Deep Gluteal Pain

  • Buttock pain or numbness
  • Pain radiated to the knee (sciatic nerve symptoms)
  • Pain triggered by prolonged sitting
  • Walking in short strides for pain avoidance
  • Sensory changes and pain upon palpation
  • Disturbed sleep due to severe pain at night
  • Locking or clicking sounds on the hip joint
  • Limping after prolonged sitting

These symptoms do not follow a set script. Nerve entrapment can be vague and hard to pinpoint. Symptoms may come and go and change location, varying in intensity depending on the cause.

Specific conditions may present differently. For example, hamstring tendinopathy could make you feel a “boggy mass” in your hips with weight-bearing activities. Gluteal tendinopathy gives you night pain when lying on the affected side. In pudendal nerve entrapment, using a seat or riding a bicycle increases the pain, but sitting on a toilet might bring some relief.

Deep Gluteal Pain vs. Other Conditions

Piriformis Syndrome — The term has been around since the 1930s. Today, deep gluteal syndrome casts a wider net, encompassing piriformis syndrome plus new entities health professionals should consider.

Proximal Hamstring Tendinopathy — Occurs due to repetitive loading and strain. Repetitive motion causes micro-tears, inflammation, thickening of the tendon, and compression of the sciatic nerve.

Trochanteric Bursitis — Features inflammation in the bursa of the greater femoral trochanter. People typically present with pain on the outside of the hip and posterior thigh.


Determining Piriformis And Deep Gluteal Pain

Physical Examination

Physical therapists may assess whether hip flexion or rotation worsens the pain and whether it flares up during physical activity or extended sitting. Through physical examination, paresthesia, numbness, trigger points, and tender areas can be detected. Different landmarks guide palpation, including the greater trochanter, ischial tuberosity, and iliac crest.

Special Tests

Special tests include internal rotation of the hip, the flexion test, and the seated piriformis stretch test. The piriformis muscle provocation test is also beneficial to diagnose sciatic nerve entrapment.

Diagnostic Imaging

X-rays can spot bone pathologies. Nerve conduction studies help detect sciatic nerve entrapment. However, an MRI is the most convenient to rule out specific underlying contributors and assist with diagnosing the root cause. Ultrasound can also play a crucial role, adding real-time evaluations while guiding palpation and identifying structures likely to be a source of pain.


The Role Of MRI In Deep Gluteal Pain Syndrome

MRI is the most commonly used tool by physicians to investigate deep gluteal syndrome anatomy. But like other diagnostic tools, it has limitations.

MRI Accuracy

Research pooling 239 cases of sciatica of non-disc origin revealed a specificity of 93% and a sensitivity of 64%. This means false positives are very uncommon, but there is a high incidence of false negatives. Many patients could have deep gluteal syndrome anatomy issues even if they don’t show up on their MRI. An MRI should confirm the diagnosis or rule out other causes — it is not a screening test.

How MRI Findings Affect Treatment

Depending on the MRI findings, the therapy plan takes shape:

Piriformis Syndrome — MRI may show hypertrophy and anatomical variants of the piriformis muscle. Treatment usually consists of anti-inflammatory medications, muscle relaxants, rest, and a 6-week course of exercises. If conservative approaches fail, botulinum toxin injection and surgical resection may be considered.

Sciatic Nerve Variants — Around 16–17% of the population has an abnormal course of the sciatic nerve inside the deep gluteal space. If conservative treatment fails, an endoscopic tenotomy of the piriformis muscle is the treatment of choice.

Piriformis Muscle Variants — An anatomical variant can alter the interaction between the piriformis muscle and the sciatic nerve. These cases are usually more difficult to resolve and may require endoscopic muscle resection.

Trauma and Overuse — MRI can detect fibrous bands that form in response to inflammation. The most effective treatment is often endoscopic sciatic nerve decompression.

Hamstring Tendinopathy — Images may feature acute inflammation and edema affecting the sciatic nerve, or chronic fibrotic tissue. Many acute cases respond to conservative treatment; chronic cases may require surgery.

Limitations Of MRI

MRI has key limitations to understand:

Dynamic Entrapment — A type of piriformis syndrome involves sciatic nerve entrapment that only occurs during certain postures or movements. MRI cannot capture this.

Orthopedic Anomalies — When sciatic pain is triggered by orthopedic issues, these are not always visible on MRI because the neuropathy is activated only during dynamic motion.

All diagnostic tools should guide and not replace clinical tests. A postural evaluation, gait examination, and physical exam maneuvers can lead the diagnostic suspicion to a more accurate location.


Top Tips For Dealing With Piriformis Pain

Before jumping into release techniques, consider these practical tips:

  • Avoid crossing your legs and generally sitting with your knees too close together
  • Avoid excessive aggressive stretching of the piriformis — this often makes things worse
  • Avoid intense strength training that fatigues already painful and sensitive tissues
  • Emphasize placing the affected-side leg into external rotation to allow the muscle to passively shorten and relax
  • Use a cane or walking sticks temporarily if it’s painful to walk
  • Use passive therapies such as heat or ice, pain relief creams, or TENS to calm down nerves and promote circulation
  • Strengthen the other gluteal muscles and reduce over-activity of antagonist muscles

The Piriformis Relief Position

When piriformis pain is just too aggravated and sensitive to stretch or exercise, sometimes the best thing to do is simply get into a position of relief.

Lay face down and place the affected leg out to the side. This position allows the piriformis muscle to shorten, which can help relieve tension and allow it to calm down. A small pillow can be placed under the hip to reduce lower back discomfort. Usually 3–5 minutes is sufficient to allow a reduction in excess muscle tone, but it can be done for much longer if desired.


How To Self-Release Piriformis Trigger Points — 8 Techniques

Technique #1: Piriformis Relief Position

(Described above) — When pain is too aggravated for any active work, start here.

Technique #2: Piriformis Muscle Massage Therapy

The piriformis muscle lies under the larger, more superficial glute muscles, so it can be challenging to directly reach until those layers are relaxed. This muscle is responsive to gentle approaches and does not need overly aggressive pressure to get results. Even simple glides with thumbs or the elbow are effective.

The fibers connect to the anterior (front) surface of the sacrum bone, so they can be challenging to fully address — which is why a combination of deep tissue massage and stretching work is often indicated for best results.

Caution for Piriformis Syndrome: Since the muscle is already aggravated, excessive intensity can further increase sensitivity, pain, and guarding. A gentle, graded exposure approach is essential. Since the intensity is generally low, it may be necessary to follow up with exercises and stretches to get the release to “stick.”

Technique #3: Foam Roller Release

Sit on a foam roller and position it under the buttock of the affected side. Gently roll back and forth, applying sustained pressure on tender areas to help release muscle tightness. The foam roller provides a soft surface, and the wider contact area makes it the most tolerable tool to start with.

Technique #4: Tennis or Lacrosse Ball Release

Place a tennis or lacrosse ball under the buttock and lean into it. Target specific trigger points more precisely, applying pressure and making small circular movements. Note: using a softball or lacrosse ball can be quite uncomfortable due to the concentrated pressure per square inch. This may result in an inability to relax fully, trigger guarding, and reduce effectiveness — especially important when dealing with piriformis syndrome.

Technique #5: Post-Isometric Relaxation (PIR)

Post-isometric relaxation works very well for the hip muscles. Contract the piriformis at a low intensity for 8–10 seconds, then fully relax into the new stretch position for another 8–10 seconds. Repeat several times.

Technique #6: Reciprocal Inhibition

This is a very powerful release technique for the piriformis and other external hip rotators because the groin (especially on the left side) is often inhibited and needs to be strengthened. By actively engaging the opposing muscle group, the piriformis reflexively relaxes.

Technique #7: Self-Massage With Foam Roll

You can perform self myofascial release by foam rolling the piriformis, using a lacrosse ball, or a softball. Start with the foam roller for gentlest contact, then progress as tolerated.

Technique #8: The 90-90 Self-Release

The 90-90 stretch is an excellent self piriformis release that combines stretch with gentle pressure in a seated position.


Piriformis Stretches — 5 Techniques That Actually Work

Stretching the piriformis after trigger point release is vital. The process ensures the muscle retains its relaxed state, prevents re-tightening, boosts blood flow, and speeds up recovery. A flexible piriformis functions more efficiently and reduces potential injuries.

Important: Make sure you have warmed up before stretching. An easy way to warm up is a few minutes of light aerobic exercise like walking — this is often the easiest and fastest way to reduce subconscious tension and guarding.

Stretch #1: Supine Cross-Leg Glute Stretch

Lie on your back with legs straight. Bend one leg and place the foot just outside the opposite knee. Use your opposite hand and gently pull the knee across the body and up slightly toward the hip. You will feel a stretch on the outside of the hip. Hold for 30 seconds, repeat 2–3 times.

This is often the most comfortable stretch to start with.

Stretch #2: Adduction and Hip Flexion Stretch

Because of the piriformis location and hip mechanics, there are two different approaches to stretching it. In this version, the emphasis is on adduction and hip flexion, which allows for release of the more superficial muscles and some of the external hip rotators.

Stretch #3: Deep Piriformis Stretch With External Rotation

This second variation can directly target the piriformis and is generally performed AFTER the adduction stretch. A combination of varying hip positions with external rotation will get most of the deep hip muscles stretched.

Stretch #4: 90-90 Piriformis Stretch (Floor)

Sit on the floor with one leg out in front of you at a 90-degree angle from your body. The other leg should be placed to the side with the knee at a 90-degree bend. While maintaining the arch (lordosis) of the lower spine, tip your pelvis forward as though it were a bucket of water. You should feel a stretch in the gluteal area. Hold for 30 seconds, repeat 2–3 times.

Stretch #5: Standing 90-90 Piriformis Stretch

This standing version is virtually identical to the floor version. It is most helpful when it’s not possible to get down on the floor, or if there isn’t enough hip mobility for the floor version. Place the bent leg on a table, keep the opposite knee bent for balance, and from the starting position, tip your hips forward until you feel the stretch. Hold for 30 seconds, repeat 2–3 times.


Follow-Up Exercises For The Piriformis

Post-trigger point release, follow-up exercises are paramount to ensure sustained muscle health and functionality. While release targets immediate tension, exercises reinforce muscle strength, endurance, and coordination.

By actively engaging the piriformis and its neighboring muscles, these exercises foster muscle memory, ensuring the piriformis operates in harmony with surrounding structures. This reduces the risk of muscle imbalances (a precursor to injuries and strain) and supports optimal hip and pelvic mechanics during daily activities.

Consistent exercises act as a preventive measure, deterring the re-emergence of trigger points by keeping the muscle active and well-circulated. While trigger point release provides immediate relief, follow-up exercises lay the foundation for long-term piriformis health and optimal biomechanical function.


Exercises To Avoid With Piriformis Syndrome

If you have active piriformis syndrome, certain exercises can make things worse:

Sidelying Clamshells — Often assigned early in rehab, but they tend to be too much of a “direct hit” on the muscle. Since it’s hard to perform them with low-enough intensity, it’s best to hold off until the muscle is less irritated and pain has been reduced.

Lateral Band Walks — Avoid for the same reason as clamshells — they are usually not well-tolerated when the piriformis is aggravated.

Pay attention to how your body feels during each exercise and don’t push too hard. Go slowly, focus on proper form, allow time to rest between sets, and always listen to what your body is telling you.


Therapeutic Options — From Home Remedies To Surgery

Home Therapy

Activity Modifications — Depending on the source of pain, changes may be needed. For hamstring tendinopathy, avoid bending activities, especially deadlifts, and avoid stretching the hamstrings unless directly recommended by your therapist. Alternate periods of sitting and standing. Drivers should move the seat closer to the steering wheel. Runners may need to reduce stride length.

Additional Home Recommendations — Shed excess weight and quit smoking if applicable. Anti-inflammatory foods can be helpful, such as turmeric and omega-3. Ice can improve pain temporarily — use a cloth to keep skin apart, and limit ice therapy to five minutes to avoid ice burns.

Self-Massage — You can benefit from self-massage at home with foam rollers or a tennis ball (see the 8 techniques above).

Professional Therapy

Medications — Oral analgesics are often the first-line treatment. Muscle relaxants may be added when the source is muscle tension. More severe cases may require intramuscular or intravenous therapy.

Physical Therapy — Most professionals recommend rehabilitation for a minimum of six weeks, consisting of exercises to strengthen hip mechanics, tendons, and muscles involved in lower extremity movement. Some exercises are designed to mobilize sciatic nerve entrapment through nerve gliding techniques.

Massage TherapyNeuromuscular massage therapy, also referred to as myofascial release or trigger point therapy, consists of applying pressure for 30 seconds to two minutes with appropriate intensity on the correct trigger point. This technique should be administered by a professional for best results.

Experimental and Complementary Treatment — Some cases improve with trigger point injections and acupuncture. There are reports showing results with botulism toxin injections in the piriformis muscle, though this approach can cause complications such as fibrosis of the sciatic nerve.

Surgical Treatment — Sometimes surgery is the only resource to achieve pain relief. Options include open decompression of the sciatic nerve or endoscopic procedures. For severe cases, this can be a game-changer in hamstring or piriformis muscle syndrome and traumatic causes of deep gluteal syndrome.


When To Seek Professional Help

If your pain persists after trying self-care measures such as rest and stretching, seek professional advice from a physical therapist before attempting further activity that could exacerbate your symptoms.

When dealing with issues like piriformis syndrome, proper assessment for underlying causes (such as lumbar pathology) and personalized care are essential for successful recovery. Remember: other problems outside the deep gluteal space — such as hip joint osteoarthritis or femoral neck fractures — can also trigger these symptoms.

Do not hesitate to come to a professional for deep gluteal pain. Most patients find relief through conservative treatment and physical therapy, making a profound difference in their quality of life.


FAQs

How long does it take for piriformis pain to go away?

With consistent stretching and gentle exercises, most simple cases of piriformis pain improve within a few weeks. Recovery from deep gluteal pain may take 6 to 12 weeks, depending on the trigger and severity. During this time, follow the instructions of your doctor or therapist to speed up results.

Can deep gluteal pain be chronic?

Yes. Chronic deep gluteal pain can develop when a long-standing ailment is causing symptoms. Some cases of recurrent or refractory pain can reach a chronic state. Supportive therapy rather than a curative approach may be needed.

Should you stretch a sore piriformis?

If you have a mild case of muscle spasms or strain, a gentle stretch may help. In cases of severe inflammation or nerve irritation, a more specialized approach is needed. If pain persists, seek professional advice before continuing.

What is the best way to prevent piriformis problems?

Regular stretching, strengthening exercises (especially the other gluteal muscles), and staying active throughout the week with activities such as walking or cycling. Avoid prolonged sitting, and pay attention to posture and gait.

How does deep gluteal pain affect leg abduction?

Deep gluteal pain with leg abduction can be a sign of piriformis muscle involvement. This movement may be used during physical examination to identify the source of pain.

When should I consider surgery?

Surgery is the last treatment option for patients who do not respond to medical treatment and physical therapy. In most cases, conservative treatment is sufficient.

Can deep gluteal pain be a sign of a more serious condition?

Yes. Hip joint osteoarthritis, femoral neck fractures, and other serious injuries outside the deep gluteal region can trigger similar symptoms. A thorough evaluation is essential.

Are there risks associated with stretching the piriformis?

Incorrect form could lead to further irritation. If your condition has progressed beyond basic muscular tension, stretching may not provide much benefit. Always listen to your body and take appropriate measures.

What are the long-term effects of piriformis pain?

If left untreated, the piriformis remaining in an overly contracted state could lead to other areas of tension, joint instability, additional pains, and may affect your ability to move freely through everyday activities.


References:

  1. Podschun, L., Hanney, W. J., Kolber, M. J., Garcia, A., & Rothschild, C. E. (2013). Differential diagnosis of deep gluteal pain in a female runner with pelvic involvement: a case report. International Journal of Sports Physical Therapy, 8(4), 462.
  2. Hu, Y. W. E., Ho, G. W., & Tortland, P. D. (2021). Deep gluteal syndrome: a pain in the buttock. Current Sports Medicine Reports, 20(6), 279-285.
  3. McCrory, P., & Bell, S. (1999). Nerve entrapment syndromes as a cause of pain in the hip, groin, and buttock. Sports Medicine, 27, 261-274.
  4. Franklyn-Miller, A., Falvey, E., & McCrory, P. (2009). The gluteal triangle: a clinical patho-anatomical approach to the diagnosis of gluteal pain in athletes. British Journal of Sports Medicine, 43(6), 460-466.
  5. Ohm-Pedersen, K. (2018). Gluteal Tendinopathy. Clinical Practice Guidelines, 357.
  6. Carro, L. P., et al. (2016). Deep gluteal space problems: piriformis syndrome, ischiofemoral impingement, and sciatic nerve release. Muscles, Ligaments and Tendons Journal, 6(3), 384.
  7. Martin, H. D., & Gómez-Hoyos, J. (2019). Deep gluteal syndrome. Posterior Hip Disorders: Clinical Evaluation and Management, 167-187.
  8. Hernando, M. F., et al. (2015). Deep gluteal syndrome: anatomy, imaging, and management of sciatic nerve entrapments in the subgluteal space. Skeletal Radiology, 44(7), 919-934.
  9. Chang, K. V., et al. (2018). Ultrasound imaging and guided injection for the lateral and posterior hip. American Journal of Physical Medicine & Rehabilitation, 97(4), 285-291.
  10. Awan, W. A., & Babur, M. N. (2011). Effectiveness of deep friction massage & stretching exercises in piriformis syndrome. IJCRB, 3(03), 378-383.


Trigger Points For Plantar Fasciitis | How To Find And Release

Myofascial trigger points are a controversial topic, especially when it comes to chronic pain.  Keep this in mind when setting expectations for learning about trigger points for plantar fasciitis.

Trigger point therapy can be helpful if muscular dysfunction is a contributing factor in your individual case.  In some situations it is possible that trigger points can mimic plantar fasciitis type pain, and upon resolving them, the problem may go away completely.

There is rarely a single pressure point to relieve plantar fasciitis pain, but instead, a collection of them that can be found in the surrounding muscles of the foot and ankle.

In this article, I’ll show you the most relevant trigger points, but keep in mind this is NOT an exhaustive list.  There are other trigger points found further up the leg that have the potential to refer sensations down to the foot, and therefore may also contribute to this trigger point pain phenomenon.

So, with that said, let’s get started on finding these little pressure points.

Locating Plantar Fascia Trigger Points

The Science Behind Trigger Points

Trigger points are often referred to as “knots” in your muscles that form when fibers are unable to relax. While the actual concept of a muscle knot is highly debatable, these sensitive points can contribute to pain and limit your range of motion. In the case of plantar fasciitis, trigger points often form in the calf  and foot muscles, which can exacerbate the pain in your foot. Treating these trigger points can provide improved muscle performance and facilitate the rehabilitation process.

Foot Trigger Points

Plantar fasciitis occurs when the plantar fascia, a thick band of tissue running from your heel to your toes, becomes inflamed. This band acts like a shock absorber for your foot, and when it’s strained, you feel pain, especially while walking or standing. Understanding the anatomy of your foot can help you grasp why trigger points are so crucial in treating plantar fasciitis.

There are a lot of small muscles in the foot, commonly referred to collectively as the “instrinsic” foot muscles.  Many of these muscles can harbor trigger points that can be sensitive right where they are located, OR, can refer sensations to the most common pain point near the heel.

It is possible that in some cases an individual’s entire problem is not actually the plantar fascia, but instead the problem being generated by these local trigger points.

These muscles are generally easily accessible, but one common issue in self-treating them is hand fatigue.  I do recommend using a appropriate tool (which I’ll cover down below) in order to effectively work these key trigger points.

Plantar-Fasciitis-Intrinsic-Trigger-Points

Calf Trigger Points

Trigger points located in the calf muscles can create either local dysfunction or refer sensation down to the foot.  There is a pressure point in the medial calf that can refer directly into the commonly painful spot on the heel, so it is worth investigating.

There are 2 calf muscles: the gastrocnemius and the soleus.  The gastrocnemius rests on top of the soleus, so this muscle will need to be addressed first.  As tension and sensitivity is reduced, you will have a better chance at influencing the deeper soleus muscle.

While you won’t be able press straight down through the gastroc muscle, you will be able to access the soleus at the inside and outside parts, near the shin bone.

Plantar-Fasciitis-Trigger-Points-Calf

Trigger points are challenging for therapists to find (and agree on!), so for most people, you aren’t likely to “feel” anything specific under your finger, but you will be able to notice an area that seems very sensitive, and even more importantly refer sensations down the leg.

In my opinion, the areas that refer sensations are most important to address.  Since these tender points are challenging to locate to begin with, you might consider using a simple skin marker to make a dot or “X” so that you can easily locate the spot again with ease.  This can also be helpful when showing a professional massage therapist where your trigger points are.

Peroneal Trigger Points

The peroneal muscles are found on the outside part of the shin.  Even though there are not any common trigger points that refer to the bottom of the foot, this muscle has an important role in function.

Its main job is plantar flex (think calf raise) and evert the foot, so effectively stabilizing the outside part of the foot + ankle.

Trigger points are fairly common in this muscle and alleviation can often make the foot feel as if it’s “moving better”.

Trigger-Points-Peroneals-min

Tibialis Trigger Points

The tibialis, both anterior and posterior parts, could be strong contributors to plantar fasciitis. The tibialis functions as a sort of “stirrup” for the foot, and therefore is involved in pronation.

When you consider that over-pronation may be one of the factors that leads to excess stress on the plantar fascia to begin with, it would sense to address this muscle.

Trigger points in the anterior muscle refer directly to the big toe, while pressure points in the posterior muscle can refer directly to the achilles tendon. (Also interesting to note the common relationship between achilles issues and plantar fasciitis!).

Anterior tibialis trigger points are easy reach, but the posterior is far more difficult because of its deep location under the larger calf muscles.  While it is somewhat possible to access a portion of it coming in from the side of the shin, it’s best to work with a professional therapist to get better access to this one.

Trigger-Points-Tibialis

Trigger Point Release Techniques

Trigger point massage for plantar fasciitis muscle work can involve a number of different techniques.  Any of them can be effective, but all of them may not work for everyone.  Some experimentation may be needed.

Static Pressure Release

Static pressure is the classic method for trigger point therapy.  Once the tender pressure point is located, pressure with a thumb or tool is added and held until the sensitive spot reduces in intensity.

There isn’t a lot of agreement by therapists in how hard to press, but generally if we use a 1-10 scale, a 5, which is midway, would be a good place to start when self-massaging.

Kneading

Kneading can involve a number of different movements, but generally the idea is to grab, pinch, roll or stretch the tissues in varying directions, which often increases blood flow to the area and helps de-sensitize the trigger point.

Muscle Energy Techniques

Muscle energy techniques (MET) involves a series of osteopathic-based techniques aimed at triggering the nervous system to relax muscles that have increased muscle tension.

The two primary techniques are called:

Post Isometric Relaxation (PIR) – This technique involves a very low intensity contraction of the muscle that contains the trigger point, with a controlled inhale + exhalation, then subsequent relaxation of the contraction.  This process is repeated 3-5 times until full relaxation is achieved.

Sample Technique:

Reciprocal Inhibition (RI) – This techniques involves a contraction of the OPPOSITE muscle that contains the trigger point.  In doing so, there is a degree of reduced activity in the target muscle, which can reduce the sensitivity of trigger points.

This technique also involves a breathing component, and the intensity of the muscle contraction may vary depending on individual ability.

I’m a big fan of these techniques, because they are easy to perform, relatively gentle, and can rapidly reduce trigger point activity in the host muscle.  Covering these techniques would require an entire blog post to itself, but I wanted to mention them here due to their immense value.

Sample Technique:

Does self release with a trigger point roller help?

While not a technique itself, I wanted to address the most common version of self massage, which is rolling on a foam roller.  The roller can help you with static release and a simple version of repeated compression of tissues.

While simple and can generally hit some easy to reach trigger points, it’s not very efficient for dealing with more specific trigger points.  This is because the broad contact surface of the roller will often miss the precise trigger points mentioned in the areas above.

Massage tools attempt to help fix this problem, and they can be useful as well, but only after examining the tissues with your hands and locating the trigger points that need to be treated.

Important Tip: Follow up with stretching

Locating and releasing trigger points for plantar fasciitis needs to be a multi-step process.  This means you can’t just massage them away.

It’s important to re-train your muscles (+ nerves) on how to change their behavior.  An easy way to do this involves stretching the muscles right after treating the trigger points.  Kinesiology taping for plantar fasciitis is also helpful in reducing trigger point sensitivity.

As trigger point sensitivity is reduced, there is a sort of window-of-opportunity to teach the nerves how to keep the changes.  It doesn’t take much.  2-3 repetitions of a stretch, held for 30 seconds can effectively get the job done.

Lastly, be sure to note exercises for plantar fasciitis to avoid.

Alternative Treatments for Plantar Fasciitis

While trigger point therapy can be very helpful in some cases, it’s not the only treatment out there. Here are some alternative treatments you might consider that are often utilized:

  • Acupuncture: This ancient Chinese technique involves inserting needles into specific points on your body, including your foot, to relieve pain.
  • Physical Therapy: Exercises can strengthen your foot and calf muscles, improving your condition over time.
  • Orthotic Inserts: Custom-made shoe inserts can provide the extra support your foot needs.

A Comprehensive Treatment Plan for Plantar Fasciitis

When it comes to dealing with issues like plantar fasciitis, it is VERY important to utilize a multi-disciplinary approach to achieve the best results.  Its crucial to rule out any potential underlying serious pathology, and also identify and address any contributing factors that exist in one’s lifestyle.

  1. Consult a Specialist: Always start by consulting a healthcare provider for an accurate diagnosis.
  2. Trigger Point and/or Myofascial Release Therapy: Schedule regular sessions with a certified therapist.
  3. Home Exercises: Perform stretching and strengthening exercises as advised by your therapist.
  4. Lifestyle Changes: Consider weight loss and proper footwear to reduce strain on your plantar fascia.
  5. Follow-up: Regularly consult with your healthcare provider to track your progress and make necessary adjustments to your treatment plan.

[wp-stealth-ads rows=”1″ mobile-rows=”1″ tags=”plantar fasciitis sa”]

Article Image Note:  I have pulled images from online for utilization in this post, and while I’m not sure exactly where they are from, I do believe they are from Travell and Simon’s Myofascial Trigger Point manuals.  If you know, I’m happy to properly attribute these images.

Article Research:

Trigger Point Therapy and Plantar Heel Pain: A Case Report


Quad Trigger Points | How To Find And Treat

If you’re dealing with quadricep or knee pain, then identifying and addressing quad trigger points is an important step in a comprehensive therapy program.

We delve into identification of trigger points, self-treatment strategies, and techniques for stretching and muscle energy. By offering a scientific, analytical perspective, we aim to aid practitioners and patients alike in effectively managing quad trigger points.

Here is what we are going to cover in this guide:

-Overall anatomy and function of the quadriceps muscles

-Location of quad trigger points

-Typical symptoms that are experienced and overlapping conditions

-Potential causes, and how to self-treat these trigger points

The Quadriceps Muscles And How They Work

The quadriceps muscles, often referred to as ‘quads’, play a crucial role in carrying out the hinge-like movement of your knee, enabling walking, running, and jumping with ease.

They originate from various quadriceps attachment points, including the femur and the hip bone, before inserting onto the tibial tuberosity through the patellar ligament, which lies just below the knee joint. There are 4 muscles that form the group:

-Rectus femoris (this is the only one that moves the hip and knee!)

-Vastus lateralis

-Vastus medialis

-Vastus intermedius

The quadriceps are responsible for knee extension and hip flexion (only the rectus femoris does this one) – crucial movements in everyday activities.

Quad Trigger Points – Where Are They Located?

Trigger points in the quads are typically found in four key areas within the muscle group.

The vastus medialis and vastus lateralis, found on the inner and outer aspects of the thigh respectively, often contain very tender trigger points. Similarly, the rectus femoris and the vastus intermedius, located centrally, can also hold some important points.

Understanding the precise location aids in effective quad trigger point release, alleviating pain and improving muscle function. It’s crucial to remember that each individual may have a unique distribution of quadriceps trigger points, requiring a personalized approach to treatment.

Symptoms Associated

Recognizing the symptoms associated with quad trigger points plays a vital role in both getting to the root cause of the problem, as well as selecting the right therapy protocols.

The manifestation of a trigger point in quad muscles typically results in localized pain or discomfort. This may be accompanied by muscle stiffness or a palpable “knot”, often referred to as a quad muscle knot.

It’s important to note that the severity of symptoms can vary greatly from individual to individual. Some individuals might experience mild discomfort, while others may report deep aching pain. Furthermore, these “knots” in quads can lead to limited mobility in knee flexion, muscle weakness, or even muscle twitching.

In some cases, quads trigger points could also cause referred pain that radiates to other areas. This is especially the case when it comes to anterior knee pain and patellar tendon.

Causes And Treatment Options

Overuse, trauma, or strain are common causes for trigger points in quads. A sedentary lifestyle can also lead to de-conditioning and tension in the quadriceps.

To relax the quad muscles, physiotherapy, stretching, and massage are often generally recommended. Trigger point therapy or myofascial release techniques can be used to release quads, focusing on specific quadricep trigger points.

If symptoms persist even after these interventions, the trigger points themselves may not be the primary contributor to the issue, and additional sources should be ruled out.

Differential Diagnosis – What Else Could It Be?

Differential diagnosis plays a crucial role in ruling out other potential causes of discomfort in the quadriceps.

A detailed clinical examination often reveals tense bands of muscle fibers, often associated with trigger points in the thigh. However, the presence of a muscle knot in the quad does not necessarily confirm a trigger point.

It’s essential to differentiate between simple trigger points and other pathologies such as strains or tears.

Hence, a comprehensive differential diagnosis is paramount in accurately identifying and treating quad trigger points. This should be performed by your primary healthcare provider.

How To Self Treat

Self-treatment methods for quad trigger points, when applied correctly, can effectively alleviate discomfort and enhance muscle function.

The first step in how to self-treat these muscle “knots” is identifying the specific trigger points. Once identified, you can use various techniques to release them.

These techniques can include self myofascial release with a tool such as a foam roller, tennis ball, lacrosse ball, etc., muscle energy techniques, or ice therapy with stretching.

VIDEO

Stretching quadriceps muscles aids in relaxing the tense muscle fibers and promoting blood circulation. It’s vital to maintain a gentle, consistent stretch for maximum benefit.

Stretching The Quadriceps

Incorporating regular quadriceps stretching into your routine can significantly assist in relieving the tension from quad trigger points. The standing quad stretch, for instance, is very easy to perform, and get the job done efficiently.

https://vimeo.com/805256199

The standing quad stretch can be done for 2-3 repetitions on each side, holding for 30 seconds each. This can repeated 1-3 times per day.

Regular practice of this stretch can help get the self massage work to “stick”, improve range of motion, and reduce likelihood of the issue in returning.

Muscle Energy Technique For The Quads

Muscle Energy Technique (MET) is a type of manual therapy that uses the patient’s own muscle energy (i.e., their force) to improve joint mobility and muscular function. Here’s how it works:

  1. Isometric Contractions: The therapist positions the quadricep into a lengthened position. The patient is then asked to contract the quad against a counterforce provided by the therapist. This is done in a controlled and gentle manner. Only about a 15% effort is generally required.
  2. Relaxation & Stretching: After the isometric contraction, the muscle is allowed to relax for a short period. The therapist will then move the tissues to their new range of motion, effectively stretching the muscle a bit further.
  3. Repetition: This process is repeated 5 or more times, until no further range of motion is achieved.

At the end of the technique, the previously tender trigger point is retested, for reduced sensitivity or de-activation.

Conclusion

Effective management of trigger points in the quadriceps encompasses various treatment options, including self-myofascial release, stretching, massage, and muscle energy techniques. However, a differential diagnosis is vital to rule out other conditions with similar manifestations.

Thus, comprehensive knowledge and appropriate intervention strategies are paramount for optimal outcomes.

Pectoralis Trigger Points | How To Find And Release

Have you ever experienced chest or shoulder pain that seemed to defy explanation? It’s possible that pectoralis trigger points are the culprits. Unlocking pain relief by treating these trigger points can be life-changing. In this blog post, we’ll delve into the world of pectoralis trigger points, focusing on the major and minor muscles and their referred pain patterns.

Key Takeaways

  • This article explores the characteristics and referred pain patterns of pectoralis trigger points, located in both the major and minor muscles.
  • Common symptoms include mid-scapular back pain, breast sensitivity, chest pains mimicking cardiac angina, and shoulder/ulnar nerve discomfort.
  • Treatments involve self massage techniques such as pressure application with fingers or a foam roller, professional therapy options like injections or neuromuscular therapy massage, stretching exercises to increase flexibility & strength. Plus prevention methods for future activation.

Understanding Pectoralis Trigger Points


Pectoralis-Trigger-Points

Trigger points are localized, hyperirritable spots in a taut band of skeletal muscle, and they can cause pain both locally and in a referred pattern. The pectoralis major and minor muscles are particularly known for their trigger points, which can refer pain to the chest region.

We will delve into the specifics of these muscles and their referred pain patterns next.

Pectoralis Major Muscle

The pectoralis major muscle, also known as the pectoralis muscle, is a large fan-shaped muscle located in the chest that can develop trigger points, causing breast and nipple hypersensitivity. It is responsible for the movement and stabilization of the shoulder joint and comprises two heads: the clavicular and sternal heads. The clavicular head lies underneath the collarbone, while the sternal head is situated at the bottom of the sternum, just above the ribcage.

Muscle overload, poor posture, or injury to any of the three portions of muscle fibers that make up the pectoralis major muscle may activate trigger points. Damage to the nerve of the pectoralis major can lead to disruption in its normal functioning. This can result in denervation, atrophy or fibrosis of a section of the muscle. The symptoms associated with pectoralis trigger points may be more intense than the actual severity, giving the sensation of cardiac pain or even a heart attack.

Pectoralis Minor Muscle

pectoralis-minor-trigger-points

The pectoralis minor muscle is a thin, triangular muscle situated at the upper part of the chest, beneath the pectoralis major muscle. It has the following features:

  • Origin: 3rd to 5th ribs near their costal cartilages
  • Insertion: Medial border and superior surface of the coracoid process of the scapula
  • Primary actions: Stabilization, depression, abduction or protraction, internal rotation
  • Function: Provides a passage for the vascular-nerve brachial system.

Referred Pain Patterns

Referred pain occurs when pain is felt in a different location than the actual source of the pain. In the case of pectoralis trigger points, pain referral may include:

  • the chest
  • anterior shoulder
  • medial arm, which can cause arm pain
  • inner elbow

These referred pain patterns can be confusingly similar to those of other conditions, such as cardiac pain or thoracic outlet syndrome, and can lead to misdiagnoses.

Before attributing chest pain to trigger points, verify there is no cardiac involvement.

Referred pain from pectoralis trigger points can also be associated with conditions such as mid-scapular back pain, breast pain, and pain radiating in the anterior shoulder and ulnar nerve path.

Understanding these referred patterns can help differentiate between pectoralis trigger points and other underlying conditions.

Identifying Pec Trigger Points

The pec major and minor muscles have unique trigger points that can be found using specific palpation techniques, which we will discuss in the following subsections.

Locating Pec Major Trigger Points

To identify trigger points in the pectoralis major muscle, begin by locating the sternal head of the muscle, situated at the bottom of the sternum, just above the ribcage. Use your fingers to trace up the muscle until you encounter a taut band, which may or may not produce a referral pattern to the shoulder or down the arm.

Locating Pec Minor Trigger Points

To find trigger points in the pectoralis minor muscle, start by identifying the clavicular head of the muscle, situated at the upper portion of the sternum, just under the collarbone. Again, move your fingers along the muscle until you detect a taut band, which may or may not produce a referral pattern to the shoulder or down the arm.

Potential Causes of Pectoral Trigger Points

Pectoralis trigger points can be activated or reactivated due to various factors such as:

  • Muscle overload or fatigue
  • Improper posture
  • Stress
  • Strenuous lifting
  • Exposure to cold air from air conditioning
  • Immobilization of the shoulder or arm in a cast or sling
  • Excessive training volume in sports like weight training, rowing, boxing, and push-ups

Being aware of these potential causes can help you take preventive measures to avoid recurring pectoralis trigger point re-activation.

Treating Pectoralis Trigger Points

Effective treatment of trigger points (along with an overall integrative approach to pain) can provide significant pain relief and improve overall quality of life.

In the following sections, we will discuss self-massage techniques, professional therapy options, and stretching exercises that can help treat these trigger points.

Self-Massage Techniques

To release pec-based trigger points, you can employ various self-massage techniques such as applying static pressure to the sensitive points with your fingers, using a foam roller, or utilizing a massage ball.

When applying static pressure, hold a light to moderate pressure for 30-60 seconds and release, repeating as needed 1-2 more times. An important note that applying excessively aggressive pressure is NOT needed for results.

Always start with small amounts, and increase as tolerance improves over time.

Professional Therapy Options

Based on the provided text, I have split it into two paragraphs for improved readability:

For more targeted treatment of shoulder pain, particularly front shoulder pain, professional therapy options such as trigger point injections, neuromuscular massage therapy, and muscle energy technique stretching can be explored. Additionally, working with a trained therapist can help you learn effective stretching exercises to enhance shoulder range of motion and strength.

Stretching Exercises

Incorporating regular stretching exercises can help alleviate pectoralis trigger point pain and prevent reactivation. The Pec Major Stretch and Doorway Stretch are two recommended exercises for treating pectoralis trigger points. The Pec Major Stretch involves standing in a doorway, placing your arms on either side, and leaning forward until a stretch is felt in the chest.

The Doorway Stretch also requires standing in a doorway and placing your arms on either side of the doorway, then leaning forward until a stretch is felt in the chest area. Consistently performing these stretches can help to increase flexibility, reduce muscle tension, and alleviate pectoralis trigger point pain.


Preventing Pectoralis Trigger Point Activation

Preventing the activation of pectoralis trigger points can save you from unnecessary pain and discomfort. To avoid pectoralis trigger point activation, consider implementing the following techniques:

  • Manual therapy
  • Myofascial release
  • Gentle stretching techniques
  • Refraining from activities that put strain on the pectoralis muscles

Keeping a good posture and adding regular stretching exercises to your routine can also ward off the development of pectoralis trigger points.

Pectoralis Trigger Points and Related Conditions

Pectoralis trigger points are not only a source of pain in the chest and shoulder area but can also be associated with other conditions such as Thoracic Outlet Syndrome and Carpal Tunnel Syndrome.

Thoracic Outlet Syndrome is a condition caused by the compression of nerves and blood vessels in the thoracic outlet, resulting in pain, numbness, and tingling in the neck, shoulder, and arm.

Carpal Tunnel Syndrome is characterized by compression of the median nerve in the wrist, resulting in pain, numbness, and tingling in the hand and fingers.

Recognizing the association between pectoralis trigger points and these related conditions can help identify the correct diagnosis and appropriate treatment. Collaborating with healthcare professionals to address both pectoralis trigger points and underlying conditions can improve overall well-being and quality of life.

Summary

In conclusion, understanding and effectively treating pectoralis trigger points can provide significant pain relief and improve overall quality of life.

By learning about the pectoralis major and minor muscles, identifying their trigger points, and employing self-massage techniques, professional therapy options, and stretching exercises, you can unlock pain relief and prevent the reactivation of these trigger points.

Remember to consult with a healthcare professional before initiating any treatment plan to ensure the most appropriate and effective approach for your specific needs.

What Does Psoas Release Feel Like? – What Most People Experience

The psoas muscle is the most powerful hip flexor muscle, and is essential to stability of the hips, pelvis, and spine. It is commonly found to be short and tight on testing (the Thomas Test), but not always.

Just because the muscle isn’t found to be tight on testing, doesn’t mean that it doesn’t FEEL tight.

I frequently have this type of discussion with my personal clients, and it is very often very enlightening for them to understand what a muscle release feels like.

What does a psoas release feel like?

We all know what it feels like to stretch a muscle.  For example the hamstrings, or the calves.  Its a fairly sharp, pin-point type of feeling at the end of the available range of motion that the muscle has.  As we stay in that position, it’s as almost the muscle starts to let go and give way a bit.

This is the same feeling you will feel when stretching your psoas.  The easiest position to feel this stretch is in the Thomas Test position.  As the upper thigh is allowed to hang, the psoas is put into a lengthened position. As gravity does the work, the upper thigh will descend as the muscle stretches and lets go.

This feeling is a bit different when hands-on techniques are used to release the psoas muscle.

In the following video, I demonstrate a massage technique technique for the psoas.

First of all, its not possible to make direct contact with the psoas without making contact with the tissues on top of it, so the pressure is super gentle, and whatever tissue/s are sensitive will be the target of the technique.  You certainly won’t feel a stretch in the muscle, or much tenderness like you would when working another muscle such as the TFL or quadricep.

At the tendon attachment of the psoas on the femur, there is much more of a chance of making contact with it.  The insertion point will be much more tender and often sharp.

When working that attachment (as well as many other areas), I usually only press to a 4/10 max intensity on the point.  This is confirmed by the client’s input on how sensitive it is.  This stimulation is sufficient to bring the person’s awareness to the muscle, but very comfortably.

At that point, I ask them to take a nice deep but comfortable breath in, hold it for a movement, then sigh and exhale fully to relax.

The psoas “release” occurs at this point.  What it will feel like is that I have lessened my pressure on that point, but I have not.  So, what happened?

My theory here is that the very low level of “threat” or guarding that occurred on pressing the tender spot was essentially discharged or diminished as a result of the deep breath followed by the exhalation.  It allows the nervous system to be reminded of safety.  The context of being in the therapist’s office, performing low-threat, comfortable techniques for the purpose of relief, helps make the release possible.

After the technique is repeated for a number of repetitions, re-testing is done to check for improvements.  This can be done by repeating the Thomas Test, testing the performance of the muscle, or simple standing and walking around to note any differences in the person’s experience.

That is how a psoas muscle release feels like!

How To Stretch Psoas While Sleeping – Is It Possible?

So you’ve been told that your psoas muscle is tight and it needs to be stretched.

Certainly this is easy enough to do with proper psoas stretching techniques during the daytime, but is it possible to do at night while sleeping?

Sure, but it may not be a good idea.  Let’s dive into this a bit more.

Is it possible to stretch the psoas while sleeping?

The psoas muscle is a hip flexor, so stretching it means placing it into its lengthened position, which is in extension.

The best example of this is the Thomas Test:

How To Stretch Psoas While Sleeping

As you can see the upper thigh needs to move into extension, which is moving in the direction behind you.  This is not the only thing you have to pay attention to.  The lower spine needs to be in a stable position, which is either a neutral curvature, OR flat on the table in order to allow for a full psoas muscle stretch.

Now, imagine yourself having to be in this type of position in bed.  Sure its possible to maintain this position while awake, but at night?

No way.  

And even if you figured out a way to rig this setup so that you could fall asleep in it, your leg would very likely fall asleep in that position.  It would be very uncomfortable.

What works better?

The better option is to sleep in a comfortable position which allows the greatest relief in order to get a good nights sleep, and address chronic psoas tension issues in the daytime!


6 Step Guide to Releasing a Tight Psoas Muscle

The psoas muscle (also known as the iliopsoas) plays an important role in spinal stabilization and hip flexion. However, chronic tightness in the psoas can lead to low back and hip pain. Releasing the psoas requires a comprehensive approach to address the muscle itself as well as contributing factors. 

In this guide, we will cover the key steps to releasing a tight psoas muscle:

  1. Assessing psoas and hip flexor tension
  2. Ruling out underlying issues  
  3. Stretching the psoas
  4. Psoas release massage techniques
  5. Releasing other hip flexors
  6. Activating glutes and hamstrings

Read on for details on each step. And be sure to check out our dedicated posts that dive deep into psoas tests, stretches, and release techniques.

Psoas Release - Iliopsoas

Key Takeaways:

  1. Properly assessing hip flexor tension is essential before assuming the psoas muscle is tight. The Thomas Test is commonly used to evaluate hip flexor length.
  2. Rule out underlying pathology, such as hip joint or lumbar spine issues, before focusing on psoas release techniques.
  3. Stretching the psoas involves reversing its action by side-bending the spine away from the side of the stretch.
  4. Neuromuscular techniques like reciprocal inhibition and post isometric relaxation can enhance the effectiveness of psoas release.
  5. Manual therapy, such as massage techniques, can help address chronic tightness in the psoas muscle.
  6. Additional hip flexor muscles, such as the rectus femoris and tensor fascia latae, should also be addressed to reduce overall hip flexor tension.
  7. Facilitating the opposite muscles, particularly the hip extensors, can help relax the tight hip flexors and improve range of motion.
  8. If all steps have been followed and tightness persists, consider seeking manual therapy or addressing other underlying issues that may be contributing to the tension, and be sure to include psoas strengthening exercises.

Step 1:  Assess True Psoas and Hip Flexor Tension

Everyday I see people that have been told their iliopsoas muscle is tight, and its causing all their problems. However, most of these people have never actually had their hip flexors assessed for tightness.

Just because someone looks like their pelvis has a bit of increased anterior pelvic tilt does not automatically mean the psoas major is tight.

The “feeling of tightness” or tension isn’t the same as actually having a positive hip flexor tension test. This is why it needs to be assessed properly, and additional psoas myths need to be eliminated.

Thomas Test

The Thomas Test is best way to measure hip flexor length and is commonly performed by physical therapists. It not only tests psoas muscle tension, but also the other hip flexors including the rectus femoris, sartorius, and even the tensor fascia latae (TFL).

Since the psoas connects the lumbar vertebrae to the thigh bone (lesser trochanter), it has an important stabilization function for the lumbar spine, but also acts as a hip flexor.

To perform the Thomas Test, sit at the edge of a massage table (or bed if you don’t have access to a table), and bring one knee toward your chest.

The goal here is to have enough hip flexion to get a slight posterior pelvic tilt so that your lower back is flat on the table.

The opposite leg is allowed to hang fully in order to assess the degree of hip flexion.

There are a few primary things we are looking for here:

  1. The thigh should rest at least parallel to the floor (optimally about 10 degrees below parallel indicating the psoas muscle has adequate length)
  2. There is no hip pain or knee pain in this position, only a feeling of a upper thigh area or psoas stretch (pain may indicate an underlying hip joint condition)
  3. From the front or top view, the upper thigh should not be excessively externally or internally rotated (this may indicate tightness in the TFL and/or psoas if combined with #1)
  4. The knee is bent near 90 degrees (if more than 90 degrees it indicates tightness of the rectus femoris, which is a quadricep muscle that is responsible for hip flexion)

Here is a video to walk you through this process:

Check out our complete visual guide to properly performing the Thomas Test.

If you find that you pass the above test, then you may be feeling tension/overactivity in your psoas muscle vs it actually being tight. Odds are likely you need on the other hip flexors in this case!

Step 2:  Rule Out Underlying Pathology

Before moving on to psoas release techniques or aggressively stretching the hip flexors with the intention of getting pain relief, its important to rule out any underlying causes for psoas muscle tension, especially in the presence of chronic pain or guarding.

Guarding and tension may simply be a way the nervous system is trying to protect things.

Hip joint pathology can be a source of hip pain, and the psoas major is a protector for this region. For example, the psoas muscle may reflexively spasm to guard a labral tear.

Potential Reasons For Psoas Major Tension

  • Hip joint pathology
  • Lumbar spine and/or SI Joint pathology
  • Muscular imbalance elsewhere in the body (resulting in compensation pattern)
  • Nerve entrapment or irritation

Learn all about the potential reasons for psoas tightness and when you should see a doctor.

Step 3:  Stretch The Psoas Muscle

A simple search online will turn up about a dozen different varieties of psoas stretch options. While some are creative and interesting, this muscle isn’t complicated to stretch.

To stretch any muscle, we determine which actions occur when it contracts, and simply reverse it. In the cases of the iliopsoas muscle, when the spine is in neutral, it produces hip flexion.

There are some conflicting views on the contribution of the psoas to rotation of the hip, but it is not that influential in this role. (not enough to spend time doing super duper specific little tweaks in order to get at every little fraction of the fibers anyway!)

We can, however have an influence on the degree of stretch by changing the position of the spine. By side-bending the spine AWAY from the side of the psoas stretch, we can add a little extra bonus to the lengthening of the psoas.

Here is a simple way to accomplish the psoas muscle stretch:

Neuromuscular Techniques For The Psoas Muscle

Beyond basic stretching, we can add what is referred to as neuromuscular release techniques to improve the outcome of our work.

These techniques work on simple principles of the central nervous system. The two techniques I use the most are reciprocal inhibition (RI) and post isometric relaxation (PIR).

Psoas Release Technique – Reciprocal Inhibition

Reciprocal inhibition (RI) technique involves contracting the muscles on the opposite side of the muscle that is lengthened/stretching. In this case, the muscles working on the opposite side of the iliopsoas are the glutes and hamstrings.

This technique is excellent for restoring mind-to-muscle connection in the opposing muscles, as well as improving coordination and strength at the new range of motion after a tight iliopsoas is released.

Psoas Release Technique – Post Isometric Relaxation

Post isometric relaxation (PIR) is a technique that involves a low-intensity contraction of a muscle for a short duration, immediately followed by a stretch.

When this technique is used for hip flexor stretching on a massage table, you can take advantage of gravity for the activation of the muscle (lifting up) and also assistance during the stretch phase.

Step 4:  Psoas Release Massage Techniques

Manual therapy techniques are often very helpful for stubborn psoas major chronic tightness issues. Trained massage therapists often offer these techniques, and they should be only be carried out by a careful professional.

While the majority of the psoas is generally inaccessible via direct palpation, it can be contacted at the lesser trochanter attachment point, and influenced through the superficial tissues in the abdomen, just to the side of the rectus abdominus.

Psoas Massage Technique

Learn more about how massage therapists can provide psoas pain relief.

Step 5:  Release Additional Hip Flexor Muscles

The psoas muscle (like ALL other muscles in the body) doesn’t work by itself. Other muscles work with it to perform functions. Hip flexion, which is what the psoas major is most known for, involves multiple muscles:

By addressing chronic tightness in these associated muscles, there will be a positive influence on the problematic tight psoas muscle. When one muscle is overworking relative to the rest of the group, it’s commonly referred to as “synergistic dominance”.

All of these muscles are in a relatively shortened position in the case of excess anterior pelvic tilt, so releasing muscles as a group makes more sense.

The good news is that these additional hip flexor muscles can be stretched and simple tools like a massage ball can be used to release hip flexor restrictions.

Kneeling Hip Flexor Stretch

The kneeling hip flexor stretch is my favorite go-to for addressing chronic tightness in the hip flexors, and to prepare the tissues to progress into the split squat.

The split squat is by far the best exercise to address muscular imbalance in the lower body.

Self-stretching of the hip flexor group can also be accomplished with this stretch.  Depending on the amount of bend of the knee, this stretch emphasizes much more of the quadricep muscle (Rectus Femoris) than the TFL, but it works very well for the overall goal in reducing hip flexor tension.

Foam Rolling Hip Flexors

While I’m not a huge fan of foam rolling (I prefer massage as its usually far more comfortable), rolling is cheap, effective, and can be done on a frequent basis.

This checks all the boxes for addressing the hip flexor muscles such as the TFL and sartorius.

These two muscles are easy to access, but just a light warning…they can be VERY sensitive!

Foam Rolling The TFL

Foam Rolling The Adductors + Sartorius

Get the complete guide to foam rolling techniques for hip flexor and TFL release.

Step 6:  Engage The Glutes And Hamstrings

If increased activity exists in the muscles that create increased anterior pelvic tilt, then the opposing muscles will contribute to posterior pelvic tilt.

These antagonistic muscles when targeted, will create a neurological “inhibition” effect on the hip flexors. A simple example of this would be doing a bicep curl. The tricep muscle must lengthen in order for the bicep to shorten.

The tricep does not “shut off”, but a different set of nervous system signals has to go to this muscle group in order to perform the activity.

The same type of relationship exists between the hip flexors and hip extensors.

By following psoas release techniques with movement techniques which emphasize the opposite muscles, we can encourage the nervous system to relax the tight muscles, but also train the new range of motion achieved.

Bottom line, this helps to get our work to “stick”.

Glute Bridge

This is an easy go-to exercise for the hip extensor muscle group. One of the main challenges of this exercise is learning how to maintain a posterior pelvic tilt as the hips are lifted, and to sense when to stop at the top.

In the video, I demonstrate how to do this, and in particular, how to reduce any discomfort often felt in the lower back. This is usually due to over-activity in the lower back muscles and extension in the lumbar vertebrae in some individuals that are sensitive to this.

Discover the best hip extensor exercises to relax tight hip flexors.

Step 7: When Psoas Tension Persists

If you’ve gotten to this point, and followed all of the above steps, and still have not been able to reduce the sense of tightness in your psoas and at least improved a bit on your hip extension range of motion, you may need to look elsewhere for the solution.

As mentioned at the top of this post, NO muscle group works alone. Our bodies are meant to compensate in a variety of ways for some times very complicated reasons. Chronic pain in particular can cause us to move in certain ways in an attempt to keep us safe.

The hip flexors in particular are very responsive to this need.

Manual therapy in particular may be needed to address chronic tightness in the psoas muscle. Massage therapy applied directly to the psoas major attachments at the lesser trochanter, along with the other hip flexors may help further relax the psoas muscle and get pain relief.

Why Hip Flexors Won’t Release

Check out my tips on what to do when hip flexors refuse to release.

In Conclusion

Releasing a chronically tight psoas requires patience and a holistic approach. Work through each of these steps – assessment, ruling out pathologies, stretching, massage, releasing surrounding muscles, and strengthening the area. Dramatic change doesn’t happen overnight, but you should notice gradual improvement in mobility and reduction in muscle tension.

For more in-depth information on psoas release, check out the links within each section. And as always, comment below with any psoas or hip flexor questions!e muscles.

Foam Rolling: A Beginner’s Guide

Foam rolling is a self-massage technique that utilizes a foam cylinder to release muscle tightness and tension. It has become a popular way for beginners to improve flexibility, relieve soreness, and support overall well-being.

Specifically for beginners, foam rolling can enhance flexibility, reduce post-workout muscle soreness, and provide relaxation. This guide will provide foam rolling basics, from proper technique to creating a starter routine.

Whether you’re new to fitness or just looking to enhance your workouts, foam rolling offers numerous benefits. The targeted pressure can increase blood flow, improve range of motion, and help prevent injury. When performed correctly, almost anyone can incorporate foam rolling into their fitness journey.

By starting with basic exercises and foam rolling best practices, beginners can ease into this beneficial activity safely. Follow along for step-by-step instructions on the best foam rolling exercises for beginners.

Also be sure to check out our previous post, Foam Rolling 101 for additional info.

Foam-Rolling-A-Beginners-Guide

Why Start Foam Rolling?

Foam rolling provides both physical and mental rewards on the path towards better health. Here are some of the top reasons to add it to your routine:

  • Reduces muscle tightness from poor posture or strain
  • Restores mobility by loosening tense areas
  • Prepares muscles for workout by increasing joint range of motion and improving blood flow
  • Soothes soreness and speeds recovery after exercise
  • Improves circulation through gentle tissue massage
  • Potentially reduces risk of injury by enhancing flexibility
  • Offers pain relief through low-threat novel stimulation
  • Provides stress relief and relaxation

The unique pressure from foam rolling can yield improvements unachievable through stretching alone. Dedicate just 10-15 minutes 1-3 times per week to feel the benefits.

Choosing the Right Foam Roller

With different sizes, textures and densities available, selecting the ideal foam roller ensures safety and effectiveness. Here are key factors for beginners to consider:

  • Size: Standard rollers are 12-18 inches long. Mini rollers are more portable while 36-inch rollers allow you to lie on top.
  • Density: Opt for medium soft density. Very soft rollers offer insufficient pressure while hard ones are overly intense.
  • Texture: Smooth rollers without ridges are suitable for beginners.

Try an in-store test roll to assess comfort and pressure before purchasing. It should provide gentle-but-firm support.

Step-by-Step Rolling Exercises

Follow these illustrated guides to roll out your upper body, core and lower body like a pro:

Upper Body

Shoulders: Sit with roller under upper back. Extend arms straight out to sides. Slowly roll back and forth from low shoulder blade to upper shoulder.

Arms: Sit with one arm extended, palm down. Place roller under forearm. Roll from elbow to wrist. Repeat on other arm.

Upper back: Lie back with roller under mid-upper back. Cross arms in front. Raise hips and slowly roll up to armpits and down.

Core

Lower back: Sit with roller under curve of low back. Cross ankles. Place hands behind knees. Tilt pelvis back and roll up to mid-back.

Abs: Lie back with roller under abdomen above naval. Place hands behind head. Contract abs and slowly roll roller side to side.

Lower Body

Glutes: Sit on roller, placing one glute cheek on roller. Cross ankle over opposite knee. Roll from hip to mid-glute. Repeat on other side.

Quads: Lie facedown with roller under thigh of one leg. Support weight on forearms. Roll from hip to above knee. Repeat with other leg.

Calves: Sit with one leg extended, placing roller under mid-calf. Support weight with hands behind you. Roll up and down calf, repeating on other side.

Common Mistakes to Avoid

As a foam rolling beginner, it’s normal to make some errors. Watch out for these common missteps:

  • Rolling too fast or aggressively before you’re warmed up
  • Allowing the roller to roll away uncontrolled rather than moving slowly
  • Focusing solely on problem areas, rather than entire muscles
  • Progressing too quickly rather than gradually increasing pressure
  • Rolling joints or spine rather than surrounding muscles
  • Pushing through sharp pain rather than easing up pressure

Remember to start slow and focus on proper form. It may feel awkward at first, but your technique and body awareness will improve with practice.

Developing an Effective Routine

To fully reap the rewards, foam rolling should be done consistently. Here are tips for creating a sustainable routine:

  • Schedule sessions right before stretching or after workouts when muscles are warm.
  • Target 1-3 muscle groups per session, spending at least 90 seconds rolling each area.
  • Gradually increase pressure and duration, while reducing frequency to 2-3 times per week to avoid overuse.
  • Pair foam rolling with stretching, massage, or physical therapy for compounding benefits.
  • Listen to your body and adjust your routine as needed allowing for rest days.
  • Use a foam rolling journal or app to track progress over time.

Consistency and patience are key. Stick with it to make foam rolling a habit.

Conclusion

For beginners, foam rolling can provide numerous benefits like enhanced flexibility, relief from muscle soreness, and overall improved muscle health. When starting a foam rolling routine, opt for a soft, smooth roller and focus on proper technique. Incorporate it consistently to reap the rewards of this beneficial activity.

Foam Rolling 101: Your All-in-One Guide to Pain Relief and Flexibility

Foam rolling, also known as self-myofascial release, has become an increasingly popular practice among athletes, fitness enthusiasts, and physical therapy patients. But what exactly does foam rolling do to your body? How does it provide its purported benefits?

In this comprehensive guide, we will explore the origins and evolution of foam rolling, the science behind how it works, proper techniques to utilize it, and the evidence-based benefits it can provide.

First developed by physical therapists to help patients, foam rolling has now become a mainstream recovery and mobility practice. But the techniques and expected benefits have developed in parallel with the research. Many assume foam rolling “breaks up adhesions” or “releases tight muscles,” but the mechanical effects may not be that straightforward.

By evaluating the research on foam rolling’s effects on range of motion, pain sensitivity, and more, we can categorize its impacts into mechanical, physiological, neurological, and psychobiological effects. We will break down what the science says about each of these categories to explain how foam rolling influences the body and mind.

With a research-backed understanding of how foam rolling works, individuals can utilize it in their training and recovery more effectively. Our guide will cover proper foam rolling techniques for both beginning and advanced fitness enthusiasts. We’ll also provide specific recommendations for athletes, rehabilitation patients, seniors, and other groups looking to experience its benefits.

History of Foam Rolling

Once a practice reserved for physical therapists and professional athletes, foam rolling has become accessible to all. Discover the history and evolution of this remarkable tool.

  • Foam rolling has its roots in myofascial release techniques used by physical therapists to treat patients.
  • Dr. Moshe Feldenkrais, an Israeli physicist, was the first to use a foam roller for self-massage in the 1970s.
  • Foam rolling was popularized by his students and eventually adopted by therapists, trainers, and athletes.
  • Variations like vibrating foam rollers, rumble rollers, and massage sticks emerged as foam rolling gained popularity.
  • Foam rollers are now a mainstream recovery tool found in gyms and homes worldwide.

Who Can Benefit

Foam rolling has become a mainstream practice utilized by everyone from elite athletes to recreational fitness enthusiasts. However, due to limited and sometimes contradictory scientific research, it’s unclear exactly who can realistically benefit from foam rolling techniques.

Based on the current research, here is a breakdown of who may benefit from foam rolling:

  • Elite athletes: Studies show foam rolling may provide minor performance benefits for elite athletes who are training at very high volumes. However, the effects tend to be short-lived.
  • Recreational athletes: For most regular gym-goers and casual fitness enthusiasts, the benefits of foam rolling are less clear. More research is needed to determine if foam rolling provides any advantages over proper warm-ups and cooldowns for flexibility.
  • Patients in physical therapy: Under the guidance of a physical therapist, foam rolling may help relieve muscle tension and discomfort after injuries or surgery. However, patients with acute inflammation should avoid foam rolling painful areas.
  • Chronic pain patients: Some research indicates foam rolling can temporarily reduce feelings of muscle pain and soreness. However, more studies are needed to determine if it provides lasting pain relief.
  • Fitness class participants: Many yoga, Pilates, and group fitness classes have incorporated foam rolling. While participants may enjoy the practice, there’s no evidence it provides added benefit over traditional mobility warm-ups.

More research is still needed to clarify exactly who can realistically expect to benefit from foam rolling. Many individuals continue to use foam rollers because they subjectively feel better after use. However, the science is still unclear regarding any evidence-based advantages for most mainstream fitness and rehab applications.

Different Types of Foam Rollers

Foam rollers come in various shapes, sizes, and textures. From smooth to ridged, soft to firm, there’s a foam roller for every need. Learn more about the different types of foam rollers and find the one that’s right for you. Explore our product reviews for top recommendations.

  • Smooth foam rollers: Basic foam rollers with a uniform surface. Beginners may prefer a smoother, softer density.
  • Textured foam rollers: Designed with ridges, nobs, or grooves for increased pressure on tissues.
  • Vibrating foam rollers: Feature internal components to provide vibration while rolling. However, claims of increased blood flow and massage benefits are unproven.
  • Rumble rollers: Made from hard rubber with protruding balls to mimic massage pressure points. For advanced self-massage.
  • Foam rolling sticks: Resemble rolling pins to target smaller areas like the calves, arms, and back.
  • Balls: Tennis, lacrosse or other balls can provide focused pressure. Cheap DIY option.

Foam Rolling Techniques

Whether you’re a beginner or a seasoned pro, our guide to foam rolling techniques has something for everyone. Discover basic and advanced techniques to enhance your recovery and performance.

Basic Rolling Techniques

  • Slowly roll over muscles using body weight pressure for 20-40 seconds per area. Avoid bones and joints.
  • Focus on large muscle groups like quads, hamstrings, calves, glutes, lats, and upper back.
  • Adjust pressure and speed as needed. Discomfort is normal but pain indicates you should lighten up.
  • Roll before exercise as part of warm up routine to enhance range of motion.
  • Roll after exercise during cool downs to help reduce muscle soreness.

Advanced Rolling Techniques

  • Flossing – Keep foam roller stationary while moving the targeted body part back and forth.
  • Vary cadence – Increase pressure by pausing for 1-2 seconds over tender areas.
  • Layering – Stack limbs on top of each other to increase pressure on muscles.
  • Supported positions – Use wall or bench to allow gravity to increase pressure.
  • Review our video tutorials for step-by-step guidance on basic and advanced foam rolling techniques.

Benefits of Foam Rolling

  • Improved flexibility: Research shows foam rolling improves range of motion in joints, though effects dissipate within 10-15 minutes. Regular use enhances overall flexibility.
  • Reduced muscle soreness: Foam rolling following exercise appears to help decrease delayed onset muscle soreness by increasing blood flow to tissues.
  • Enhanced circulation: The pressure and motion increases blood flow to muscles and soft tissue allowing better oxygen circulation.
  • Better range of motion: Foam rolling can reduce muscle tightness allowing for freer movement.
  • Pain relief: The pressure stimulates the nervous system providing temporary pain relief in overused and sore muscles.

Foam Rolling for Specific Audiences

Foam rolling isn’t just for athletes. Whether you’re into yoga, weightlifting, or recovering from an injury, foam rolling can be tailored to your needs.

  • Runners: Focus on foam rolling the IT band, hamstrings, quads, and calves which take a pounding during runs.
  • Weightlifters: Target the lats, chest, upper back, glutes and thighs between heavy lifting sets.
  • Yogis: Use foam rolling to open hips, inner thighs, and shoulders before stretching for greater mobility.
  • Rehab patients: Work with a physical therapist to use foam rolling to aid in recovery from injuries, strains or surgery.
  • Seniors: Gentle foam rolling can help improve circulation and flexibility allowing for greater mobility.

Equipment and Accessories

From choosing the right foam roller to discovering handy accessories, our equipment guide has you covered.

Foam Rollers

Foam rollers come in a variety of densities, sizes, and textures to suit different needs. Consider these factors when selecting a roller:

  • Density: Firmer rollers provide more intense pressure. Softer ones are more gentle. Choose based on your sensitivity and experience level.
  • Size: Standard rollers are 6 x 12-18 inches. Longer 36 inch rollers allow you to lie on top. Shorter rollers are more portable.
  • Shape: Half-round and full-round shapes are available. Some have ridges or bumps for targeted massage.
  • Material: More expensive EPP/EVA foam is durable and long-lasting. Cheaper styles may deteriorate faster.

Other Equipment

  • Rolling sticks: Target smaller areas like forearms, legs, and upper back. Easier to transport than rollers.
  • Lacrosse balls: Place on knots or trigger points for focused, intense pressure. An affordable DIY option.
  • Yoga blocks: Use underneath elbows, knees, or back for support and stability during foam rolling.
  • Mats: Provide cushioning and prevent slipping. Helpful for beginners.

Consider starting with an inexpensive, medium-density foam roller to determine your preferences before investing in more advanced equipment. Review our top product recommendations.

Conclusion

While the research is still emerging, many individuals report subjective benefits from foam rolling. It can be a useful tool as part of a warm-up or cool-down routine, with guidance from a therapist or trainer. However, the science is unclear about lasting performance and recovery advantages for most. Focus on proper technique and avoid excessive pressure.

TFL And IT Band Release – 4 Top Techniques

The tensor fascia lata (TFL) is a muscle located on the front of the hip and merges into the iliotibial band (IT band). It is often associated with a variety of movement pattern imbalances and pain in the lower back, pelvis, hips, and knees.

This muscle should be addressed in all of the above issues.

Key Takeaways

  • The TFL (tensor fascia lata) muscle, which merges into the iliotibial band (IT band), is often associated with pain and movement imbalances in the lower back, pelvis, hips, and knees.
  • To release the TFL muscle, you can use hands-on massage techniques, self-massage techniques like foam rolling, or neuromuscular techniques such as muscle energy.
  • Tightness in the TFL muscle can be caused by compensatory patterns and excessive anterior pelvic tilt. Strengthening opposing muscles and addressing muscle imbalances are essential for fixing overactive TFL.
  • TFL pain can be sharp or a dull ache and may contribute to sacroiliac and lower back pain.
  • Assessing TFL tightness can be done through tests like the Ober Test and Thomas Test, which reveal reduced hip range of motion.
  • Foam rolling can help address the muscle beneath the IT band, but the IT band itself cannot be released or stretched. It’s important to incorporate a comprehensive approach that includes exercises, stretches, and other techniques to effectively manage TFL and IT band pain.
Tensor Fascia Lata

How to know if you need to address the TFL and IT Band:

Most Common IT Band And TFL Questions

How do you release the TFL muscle?

The tensor fascia lata can be released with hands-on massage techniques, self massage techniques (SMFR) such as foam rolling, or with neuromuscular techniques such as muscle energy technique.  In this blog you’ll find demonstration videos for all these options.

What causes tight TFL?

The TFL is a very common compensatory muscle.  Its often over-active as an internal hip rotator, especially when the pelvis is positioned in excessive anterior pelvic tilt.  When the opposing muscles are weak, this muscle will become dominant and become facilitated.  Therefore, a TFL muscle stretch may be warranted.

What does TFL pain feel like?

Pain in the TFL can either be sharp (usually during single leg standing or when lifting your leg in front of you), or a dull ache when walking up or down stairs.  If the muscle is short and tight, it can also be a contributor to sacroiliac and/or lower back region pain.

How do you fix overactive TFL?

Reducing the effect of an overactive tensor fascia lata involves two parts:

  1. Reducing excess muscle tone with TFL release techniques (described later in this article)
  2. Increasing activity in the muscles that both oppose and synergistically work with the TFL.

While release techniques can provide relatively rapid results including pain relief, exercise work should be the primary focus over the long term. TFL muscles can be effectively stretched as part of a full range of motion exercise strategy as well.

How do you check TFL tightness?

The Ober Test and Thomas Test both reveal reduced range of motion in the hips that is related to TFL and IT band tightness.

Why does the IT band get tight?

Since the IT band is not a contractile tissue, it does not become tight, and thus there is no true IT band release techniques.  There are, however, muscles that attach to the band, including the tensor fascia lata (TFL) and the gluteals.  In addition, the band lays over a commonly tight muscle, which is the vastus lateralis (a quadricep muscle), which is usually the source of the tenderness which is often felt during IT band massage therapy or foam rolling.

Should you foam roll your IT band?

Foam rolling is a version of IT band self massage, and can be helpful for addressing the muscle that lies beneath the IT band, which is the vastus lateralis.  It’s important to understand that releasing the IT band itself is not possible.

TFL Trigger Points

TFL trigger points are routinely found, and can often refer sensation down the lateral aspect of the thigh.  This referred sensation location can be familiar to those dealing with pain in this area.

They are often quite tender, and light to moderate pressure is usually all that is necessary to diminish sensitivity.  Tensor fascia lata trigger points in my experience are very important to address in cases of hip and knee pain that doesn’t seem to be improving just by focusing on basic rehabilitation practices.

TFL Trigger Point Location

Top Tips For Dealing With TFL + IT Band Pain

  • Avoid crossing legs
  • Strengthen all glute muscles to opposite TFL
  • Professional or self-massage techniques to reduce TFL over-activity
  • Re-training exercises to balance hip musculature and reduce TFL dominance

Seated TFL Massage Technique

Addressing the tensor fascia lata muscle in the seated position is an easy way to locate the muscle and get enough leverage to work it.

In this position, the TFL is shortened, which means its not an ideal position to attempt to stretch it, but regardless, it can reduce tissue strain and also allow you to self-treat without too much difficulty.

Word on caution here:  Be nice to your thumbs!

TFL and IT Band Massage

With IT band massage, we are really addressing the lateral quadricep, called the vastus lateralis, which lies under the iliotibial band.

Since the TFL merges into the IT band superiorly, we should address that too in the same massage session.

In the video below, I’ll show you step-by-step how to massage the IT band along with the tensor fascia latae and vastus lateralis.

TFL and IT Band Theracane Self-Massage

The Theracane is a great tool for self-treating the TFL in the standing position.  The key is proper placement of the tool, as well as shifting your bodyweight to the other leg.

Foam Rolling The TFL And IT Band

Foam rolling the IT band is a great general technique to address the outside quadricep muscle, the IT band, as well as a small portion of the TFL muscle.

Because of where the TFL is located, along with the size of the roller, you won’t be able to sufficiently access most of the muscle.  You will need to use a lacrosse ball or select another technique or position to adequately address tensor fasciae latae pain.

After foam rolling, I would recommend a tensor fascia lata stretch for further improve the effectiveness of the work.

Tensor fascia lata stretches are essentially the same as some psoas stretch techniques, which some subtle differences found HERE.  TFL stretch work alone won’t provide the best results, so be sure to add in the other techniques in this post for maximum benefit.

Lastly, I’m frequently asked about the best IT band massager, and while there are some interesting tools available, you can’t go wrong with a simple foam roller or a massage gun tool.

FAQ

How do you release the TFL muscle?

You can release the TFL muscle through hands-on massage techniques, self-massage techniques such as foam rolling, or neuromuscular techniques like muscle energy. Demonstration videos for these options can be found in the blog.

What causes tight TFL?

The TFL muscle can become tight due to compensatory patterns and excessive anterior pelvic tilt. When the opposing muscles are weak, the TFL muscle becomes overactive and facilitated, leading to tightness.

What does TFL pain feel like?

TFL pain can manifest as sharp pain during activities like single-leg standing or lifting the leg, or as a dull ache when walking up or down stairs. Short and tight TFL muscles can also contribute to sacroiliac and lower back pain.

How do you fix overactive TFL?

Reducing the overactivity of the TFL involves two steps: reducing excess muscle tone through TFL release techniques and increasing activity in the opposing and synergistic muscles. While release techniques provide rapid results, long-term focus should be on exercises that stretch and strengthen the TFL and surrounding muscles.

How do you check TFL tightness?

The Ober Test and Thomas Test can reveal reduced hip range of motion associated with TFL and IT band tightness. These tests can help determine if TFL tightness needs to be addressed.

Should you foam roll your IT band?

Foam rolling the IT band can be helpful for addressing the muscle that lies beneath it, such as the vastus lateralis. However, it’s important to note that the IT band itself cannot be released or stretched. Foam rolling can be part of a comprehensive approach to addressing TFL and IT band pain, along with other techniques described in the article.