Psoas stretching is a key component of maintaining overall well-being, but it doesn’t have to stop there. In this blog post, we will explore how combining psoas stretching with other related techniques can further improve posture, prevent back pain, and increase flexibility for a healthier, more active life. By incorporating these additional techniques, you can optimize your stretching routine and experience even greater benefits.
Psoas Stretching and Core Strengthening
A strong core is essential for good posture, balance, and injury prevention. Combining psoas stretching with core-strengthening exercises can help you achieve a more balanced and efficient body.
A very common problem that I see is ONLY focusing on stretching the psoas muscle. While quick and lasting improvements can be made with stretching, what is most overlooked is the fact that strengthening everything else around the psoas helps to create lasting results. Remember no muscle works by itself!
Key Core Strengthening Exercises
Traditional Plank
Opposite Arm + Leg Raise (Bird Dog)
Supported Lower Abdominal Exercise
Benefits of Combining Psoas Stretching and Core Strengthening
Improved posture and spinal alignment
Enhanced balance and stability
Reduced risk of injuries, especially in the lower back
Psoas Stretching and Hip Mobility Exercises
Hip mobility is crucial for overall flexibility, athletic performance, and daily activities. By incorporating hip mobility exercises into your psoas stretching routine, you can further enhance your range of motion and reduce the risk of injury.
Key Hip Mobility Exercises
90-90 Hip Stretch
Fire Hydrants
Leg Swings
Benefits of Combining Psoas Stretching and Hip Mobility Exercises
Increased range of motion in the hips
Improved functional movement and athletic performance
Reduced risk of hip-related injuries
Psoas Stretching and Lower Back Stretches
Lower back pain is a common issue that can be alleviated with proper stretching techniques. Combining psoas stretching with targeted lower back stretches (and massage techniques) can help address the root causes of discomfort and prevent future issues.
Key Lower Back Stretches
Cat Cow
Child’s Pose
Knees To Chest Stretch
Benefits of Combining Psoas Stretching and Lower Back Stretches
Alleviated lower back pain and discomfort
Improved spinal alignment and flexibility
Reduced risk of developing chronic back issues
Psoas Stretching and Foam Rolling
Foam rolling is a self-myofascial psoas release technique that can help alleviate muscle tightness, improve flexibility, and speed up recovery. Incorporating foam rolling into your psoas stretching routine can enhance the effectiveness of your stretches and provide additional relief.
Key Foam Rolling Techniques for Psoas
Foam Roll Hip Flexors/Quads
Iliotibial (IT) band release
Benefits of Combining Psoas Stretching and Foam Rolling
Reduced muscle tightness and tension
Enhanced effectiveness of stretches
Accelerated recovery and reduced risk of injury
Conclusion
By combining psoas stretching with related techniques, such as core strengthening, hip mobility exercises, lower back stretches, and foam rolling, you can create a comprehensive routine that addresses multiple aspects of flexibility, posture, and overall well-being. Incorporating these additional techniques can help you maximize the benefits of your stretching routine and lead to a healthier, more active, and pain-free life.
Foot pain and tension are common issues experienced by many individuals due to factors like long hours of standing, walking, or exercising. While self massaging pressure points would be a great way to address, this, it requires effort and hand endurance. Fortunately, there are a variety of massage equipment options available to help alleviate discomfort and promote relaxation. This article will discuss top massage tools for relieving foot pain and tension, focusing on evidence-based approaches.
Handheld Massage Tools
Handheld tools are perfect for targeting specific areas of the foot that need attention, providing precise pressure and control. Some popular handheld tools include:
Massage balls
Lacrosse balls: Firm and versatile, lacrosse balls can be used to apply pressure to tight spots in the feet, helping to release tension.
Spiky massage balls: With a textured surface, spiky massage balls can stimulate the muscles in the feet and improve blood flow.
Foot rollers
Wooden foot rollers: Featuring a ridged design, wooden rollers can provide a deep, kneading massage to the arches of your feet.
Textured foot rollers: Rollers with various textures can offer different levels of intensity and sensations during your massage.
Massage sticks
Massage sticks can help work out knots and tight spots in the feet by applying targeted pressure to specific areas.
Electric Massage Devices
Electric massage devices offer a more automated approach to foot pain relief and relaxation. Some popular options include:
Shiatsu foot massagers
These devices use rotating nodes to mimic the pressure and kneading techniques of a shiatsu massage, providing deep relief to tired and sore feet.
Vibrating foot massagers
Vibrating foot massagers use gentle vibrations to stimulate the muscles and nerves in the feet, helping to relax and soothe them.
Heated foot massagers
Heated foot massagers combine warmth with massage techniques to further enhance relaxation and promote better blood circulation in the feet.
Nekteck Foot Massager
Acupressure and Reflexology Tools
While the focus of this article is on evidence-based approaches, it’s worth mentioning acupressure and reflexology tools as supplementary options for relieving foot pain and tension:
Acupressure mats
These mats feature plastic spikes that can stimulate pressure points on the feet, providing a gentle massage and promoting relaxation.
Reflexology socks
Reflexology socks can guide users in applying pressure to specific points on the feet, which may help to relieve tension and stress.
Compression and Support Tools
In addition to massage tools, compression and support tools can complement massage equipment for foot pressure points, providing additional relief and support:
Compression socks
Compression socks can help improve circulation, reduce swelling, and provide support for tired feet, making them an excellent addition to your foot care routine.
Arch support inserts
Arch support inserts (orthotics) can alleviate pressure on the feet, especially for those with plantar fasciitis or flat feet, and help to distribute weight more evenly.
Plantar fasciitis night splints
Night splints can help to stretch the plantar fascia during sleep, reducing pain and stiffness in the morning.
Choosing the Right Massage Tool for Your Needs
When selecting a massage tool, consider the following factors:
Assess your foot pain and tension to determine which tool might be most effective.
Consider your personal preferences and budget constraints.
Consult with a healthcare professional for guidance on the most appropriate tools for your specific needs.
Conclusion
Using massage tools for relieving foot pain and tension can have a significant impact on your overall well-being. By exploring and incorporating different types of massage equipment into your self-care routine, you can find the most effective solution for addressing your foot pain and promoting relaxation.
Psoas stretching is a crucial aspect of maintaining flexibility, preventing injury, and improving overall well-being. In this blog post, we will explore the benefits and techniques of psoas stretching tailored to athletes, seniors, office workers, and pregnant women. By understanding the unique needs of each group, you can maximize the positive effects of psoas stretching on your body and structure. Also be sure to check out psoas myths about stretching before starting off!
[lwptoc]
Psoas Stretching for Athletes
Athletes, especially those involved in running, jumping, or kicking sports, are prone to tight hip flexors, which can lead to imbalances and injuries. Psoas stretching can help maintain hip flexibility, prevent strains, and improve overall athletic performance. Its also important for athletes to combine stretching with additional psoas release techniques.
Benefits for Athletes:
Improved hip flexibility and mobility
Reduced risk of injury
Enhanced running and jumping efficiency
Key Techniques:
Kneeling Hip Flexor Stretch
Supine Psoas Stretch Off Edge Of Table
Psoas Stretching for Seniors
As we age, maintaining flexibility becomes increasingly important to prevent falls and maintain mobility. Psoas stretching can help seniors improve their balance, reduce stiffness, and maintain an active lifestyle.
Benefits for Seniors:
Increased balance and stability
Reduced stiffness and discomfort
Enhanced quality of life
Key Techniques:
Supine Psoas Stretch
Supine Psoas + Hamstring Stretch With A Strap
Psoas Stretching for Office Workers
Sedentary jobs can lead to tight hip flexors and poor posture, causing discomfort and even chronic pain. Psoas stretching can alleviate tension, improve posture, and reduce the risk of developing musculoskeletal issues.
Benefits for Office Workers:
Improved posture and alignment
Reduced lower back pain
Increased focus and productivity
Standing Psoas Stretch
Seated Hip Flexor Stretch
Lunge With Spinal Twist
Psoas Stretching During Pregnancy
Pregnancy can cause additional strain on the psoas muscle, contributing to lower back pain and discomfort. Gentle psoas stretching and other techniques can help ease tension, improve posture, and provide relief during pregnancy. Always consult your healthcare provider before starting any new exercise routine during pregnancy.
Benefits for Pregnant Women:
Alleviated lower back and hip pain
Improved posture and alignment
Enhanced comfort and well-being during pregnancy
Cat-Cow Pose
Supine Butterfly Stretch
Sideling Psoas Stretch
Conclusion
Psoas stretching is a versatile and essential practice for individuals from various walks of life. By tailoring the techniques to the unique needs of athletes, seniors, office workers, and pregnant women, you can optimize the benefits of psoas stretching, leading to a healthier, more flexible, and pain-free life. Remember to consult a healthcare professional or certified trainer before starting any new exercise routine, especially if you have pre-existing conditions or concerns.
Foot pain can be debilitating, and one of the leading causes of foot discomfort is the presence of trigger points in your feet. These tender spots can cause localized pain and discomfort that may radiate to other parts of the body.
In this article, we will explore various self-massage techniques to address these trigger points and provide relief. We will also discuss the role of foot massage trigger points charts in helping you locate and treat these points effectively.
Understanding Trigger Points
What are Trigger Points?
Trigger points are small, tight knots in muscle fibers that can cause pain and discomfort. They often form as a result of overuse, injury, or muscle imbalances. When left untreated, trigger points can lead to chronic pain and reduced mobility.
Differences Between Trigger Points and Pressure Points
While both trigger points and pressure points are sensitive areas on the body, they have different origins and functions. Pressure points in feet are specific locations that allegedly correspond to certain organs and systems when stimulated. Trigger points, on the other hand, are localized muscle knots that cause pain and discomfort often in other areas from where they are being pressed. A pressure point does not refer sensations elsewhere.
Common Trigger Points in the Feet
There are several trigger points in your feet that can contribute to foot pain and discomfort. Some common trigger point areas in the foot muscles include:
The bottom surface of the foot, including the plantar fascia
The achilles tendon
The muscles that control the ankle and foot, including the flexor digitorum brevis, the flexor digitorum longus, tibealis anterior/posterior, peroneals, and others.
Foot massage trigger points charts can be an invaluable resource for locating and treating trigger points in your feet. These charts are often used in massage therapy and provide a visual representation of the different trigger points in the foot, making it easier for you to identify and target specific areas.
There are a number of foot muscles that contain trigger points, including the calf muscles (gastrocnemius muscle and soleus) as well as many general areas that can contain a sensitive spot worth working on.
Recognizing Signs of Active Trigger Points
Active trigger points are those that cause pain when pressure is applied. You can identify these hot spots by gently pressing on various areas of your foot and noting any discomfort or pain.
It’s important to listen to your body and pay attention to any pain signals, as this can help you pinpoint the exact location of the trigger points.
Assessing Your Individual Needs
Since everyone’s feet are different, it’s essential to assess your individual needs when it comes to addressing trigger points in your feet. Factors such as your activity level, footwear, and any underlying medical conditions can all contribute to the development of trigger points.
By taking these factors into consideration, you can tailor your self-massage routine to effectively address your specific needs and treat your own trigger points.
Essential Self-Massage Techniques for Trigger Points
Static Pressure Technique
The static pressure technique involves applying sustained pressure directly to the trigger point for a period of time. This can help relax the muscle fibers and release tension. To perform this technique, use your thumb or a massage tool to press firmly on the trigger point for 30-60 seconds.
Stripping Technique
The stripping technique involves applying pressure along the length of a muscle or muscle group, helping to release tension and improve circulation. Using your thumb or a massage tool, apply firm pressure and move along the muscle fibers in a slow, controlled motion.
Pin and Stretch Technique
The pin and stretch technique involves applying pressure to a trigger point while simultaneously stretching the affected muscle. This can help release tension and improve flexibility.
To perform this technique, press firmly on the trigger point while gently stretching the foot or toes.
Cross-Fiber Friction Technique
Cross-fiber friction is a massage technique that involves applying pressure perpendicular to the muscle fibers. This can help break up adhesions and promote healing in the affected area.
Using your thumb or a massage tool, apply firm pressure and move back and forth across the muscle fibers.
Using Tools and Props for Self-Massage
Incorporating massage equipment, tools and props into your self-massage routine can enhance the effectiveness of your trigger point treatment. Some popular tools for addressing trigger points in your feet include:
Massage Balls
Massage balls are small, firm balls that can be used to apply targeted pressure for trigger point therapy. They come in various sizes and materials, such as rubber or foam. To use a massage ball, place it under the affected area of your foot and apply pressure by rolling the ball back and forth.
Foam Rollers
Foam rollers are cylindrical props that can be used to massage larger muscle groups and release tension. They are available in various sizes and densities, allowing you to choose the right one for your needs.
To use a foam roller for your feet, place the roller on the ground and roll your foot back and forth over it, applying pressure to the trigger points.
Handheld Massage Tools
Handheld massage tools, such as massage sticks or trigger point therapy tools, can help you apply precise pressure to trigger points in your feet. These tools come in various shapes and sizes, allowing you to choose the one that best suits your needs.
To use a handheld massage tool, apply firm pressure to the trigger point using the tool’s tip or edge.
Tips for Effectively Using Tools for Trigger Point Massage
Start with light pressure and gradually increase it as your muscles relax and the trigger points release.
Spend time on each trigger point, holding the pressure for at least 30-60 seconds before moving on to the next one. Give it enough time to relax and relieve the tension.
Use slow, controlled movements when rolling or moving the massage tool across the muscle fibers.
Remember to breathe deeply and relax your body while performing self-massage.
Integrating Self-Massage into Your Routine
Establishing a Consistent Self-Massage Schedule
Incorporating DIY foot massage into your daily routine can help you maintain healthy feet and prevent the development of trigger points. Aim to perform your self-massage trigger point therapy for at least 10-15 minutes each day, focusing on any areas of discomfort or tension.
Combining Self-Massage with Other Foot Care Practices
In addition to self-massage, it’s essential to practice proper foot care to maintain overall foot health. This includes wearing supportive footwear, stretching and strengthening your foot muscles, and addressing any underlying medical conditions that may contribute to foot pain.
Monitoring Progress and Adjusting Techniques as Needed
As you continue your self-massage routine, keep track of your progress and make adjustments to your techniques as needed. If you find that certain trigger points are not improving, consider seeking professional help from a massage therapist or physical therapist.
Conclusion
Understanding and addressing the trigger points in your feet can be a very powerful way to maintain healthy feet and prevent pain. By incorporating self-massage techniques and using tools like foot massage trigger points charts, you can effectively target and release these trigger points.
By making self-massage a regular part of your myofascial pain relief routine, you can experience improved foot health and overall well-being.
Your feet work hard every day, carrying you through countless tasks and activities. It’s essential to give them the attention they deserve. Learning how to massage your feet for better health and wellbeing can improve your overall health, relieve stress, and reduce pain. In this step-by-step guide, we’ll explore DIY foot massage techniques to help you achieve improved health and wellbeing.
Introduction
Did you know that your feet contain numerous pressure points and nerve endings that can influence your entire body? By taking care of your feet through regular massage, you can experience a range of benefits, from improved circulation to stress relief. Let’s dive into the world of DIY foot massage and discover how to keep your feet happy and healthy.
Benefits of Foot Massage
Foot massage has numerous benefits for your overall health and wellbeing. Some of the most significant advantages include:
1. Improved circulation
Foot massage helps to stimulate blood flow and improve circulation throughout the body, which is particularly important for people who spend long periods sitting or standing (1).
2. Stress relief
Massage has been shown to reduce the stress hormone cortisol, helping you relax and unwind (2).
3. Reduced pain and discomfort
By focusing on specific pressure points, you can alleviate foot pain and discomfort from various conditions, such as plantar fasciitis or heel spurs (3).
4. Enhanced relaxation and sleep quality
Massage helps to promote relaxation and can improve the quality of your sleep, making you feel more rested and refreshed (4).
5. Boosted immune system
Studies suggest that regular massage may help to boost your immune system by increasing the production of white blood cells (5).
Basic Anatomy of the Foot
Before diving into foot massage techniques, it’s essential to understand the basic anatomy of the foot. Your foot is divided into three main areas:
Arch: The curved part of the foot that provides support and absorbs shock.
Heel: The back part of the foot, which bears much of your body weight when you stand or walk.
Ball: The front part of the foot, just behind your toes, that helps with balance and propulsion.
By focusing on these areas and identifying foot pressure points, you can give yourself an effective DIY foot massage.
Essential DIY Foot Massage Techniques
Follow these steps to perform a DIY foot massage that targets essential pressure points:
1. Warming up the feet
Start by soaking your feet in warm water for 10 minutes or using a warm towel to help relax the muscles.
2. Massaging the arch of the foot
Use your thumbs to apply firm pressure and make small circles along the arch of your foot. Gradually work your way from the heel to the ball of the foot.
3. Working on the heel and Achilles tendon
With one hand, hold your foot at the ankle. Use the other hand to gently massage the heel and Achilles tendon with long, sweeping motions.
4. Addressing the ball of the foot and toes
Gently squeeze and pull each toe, starting from the big toe and working your way to the little toe. Massage the ball of the foot using your thumbs, making small circles.
To target specific pressure points, apply firm pressure using your thumbs or a massage tool. Hold the pressure for 10-15 seconds, then release. Repeat this process on any areas of discomfort or tension.
Using Tools and Props for DIY Foot Massage
To enhance your DIY foot massage, consider incorporating the following tools and props:
1. Foot Massage Balls – Spiky Balls
Massage balls can be used to target specific pressure points and provide deep tissue relief. Place the ball under your foot and roll it back and forth, applying pressure as needed.
2. Foot Massage Mats
Foot massage mats (also called acupressure mats) are useful for massaging the entire foot and can help to relieve tension in the arch, heel, and ball of the foot. Place your foot on the mat and move it back and forth, applying pressure as needed.
3. Percussion Massage Guns
Percussive massage tools can help you apply targeted pressure to specific areas of your foot.
Integrating Foot Massage into Your Daily Routine
To reap the full benefits of DIY foot massage, it’s essential to incorporate it into your daily routine. Here are some tips to help you get started:
Determine a consistent schedule: Choose a specific time each day for your foot massage to help create a habit. Whether it’s during your lunch break, after work, or before bedtime, consistency is key to reaping the rewards of your massage practice.
Prepare your space: Dedicate a comfortable and quiet area in your home for your foot massage sessions. Keep it clean, uncluttered, and inviting, with a comfortable chair, cushions, or even a yoga mat for support.
Learn various massage techniques: Explore different massage techniques to find the ones that work best for you. Experiment with using your hands, knuckles, or even massage tools to address various pressure points and areas of tension in your feet.
Stay hydrated and mindful: Proper hydration is essential for overall health and can improve the effectiveness of your foot massage. Be mindful of your body’s needs and drink water before and after your massage session to support muscle relaxation and recovery.
Tips for a Successful DIY Foot Massage
To ensure your DIY foot massage is effective and enjoyable, keep these tips in mind:
Start slowly and gently: Begin with gentle pressure and gradually increase intensity as needed, always listening to your body’s signals.
Listen to your body and adjust pressure accordingly: If you feel pain or discomfort during your massage, ease off the pressure or try a different technique.
Consistency and frequency: Aim for regular foot massage sessions, ideally daily or several times per week, to maximize the benefits.
Know when to seek professional help: If you have persistent foot pain or discomfort, consult with a healthcare professional or licensed massage therapist for guidance.
Conclusion
DIY foot massage is a simple and effective way to improve your overall health and wellbeing. By understanding the basic anatomy of your feet, using targeted massage techniques, and incorporating helpful tools and props, you can experience the many benefits of regular foot massage. Don’t underestimate the power of caring for your feet—start incorporating foot massage into your daily routine and discover the positive impact it can have on your entire body.
Here are the cited references included in the article:
Alvarez, D. J., & Rockwell, P. G. (2002). Trigger points: diagnosis and management. American Family Physician, 65(4), 653-660. Retrieved from https://www.aafp.org/afp/2002/0215/p653.html
Rapaport, M. H., Schettler, P., & Bresee, C. (2010). A preliminary study of the effects of a single session of Swedish massage on hypothalamic–pituitary–adrenal and immune function in normal individuals. Journal of Alternative and Complementary Medicine, 16(10), 1079-1088. Retrieved from https://www.liebertpub.com/doi/10.1089/acm.2009.0634
The levator scapulae is a small but powerful muscle located on either side of your neck that connects your upper spine to your shoulder blade.
It helps control movement between these two areas as well as providing stability when you’re performing activities such as lifting or carrying weights.
When this muscle becomes tense, it can cause discomfort and restrict movement, leading to tightness in other muscles around it, which can result in pain throughout the upper body.
Fortunately, there are ways to resolve this issue by targeting specific trigger points within the muscle itself and then supplementing that with stretching and strength training exercises designed specifically for the area.
By combining both approaches, you’ll be able to create lasting relief from muscular aches and pains while also helping improve posture and overall mobility.
So let’s dive into what needs to be done so you can free yourself from pain and tension in this muscle.
[lwptoc]
Causes Of Neck Pain
Neck pain is a common issue that can have many causes. From injury to habitual overuse and fatigue, it’s important to identify the source of your discomfort and take steps to neck pain relief.
Trigger points are tender spots in muscles that create localized pain and can refer to other areas such as down the arm or up toward the head.
The scalene muscles, which run along both sides of the neck, also contribute to shoulder pain and work alongside the powerful sternocleidomastoid.
Combined with the commonly known upper trapezius, these three muscles support our arms while they reach forward and aid in breathing by lifting our ribs during inhalation.
When tightened, they pull on the vertebrae of our spine, causing tension in surrounding muscles like the levator scapulae and creating even more discomfort.
If you want to prevent future neck pain, here is what you can do:
Gently stretching these muscles regularly will help alleviate some of this built-up tension and improve overall mobility in your neck region.
Proper muscle conditioning involves:
Engaging core stabilizers instead of relying solely on external musculature for stability;
Learning how to breathe correctly using diaphragmatic breathing
Understanding ergonomics at work, home, or driving
Integrating a basic range of motion activity throughout daily life plays an integral role in maintaining a healthy balance within the body’s neuromuscular system.
Taking time each day for self-care practices helps ensure you stay free from chronic pains caused by imbalances related to lifestyle choices we make over time!
What Causes A Tight Levator Scapulae?
Have you ever tried to keep a balloon in the air for too long? Eventually, it becomes heavy and starts to fall. This is similar to what happens when our levator scapulae muscles become tight.
The constant strain of holding your shoulders up causes fatigue and tension that can lead to trigger points and increased nerve sensitivity.
The primary cause of tightness in the levator scapulae muscle is likely postural strain combined with prolonged sitting or standing without breaks.
The combination of these two factors creates an environment where your shoulder blades are held in a position that puts excessive work on the levator scapula muscles.
Excessive forward head posture is another feature associated with rounded shoulders and can contribute to a painful neck in some people.
This forward head posture position alters the mechanics of the cervical spine and can further exacerbate muscle fatigue and trigger point development in stabilizing muscles.
If a lack of physical conditioning is also present, the levator scap has even less ability to cope with the demand.
So, what makes the levator scapulae tight? Let’s summarize them below:
Working at a computer with the head turned
Emotional/mental stress
Carrying heavy bags with a shoulder strap
Chilling of the muscle during sleep from a ceiling fan or air conditioner
Holding a phone between the shoulder and ear for too long
Sleeping on your stomach with your head turned
Head forward posture
Cervical spine dysfunction.
Repetitive arm motions such as in swimming, throwing, or racquet sports.
To prevent or resolve trigger points and tightness in the levator scapulae, we must focus on strengthening the area while also addressing underlying postural issues such as hunching over a desk or computer all day long, at least until we can build up enough strength and endurance to tolerate these habitual positions.
Achieving proper alignment through conscious body awareness will also ensure that there’s no unnecessary strain placed on any one particular muscle group resulting from sub-optimal posture habits, something that often goes unrecognized but plays a major role in overall neck health.
Being mindful about how much time you spend sitting or standing each day, coupled with regular stretching, strength training, and improved body mechanics, will go a long way toward keeping the levator scapulae healthy and free from pain-causing trigger points!
This brings us to our next section: relieving the pain in your neck.
How Do You Relieve Levator Scapulae Neck Pain?
It’s been theorized that many cases of neck pain stem from trigger points in the levator scapulae. But is this true? Let’s investigate it further.
The Levator Scapulae is a muscle located between your shoulder blade and the back of your neck, so any tension or tightness can cause serious discomfort in the area.
To relieve levator scapulae-induced neck pain, you need to both release those trigger points and strengthen the surrounding muscles for long-term relief.
To start releasing these trigger points, try using massage balls or foam rollers on the affected area. This will help loosen up any knots and get rid of built-up lactic acid, which causes stiffness.
You should also stretch out the area to increase flexibility and range of motion in order to reduce chronic pain. Some popular stretches include chin tucks, side bends with rotation, and forward folds over a chair or bench.
Wall Angels
To perform wall angels, stand with your back against a wall and your feet about 6 inches away. Raise your arms to shoulder height, with your elbows bent and your forearms resting against the wall. Slowly slide your arms up the wall, keeping your elbows and forearms in contact with the wall. Hold for a few seconds at the top, then slowly lower back down.
Band Pull Aparts
To perform band pull aparts, hold a resistance band with both hands, with your hands shoulder-width apart. Begin with your arms extended straight in front of you, then pull the band apart towards your chest, squeezing your shoulder blades together. Slowly release back to the starting position and repeat for 10-15 repetitions.
Both are designed to target specific areas such as rotator cuff muscles while engaging other important muscles like rhomboids and trapezius too!
These moves require attention to form, so make sure you use proper technique when executing them—if not done correctly, they could do more harm than good!
Additionally, incorporating an overall strength program into your daily routine can be beneficial for improving posture, balance, and stability, which all impact how we feel throughout our day-to-day lives.
No matter what type of treatment plan you decide upon—whether it’s targeted releases, stretches, or exercise—just remember that consistency is key to achieving lasting results!
Sticking with your chosen course of action will ensure that you see positive changes over time, gradually increasing intensity as needed until desired goals are achieved.
With patience comes progress; take care of yourself today and reap rewards tomorrow!
Should You Stretch Your Neck Muscles?
Stretching your neck muscles can help reduce levator scapulae trigger points and pain and loosen a stiff neck.
Increased muscle tension over time can become subconscious, and you may find yourself walking around holding your neck muscles tight during activities in which it doesn’t make sense to do so.
This is particularly common in the trapezius muscle, often referred to as the “stress muscles.”
However, it’s important to avoid overstretching or putting too much pressure on the neck muscles, as this can cause pain and injury.
It’s also important to avoid stretching the neck if you have any underlying medical conditions, such as herniated discs or spinal stenosis without consulting your doctor first.
How To Stretch The Levator Scapulae
There are several different stretches that target these muscles, but they should be done carefully with proper form, as the incorrect technique could cause injury instead of improving mobility.
Let’s look at some of the levator scapulae stretches in detail:
#1. Shoulder Rolls: Sit up straight with your feet flat on the floor. Lift your shoulders up towards your ears and then roll them back and down. Repeat this movement 10–15 times.
#2. Neck Stretch: Sit up straight and look straight ahead. Slowly lower your right ear towards your right shoulder until you feel a stretch in the left side of your neck. Hold for 10–15 seconds, and then repeat on the other side.
#3. Chin Tuck: Sit up straight and look straight ahead. Tuck your chin in towards your chest without moving your shoulders or tilting your head. Hold for 5–10 seconds, and then relax.
#4. Levator Scapulae Stretch: Sit up straight and look straight ahead. Reach your right hand behind your back and place it on your left shoulder blade. Use your left hand to gently pull your head towards your left shoulder until you feel a stretch in the right side of your neck. Hold for 10–15 seconds, and then repeat on the other side.
#5. Upper Trapezius Stretch: Sit up straight and look straight ahead. Reach your right arm over your head and place your hand on your left ear. Use your left hand to gently pull your head towards your left shoulder until you feel a stretch in the right side of your neck. Hold for 10–15 seconds, and then repeat on the other side.
#6. Foam Roller Stretch: Lie on your back with a foam roller under your upper back. Slowly roll the foam roller towards your shoulders until it reaches the top of your shoulder blades. Hold for 10–15 seconds, and then slowly roll back down.
These simple tips, combined with regular massage therapy sessions and adequate rest periods throughout training cycles, can allow individuals suffering from tightness in the levator scapulae region to experience relief without compromising their fitness goals or risking further injury through aggressive stretching techniques.
Levator Scapulae: Self-Massage
Self-massage can be a helpful way to relieve tension in the levator scapulae muscle. Here’s how to perform a self-massage for this muscle:
Locate the Levator Scapulae: The levator scapulae muscle is located on the side of the neck, between the top of the shoulder blade and the base of the skull.
Use Your Fingers: Place the fingertips of one hand on the side of your neck, just above the collarbone and below the ear. Apply gentle pressure and move your fingers slowly up toward the base of your skull until you feel a tender spot.
Apply Pressure: Apply pressure to the tender spot with your fingertips and hold for 10-15 seconds. As you apply pressure, try to relax the muscle.
Massage: While maintaining pressure, use a circular or back-and-forth motion to massage the muscle. Continue for 30-60 seconds.
Repeat on the Other Side: Repeat the massage on the other side of your neck.
You can perform this self-massage as often as needed, depending on the level of tension and discomfort you experience.
Conclusion
The levator scapulae is a vital neck muscle and could be more painful when it’s tight. This pain is common and is caused by muscles becoming overused or strained due to poor posture or repetitive movements.
Fortunately, there are several things you can do to help relieve the tension in your levator scapulae and get yourself feeling better in no time!
Here is what can help you relieve the tension: Stretch out the area around your shoulder blades and upper back while trying self-massage techniques.
Strengthening exercises will also be key to helping resolve any issue with your levator scapula. I recommend focusing on postural strengthening exercises such as planks and chin tucks; these will help improve alignment and reduce strain on the muscles around your neck and shoulders.
If you’re struggling with chronic pain from your levator scapulae, don’t give up hope! With proper care, attention, and dedication, you’ll soon be able to find relief from this common source of discomfort.
By combining targeted stretches, massage therapy, and strength-building exercises into your regular routine, you’ll be amazed at how quickly you see results! So go ahead—give it a try today; you won’t regret it!
Did you know that over 70% of Americans suffer from foot pain? Foot massage is one of the most accessible and effective methods for relieving this pain. In this article, we’ll explore the major pressure points in your feet and how to give yourself a proper foot massage for better health and well-being.
Foot massages are incredibly healing and offer a multitude of benefits:
Pain Relief: Reduces pain from plantar fasciitis, heel spurs, Achilles tendonitis, bunions, cramps, and more.
Stress Reduction: Provides deep relaxation and eases tension.
Improved Circulation: Increases blood flow to the feet and lower legs, promoting overall health.
Better Sleep: Can help improve sleep quality.
Reduced Anxiety: Studies suggest foot massage can help lower anxiety levels.
By understanding where your body’s natural pressure points lie on your feet, you can reap the full rewards that come with giving yourself a good foot massage. This knowledge helps us take control of our own physical wellbeing so we can live life at its fullest potential and find freedom within ourselves!
What Are Foot Pressure Points?
Foot pressure points, also known as reflexology points or trigger points, are specific areas on your feet that correspond to different parts of your body. Applying pressure to these points can help relieve tension and pain throughout the body.
Foot massage diagrams can easily be found online or through books on reflexology that show where these pressure points are located on each foot. Most people have heard of massaging the arch of their foot for relaxation. However, there are many other spots along both sides of your feet which you should consider exploring. Underneath your toes is one area with multiple pressure points between them. There’s even one at the base of your heel!
Taking some time to locate these self-foot massage pressure points will give you an idea of how they feel when pressed and how much relief they offer when manipulated correctly. Plus, it’s a great activity for practicing mindfulness and getting into a relaxed state before bedtime.
Trigger Points vs. Pressure Points:
While the terms are often used interchangeably, there are subtle differences.
Trigger points are localized knots of muscle tension that can cause pain and discomfort. Trigger point massage is often more beneficial for those suffering from chronic pain such as plantar fasciitis since it helps target localized knots of tension which can contribute to overall discomfort. Reduction in trigger point activity usually involves applying pressure directly to the tender point in order to stimulate the central nervous system, and allow for desensitization and release of the tissues. This can often result in immediate relief from pain. However, this type of massage requires a skilled practitioner who knows exactly how much pressure should be applied at any given time. Foot massage trigger points charts are available online for reference if you wish to try self-massage.
Pressure points are broader areas that, when stimulated, can elicit a therapeutic response in another part of the body.
Easy-to-Find Pressure Points in the Foot:
Big Toe: The big toe alone has five important pressure points! These points are located at the base, tip, middle joint, and two points in between. Stimulating these points can help with headaches, neck pain, lower back pain, and sciatica.
Other Key Areas: The ankle, arch of the foot, and heel also house important pressure points, each with its own unique benefits.
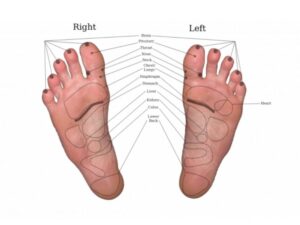
Foot Reflexology Chart:
A foot reflexology chart is a visual guide that shows the location of pressure points on the feet and their corresponding body parts. Foot reflexology is a form of alternative therapy that utilizes pressure points on the foot to affect various parts of the body. Foot reflexology chart use is common with many practitioners whom practice this art. While reflexology treatment bears little scientific evidence, practitioners believe that pressing on specific points can help reduce pain and stress throughout the body.
What the Different Pressure Points Mean:
Solar Plexus Point: Located in the center of the arch, massaging this point can help relieve stress and anxiety.
Head and Neck Points: Found on the toes, these points can help alleviate headaches and neck tension.
Lower Back and Sciatica Points: Located on the inner edge of the foot, massaging these points can help reduce lower back pain and sciatica.
The feet are full of pressure points that can help us achieve reduction in pain and improvement in function in not only the feet, but up the body as well. By exploring the various pressure points on the feet, you can begin to understand how these areas affect different parts of your body.
It’s important to note that there is no one-size-fits-all approach when it comes to using foot massage chart for pressure points; everyone responds differently based on their own unique needs. Nevertheless, understanding where each point lies gives you an opportunity to experiment with different techniques until you find what works best for you. A regular routine of self-massage on the feet helps increase circulation, reduce stress levels and promote healing throughout your body – not just physically but emotionally too!
How to Massage Foot Pressure Points:
Warm-up: Start by soaking your feet in warm water or using a warm towel to relax the muscles.
Arch Massage: Use your thumbs to apply firm pressure and make small circles along the arch of your foot.
Heel and Achilles Tendon: Gently massage the heel and Achilles tendon with long, sweeping motions.
Ball of the Foot and Toes: Gently squeeze and pull each toe, then massage the ball of the foot using your thumbs.
Pressure Point Massage: To target specific pressure points, apply firm pressure using your thumbs or a massage tool. Hold the pressure for 10-15 seconds, then release.
General foot massage techniques that are thorough can help address both pressure points and trigger points.
Is Massage Equipment Helpful?
Massage tools can enhance your foot massage experience:
Massage Balls: Spiky balls can be used to target specific pressure points and provide deep tissue relief.
Foot Rollers: Rollers can help relieve tension in the arch, heel, and ball of the foot.
Percussion Massage Guns: These tools can help apply targeted pressure to specific areas.
Massage equipment can be a great help when it comes to massaging the pressure points in your feet. From hand-held tools like rollers and balls, to acupressure mats, there is something for everyone’s preference. Hand-held tools aid in targeting specific areas by providing precise pressure directly onto them. Many are useful for virtually all body parts. The use of massage equipment is especially beneficial if you have limited mobility or difficulty manipulating muscles with just your hands alone. Even using something as simple as a ball will lend an extra bit of leverage that may make all the difference between relieving pain or not. Keep in mind that massage equipment should never replace professional treatments; however, incorporating them regularly into your self-care routine will give you more control over managing chronic conditions such as plantar fasciitis or heel spurs, or even simply promote deep relaxation.
Hands-On Massage for Tension Relief:
Hands-on massage is a great way to relieve tension and improve your overall health. You can use your hands to apply pressure to specific areas of the feet, or try various leg massage techniques for deeper tissue stimulation. Knowing where exactly to apply pressure can make all the difference when it comes to providing relief from aches and pains due to tightness or tension. In addition to using this chart for reference, there are also various leg massage techniques that you can use while administering a hand massage therapy session. These techniques will not only help you locate key pressure points but they’ll also provide deep tissue stimulation that’s sure to bring about some much needed relief!
Foot Massage Techniques:
Effleurage: Long, gliding strokes that promote relaxation.
Petrissage: Kneading and squeezing motions that help release muscle tension.
Friction: Circular motions that target deeper tissues.
Tapotement: Percussive techniques like tapping or hacking that stimulate circulation.
Now that you have experienced the tension relief of hands on massage, it’s time to move onto foot massage techniques. There are many pressure points in your feet that can be used to relieve stress and tension. By massaging certain points with a firm but gentle touch, you can reduce pain and discomfort caused by tension in your feet. With proper knowledge about how to use these pressure points along with skillful technique, you’ll be able to DIY foot massage or give someone else an effective foot massage!
Conclusion:
Foot massage is a powerful tool for improving your overall health and well-being. By understanding the different pressure points in your feet and incorporating regular foot massage into your routine, you can experience the many benefits it has to offer. While the validity of specific pressure points to improve things like internal organ health is questionable, we know the health benefits that massage produces is certainly a helpful way to create less stress on the body, and reduce certain symptoms such as pain, and even lower blood pressure.
Remember:
Listen to your body and adjust pressure as needed.
If you have any underlying health conditions, consult with your doctor before starting a new foot massage routine.
If you experience any pain or discomfort during the massage, stop immediately and seek professional advice.
Incorporating trapezius stretches into your daily routine can work wonders for your overall well-being.
These stretches target and loosen the trapezius muscle, an essential muscle responsible for stabilizing your arm, rotating your shoulder blade, and extending your neck.
By releasing the tension and stress built up in the trapezius muscle, it opens up room for improvement in your posture, reduced pain and discomfort, and enhanced mobility.
Trapezius stretches are especially beneficial for those who spend long hours in a sedentary position, as they help to counteract the negative effects of sitting for extended periods.
But where do you start with trapezius stretches?
In this article, we’ll delve into the anatomy and function of your trapezius muscle, explore the leading causes of tightness and pain, and provide you with expert-recommended stretching techniques to incorporate into your routine.
Ready to learn? Let’s get started!
Trapezius Muscles Anatomy And Function
Understanding the anatomy and function of your trapezius muscles is key to properly caring for and stretching these muscles. Let’s take a look at what they entail.
Trapezius muscles are large, triangular-shaped muscles located in the upper back, extending from the base of the skull down to the mid-back and laterally to the shoulders.
These muscles are essential for proper shoulder and neck movements, as well as maintaining posture and overall upper-body strength.
The trapezius muscles can be divided into three distinct sections, each with its own set of functions:
The upper trapezius is responsible for elevating the shoulders and rotating the shoulder blade outward.
The middle trapezius helps to retract or pull the shoulder blades together and provide stability to the shoulder joint.
The lower trapezius assists in the depression of the shoulder blade and extension of the neck.
Raise our arms above our heads when stretching
Throw overarm
When the trapezius muscles are functioning properly, they help to maintain a healthy and strong upper body, but when they become tight or strained, they can lead to pain and discomfort in the shoulders, neck, and upper back.
But what exactly causes the tightness in the upper trapezius? Let’s have a look in the next section.
Causes Of Upper Trapezius Tightness
The trapezius muscles are very responsive to fatigue of underlying muscles, in particular the scalenes and the levator scapula. These underlying muscles are often in disadvantaged positions due to rounded shoulders and an excessively forward-positioned head.
The upper trapezius muscles, in addition to being compensators for this position, can be de-conditioned and weak as well. Don’t fall into the trap of only stretching and massaging these muscles. Building up strength and endurance is part of a proper strategy for restoring optimal muscle function.
Let’s take a look at specific causes of upper trapezius tightness.
Poor posture: Sitting or standing with poor posture can cause tension and tightness in the trapezius muscle as well as pain in levator scapulae. This is often seen in people who work at a desk or computer for long periods of time.
Repetitive motion: Repeating the same motion, such as lifting heavy objects or using a computer mouse, can cause overuse and strain on the trapezius muscle.
Stress: Emotional stress can cause tension in the trapezius muscle, leading to pain and discomfort.
Injury: Trauma to the neck or shoulders, such as whiplash or a fall, can cause tightness and pain in the trapezius muscle.
Sleeping position: Sleeping in an uncomfortable position or on a pillow that is too high or too low can cause tension and tightness in the trapezius muscle.
Lack of exercise: A sedentary lifestyle and lack of exercise can lead to weak muscles, including the trapezius, which can cause pain and tightness.
Medical conditions: Certain medical conditions, such as fibromyalgia and myofascial pain syndrome, can cause chronic pain and tightness in the trapezius muscle.
Upper Trap Stretches
Stretching the upper trapezius is fairly straightforward when you know the function of the muscle. There are some additional ways to encourage the traps to relax, such as using a massage percussion gun, or tools such as a Theracane.
Let’s look at the fundamental upper trapezius stretches recommended for you.
#1. Shoulder Rolls
Shoulder rolls should be done at the beginning of every upper trap stretch. You need to undertake them before exercises so that they warm up and loose the muscles before you start full-on stretches.
Sit or stand in a comfortable position with good posture
Roll both shoulders back and down and then forwards and up in a circular motion
Start with small circles and gradually make the circles larger
Spend 30-60 seconds doing this and then repeat in the opposite direction
#2. Chin Tucks
Chin tucks are done to realign the neck and ease the tension off the upper traps, combat a forward poking chin posture, and loosen joints in the lower neck and upper back. They’re better done in front of a mirror or with expert guidance to ensure you do them correctly. Additionally, you also need to ensure that you’re relaxed and take breaks from time to time.
To be effective, here is what you need to do:
Sit or stand upright in good posture
Slowly draw your chin in towards your neck without tilting your head
To ensure the correct technique, imagine your chin is sitting on a shelf and you are sliding your chin in along the shelf – it should feel like you are giving yourself a double chin
Hold for 3 seconds and relax. Repeat 10-15 times
#3. Upper Trap Side Bends
Doing side bends will help you loosen tight trapezius muscles. When doing the stretch, ensure you tilt your head gently because it can cause general discomfort.
Here is the correct procedure.
Sit upright in a chair ensuring good posture
Place one of your arms behind your back and keep it there throughout the exercise.
Tilt your head to one side, taking your ear down towards your shoulder
Keep your eyes and nose pointed forwards through
Hold for 3 seconds and return to starting position
Repeat to the other side, aiming for 10-15 reps each way
#4. Upper Trap Head Tilts
After side bends, immediately follow them with head tilts. They should be done slowly but steadily to ensure your trapezius muscles cope well.
Here is the recommended procedure:
Sit upright in a chair, ensure good posture, and hold the bottom of the chair with one hand
Place your free hand over the side of your head (towards the back) and gently pull your head further over for a stronger stretch
Once your head is tilted over to the side, turn your head to look down towards your hip – you should feel the traps stretch further back
Tilt your head to the opposite side, taking your ear towards your shoulder
Anchoring your shoulder down by holding the bottom of the chair helps increase the trapezius stretches.
#5. Middle Trapezius Stretch
This stretch allows you to stretch both sides of the trapezius muscles at the same time.
Procedure
Sit or stand ensuring good posture
Place your hands and forearms together. Interlace your fingers and draw your hands forward until you feel a stretch across your upper back.
Draw your shoulders and shoulder blades forward until you feel a stretch along your upper back
Increase the stretch further by bringing your chin down towards your chest
Hold for 15-30 seconds and repeat 3-5 times.
#6. Sideways Child’s Pose
This pose allows you to stretch your trapezius muscles and upper back at the same time.
Procedure
Kneel on all fours, hands under shoulders, knees under feet
Slowly sit your buttocks back onto your feet, letting your chest come down to the floor
Holding the position, gradually slide/walk your hands out to the side to stretch out your tight trapezius muscle
Hold for 30 seconds, then take your hands over to the other side and repeat
Return to starting position and then repeat 2-3 times each way
Remember to breathe deeply and relax into each stretch. Hold each stretch for 10-15 seconds and repeat as needed throughout the day. With consistent stretching, you can help to reduce tension and pain in your trapezius muscles.
Massage For Upper Trapezius Pain Relief
The traps are often a strong focus area for massage therapy, and these muscles are very easy to access. Self massage is another option and is easy to perform.
Massage Ball Stretches
Massage ball stretches help you trigger trapezius points or knots by using a tennis ball placed over your back.
Procedure.
Stand with your back towards the wall and place the ball behind your back over the trapezius knot/tight area
Lean back into the ball to apply gentle pressure to stretch the trapezius
For a knotted trapezius muscle hold the pressure for 30-60 seconds, for a chronically tight trapezius roll the ball in small movements (up/down, side/side or circles) for 1-2 minutes
Loosen up those tense upper trapezius muscles with these four easy stretches:
The first stretch involves lying on your stomach and using a ball to gently massage around the base of your skull and the side of your neck.
The second stretch is done by placing a ball underneath your upper traps and pushing gently into the knot, or rolling the ball around for a general stretch.
For a super tight trapezius muscle, the third stretch can be done by lying on the floor in an open doorway and placing the ball between the wall and the muscle.
Lastly, stand by an open doorway for the fourth stretch, bend at the waist, place a ball on the top part of your trapezius, and lean into the ball to stretch out those upper trapezius muscles.
FAQ:
How long does it take for trapezius pain to go away?
The duration it takes for trapezius pain to go away depends on several factors, including the cause of the pain, the severity of the injury, and the type of treatment received. For minor muscle strains or overuse injuries, trapezius pain may resolve in a few days with rest and self-care measures such as stretching and icing. However, for more severe injuries or conditions such as herniated discs or nerve impingements, pain relief may take several weeks to months. It is crucial to seek medical attention for persistent or worsening trapezius pain to determine the underlying cause and receive appropriate treatment.
Can you massage trap pain out?
Yes, massage can be an effective way to alleviate trapezius pain. Massaging the affected area can help to increase blood flow and promote healing by reducing tension and relaxing the muscles. However, it’s important to note that massage may not work for everyone, and the effectiveness of massage for trapezius pain relief can depend on the underlying cause of the pain. For best results, it’s recommended to consult a healthcare professional or a licensed massage therapist who can provide personalized guidance and treatment.
What is the best sleeping position for trapezius pain?
The best sleeping position for trapezius pain is on your back with a small pillow or rolled-up towel under your neck to support the natural curve of your spine. This position helps to prevent your head and neck from twisting, which can exacerbate trapezius pain. If sleeping on your back is uncomfortable, you can try sleeping on your side with a pillow between your knees to help align your spine and relieve pressure on your shoulders. It’s important to avoid sleeping on your stomach if your traps are flared up as this can strain your neck and shoulders, leading to further trapezius pain.
What are trigger points in the trapezius?
Trigger points in the trapezius muscle are knots or tight areas that form in the muscle fibers, causing pain and discomfort. These points can be sensitive to touch and can cause referred pain in other areas of the body. Trigger points in the trapezius can develop due to poor posture, repetitive strain, overuse of the muscle, stress, or injury. Common symptoms of trigger points in the trapezius muscle include headaches, neck pain, shoulder pain, and limited range of motion. Trigger point therapy, which involves applying pressure to the affected area, can help alleviate pain and discomfort caused by trigger points in the trapezius muscle.
How do you loosen your upper traps?
Stretching: Perform gentle stretches that target the trapezius muscle, such as the ear-to-shoulder stretch or the chin-to-chest stretch.
Self-massage: Use a foam roller or a massage ball to apply pressure to the upper traps and release tension.
Heat therapy: Apply a heat pad or take a warm shower to relax the muscles and increase blood flow to the upper traps.
Posture correction: Practice good posture by keeping your shoulders back and down and avoiding slouching.
Ergonomic adjustments: Adjust your workspace or daily activities to minimize strain on the upper traps. For example, use a headset during phone calls to avoid cradling the phone between your ear and shoulder.
What causes tight upper traps?
There are several factors that can contribute to tightness in the upper trapezius muscles, including:
Poor posture: Maintaining poor posture for prolonged periods can cause the upper trapezius muscles to overwork and become tense and tight.
Stress and tension: Emotional and mental stress can lead to muscle tension, including in the upper trapezius muscles.
Repetitive strain: Activities that require repetitive motion of the arms, neck, or shoulders can cause strain on the upper trapezius muscles and lead to tightness.
Injury: Trauma or injury to the upper back or neck can cause the upper trapezius muscles to tighten as a protective response.
Sleeping position: Sleeping in an awkward position that strains the neck or shoulders can cause the upper trapezius muscles to become tight and painful.
Weakness in other muscles: Weakness in the muscles (such as the pec minor) that support the upper back and neck can cause the upper trapezius muscles to overcompensate and become tight.
How do you stretch your right upper trap?
Shoulder Rolls: Roll your shoulders in a circular motion, lifting them up to your ears and then rolling them back and down. Repeat this motion several times, and then reverse the direction of the rolls.
Neck Stretch: Tilt your head to the left, bringing your ear towards your left shoulder. Use your left hand to gently pull your head further to the left to intensify the stretch. Hold for 20-30 seconds and then repeat on the other side.
Ball Roll: Lie on your back and place a massage ball or tennis ball underneath your right upper trapezius muscle. Move your body so that the ball rolls over the muscle, applying pressure to tight or sore spots.
Doorway Stretch: Stand in a doorway with your right arm extended to the side, resting on the doorframe. Lean your body forward, keeping your arm in place, until you feel a stretch in your right upper trapezius muscle. Hold for 20-30 seconds and then repeat on the other side.
Upper Trap Stretch: Sit or stand up straight and gently tilt your head to the right, bringing your ear towards your right shoulder. Use your right hand to gently pull your head further to the right to intensify the stretch. Hold for 20-30 seconds and then repeat on the other side.
Are you experiencing hip pain or discomfort during your workouts? Do you want to improve your athletic performance and overall health? Look no further than your gluteus medius muscle!
This small but mighty muscle plays a crucial role in hip stability and movement, and strengthening it can have a big impact on your body’s posture, balance, and strength.
In this article, I will share with you the top 5 gluteus medius exercises to help you strengthen your hips and improve your overall health.
So, whether you’re an athlete looking to improve your performance or simply want to alleviate hip pain, keep reading to learn how to strengthen your gluteus medius muscles and transform your body.
Understanding The Anatomy And Function Of The Gluteus Medius
The gluteus medius is a hip muscle located on the outer surface of the pelvis. It originates from the ilium and inserts into the greater trochanter of the femur.
Its primary functions are to abduct the thigh (pull away from the body) and to medially rotate the thigh (internal rotation). It also helps to stabilize the pelvis during single-leg stance.
Why It’s Important To Strengthen Your Gluteus Medius
The gluteus medius is an important stabilizing muscle for the hip joint, which helps support the entire body when standing, walking, running, and performing other activities.
Strengthening the gluteus medius helps to maintain stability and proper alignment of the hip, pelvis, and lower back, reducing the risk of injuries and promoting optimal performance. It may also be beneficial in helping to reduce knee pain.
Additionally, strengthening the gluteus medius can help to improve balance, coordination, and overall body mechanics.
Signs Of Weak Gluteus Medius Muscles
There are multiple potential signs of a weak gluteus medius muscle. Here is a short list.
1. Hip pain or discomfort while walking
2. Difficulty standing on one foot (associated to Trendelenburg gait)
3. Lower back or hip pain while lying on side
4. Anterior pelvic tilt
5. Difficulty rising from a seated position
6. Knee pain while running or walking up stairs
7. Hip shifting during side to side activities
8. Difficulty standing up from a squat position
9. Uneven wear on shoes
10. Limited hip abduction range of motion
Gluteus Medius Strengthening Exercises
Glute medius exercises are combined with the other glute muscles since its virtually impossible to completely isolate this muscle.
Exercises for the gluteus medius can progress from simple to more complex, as you will find in the list below.
Sidelying Hip Abduction
This exercise is often lumped into the “glute medius activation exercises” type of list. This is mostly because the muscle is most often associated with hip abduction. It is the primary muscle, but the gluteus minimus and tensor fascia lata (TFL) are assisters in this movement as well.
The starting position for this movement is sidelying with legs straight in line with your body. As the leg lifts, maintain your pelvis in neutral and slightly reach the toes away from you to further emphasize the glute medius.
This exercise is usually performed for higher repetitions such as 15-20 or more. For increased resistance, ankle weights can be used.
Sidelying Clamshell
The clamshell exercise with strengthen the gluteus medius but also the glute max and deeper external hip rotation muscles such as the piriformis.
This exercise is started in the sidelying position with knees stacked and feet on top of each other. Hip flexion is around 60 degrees and knees are bent to approximately 90 degrees.
While maintaining the knee bent and feet keeping contact, lift the knee up until it reaches just higher than hip level. For an added challenge, shift the top knee forward a bit so that it is in front of the bottom knee. This positions the hip into more abduction, extension, and external rotation.
Most commonly the challenge is increased by using an exercise band. Adding a resistance band may be too much for some, depending on fitness level. In that case, body weight of the top leg will get the job done.
Average recommended repetitions on this exercise can vary, from 10-20. Heavy resistance bands can be used, but at a certain point it can be difficult to maintain your form, so moving to a seated hip abduction machine may be a better option.
Supine Banded Glute Bridge
The glute bridge is a great all-around glute exercise with a focus more on hip extension than abduction and external rotation. However, the glute medius can be forced to work harder in this movement by adding a resistance band around the knees.
The starting position is laying on your back with knees bent and feet flat on the ground, approximately 12 inches from the butt, and feet hip width apart or wider.
Gently flatten the lower back against the ground with a posterior pelvic tilt, press the heels down into the ground, and squeeze your glutes to lift your hips up as high as possible.
As the hips extend up, press your knees out into the resistance band. You will feel a strong activation of the gluteal muscles.
Pausing at the top for a few seconds can make the exercise more effective and establish coordination at the end of the range of motion. Hold for 1-2 seconds or more, then lower back to the starting position.
Since this exercise recruits many of the stronger lower body muscles, it usually requires added resistance across the waist, or to be performed in a single leg version.
Higher reps are often recommended in the beginning before building up resistance, so 15-20 repetitions is a good place to start.
Lateral Band Walks
This exercise is a fun and useful upright exercise to strengthen weak gluteus medius muscles in the frontal plane of movement.
This exercise is performed in the standing position by placing a resistance band around the ankles or knees. It can be performed with legs straight or knees bent.
While maintaining good upright posture, take a step out to one side with one leg. Then, while maintaining tension on the band, follow with the opposite leg.
You can continue stepping in one direction for a desired number of repetitions OR time, then return back to the starting position using the opposite leg as the “lead” leg.
Using a timer is often the easiest method for this exercise. I often recommend performing the exercise continuously for 60-90 seconds.
Barbell Hip Thrust
The barbell hip thrust is a staple for training the gluteus maximus (glute max), but it is probably one of THE best exercises to address weak glutes or hip instability.
To perform this exercise comfortably, you will need a soft foam device under the bar to protect your hip bone and relieve discomfort. At lighter weights the bar may be fine without this, but as the weights get progressively heavier, this can become quite uncomfortable.
Start by laying on your back (OR back against the edge of a weight bench) and placing the barbell just under the hip bones (ASIS bones).
Feet should be placed just wider than hip width apart. You can of course go much wider depending on what is most comfortable for the way your unique hips are built, and also what helps you feel the muscle contraction best.
As you lift your hips, the goal is to get as much hip extension as possible without excessively arching your lumbar spine. This is mostly going to be dependent on your hip flexor flexibility.
Hold for the desired amount of time, then lower back to the starting position. Then repeat.
Repetition ranges and exercise prescriptions for the barbell hip thrust are VAST. It is an exercise that can be done for low repetitions with very heavy weights, or high repetitions with light weights.
I suggest as usual starting with 15-20 repetitions to get the hang of the technique and gain comfort controlling the bar before adding more weight to the bar.
How Often To Train The Gluteus Medius
When it comes to training protocols for the glute med, there are a number of different variations possible.
In my office with personal clients, I almost always start with a program that fits their schedule and desired results. If building glutes is the primary focus, then picking 1-2 exercises per day, and performing them for ONE SET only works very well.
Once the “mind to muscle” connection is built and adequate intensity can be used without next-day muscle soreness, a second set can be added.
Over the weeks, addition exercises can be rotated in for variety and to train different joint angles.
Training the glutes everyday is NOT necessary for results. You can easily build them into a training program that targets them 2-3x per week and make great progress. Exercise routines should always be tailored to the individual.
When You Should Train The Glute Medius
Glute med exercises can really be performed at any point during a workout session, but since they are thought of as smaller, more slow-twitch muscles (endurance based), its common for them to be placed toward the end of the workout.
The obvious exception to this would be when performing the barbell hip thrust. This movement may be the primary focus of the workout, so it can often be performed as the first exercise.
Gluteus Medius Pain and Exercise
As always with pain, underlying pathology especially of the hip joint, should be ruled out before starting any exercise routine.
Quite often, when there are chronic pain issues with the glute medius (including trigger points in the glute medius), strengthening is the recommendation. This should be initiated under the guidance of a knowledgeable professional.
Being too aggressive too soon with gluteus medius exercises can simply lead to pain flare ups and inability to train the muscle frequently enough to make the progress necessary to get past the pain.
While there are many other gluteus medius exercises, the list above includes the most common and useful movements. Having strong and functional hip muscles is key to long term health and prevention.
Building muscle in the back and shoulder area is a common goal for many fitness enthusiasts. Strong back and shoulder muscles not only improve posture and athletic performance, but they also contribute to an overall balanced and aesthetically pleasing physique.
However, with so many exercises and workout programs available, it can be overwhelming to know where to start or which exercises to prioritize.
In this ultimate guide, we will provide a comprehensive overview of the most effective back and shoulder exercises to build muscle fast, as well as tips on proper form, programming, and nutrition to maximize your results.
Whether you are a beginner or a seasoned gym-goer, this guide has something for everyone looking to enhance their back and shoulder muscle development.
The Importance Of A Strong And Muscular Back
Having a strong and muscular back is essential for overall health and fitness. Not only does it lead to improved posture, but having stronger shoulder muscles also helps you perform everyday activities with ease. Plus, when your back and shoulders have increased resting muscle tone, you look more impressive in the gym or at the beach!
But getting those chiseled back muscles isn’t as easy as it looks. To achieve serious strength and definition in your upper body you need to focus on specific exercises that target both your shoulder muscles and your back muscles.
An effective workout should include a good variety of movements including, but not limited to things like overhead presses, rows and pull-ups (for starters), all of which will help build both muscle size and power.
The best way to maximize results from these exercises is to begin with lighter weights so you can perfect form before adding heavier ones for increased intensity. Make sure to keep good posture throughout each repetition too – this will ensure maximum benefit from every exercise and reduce the risk of training setbacks.
By incorporating the right protocol into your training program, you can quickly generate progress towards achieving the physique of your dreams.
Back And Shoulder Workout: The Basics
Before diving into the nitty-gritty of exercise selection and program design, we should start with a quick primer on the basics. Here are some basics tips for getting started with your own back and shoulder workout:
1) Invest in good equipment – Having the right tools can make all the difference when it comes to working out. Investing in quality weights and machines will ensure that you get the most out of your training sessions since you’ll be able to push yourself further without having to worry about safety or injury.
2) Focus on form first – Proper technique is essential when doing any kind of exercise; focusing on perfecting each rep before adding weight helps minimize risk of injury while maximizing results. Take time to learn proper form (hire a certified personal trainer if needed) so that you can confidently perform each movement with optimal technique.
3) Mix up your exercises regularly (but not EVERY workout) – Trying different movements not only keeps things interesting but also provides an opportunity for targeted muscle growth as well as overall body sculpting. There are a bazillion ways to vary your workouts, from exercise variety to repetition and set schemes.
TIP: Keep track of your progress by keeping a journal of how many reps/sets you do during each session – this way you know whether or not you need to increase weight/reps or decrease them depending on what goals you have set out for yourself!
Training Volume And Recovery
It’s important to remember that the goal of any workout routine is to create progressive overload. To do this, you’ll need to balance out your training volume with sufficient rest and recovery time over time.
When it comes to back exercises, compound movements such as deadlifts and pull-ups will help target multiple upper back muscles at once while also giving your trapezius a good challenge. These are excellent movements, but also require MORE recovery than when training smaller muscle groups. (2-3 x per week).
Isolation exercises like bicep curls, DB shoulder side lateral raises, and calf raises are less taxing, and therefore can be trained more frequently. (For example every other day).
There are ways to maintain a higher training frequency without slowing down your results. This is why having an effective post-workout routine is key; incorporating active stretches (such as upper trap stretches) after lifting can reduce soreness by loosening tight muscles while foam rolling can provide relief from excess muscle tension and trigger points that are often sensitized by high volume training programs. Massage therapy can also be an amazing recovery tool to utilize.
Warming Up
Before you can get started on any back and shoulder workout, it’s essential to warm up properly. Warming up helps your body prepare for the upcoming physical activity by increasing muscle temperature which in turn improves flexibility and reduces the risk of injury.
To begin, start with a light jog or brisk walk for 5 minutes followed by some dynamic stretches that target the upper arms and shoulders such as arm circles or overhead reaches. This should be done slowly at first, gradually building intensity until all muscles are warmed up nicely.
Additionally, make sure you’re maintaining correct posture while stretching; its the perfect time to work on body mechanics before you start loading your tissues.
The next step is to move into an active warm-up specifically tailored towards the exercises you’ll be performing during your shoulder workout routine. For example, if you plan on doing pull-ups then knock out a few lat pulldowns to prime the tissues and establish the mind-muscle connection.
By completing these steps prior to lifting weights, you’ll not only reduce soreness after working out but also increase strength gains over time due to increased range of motion in muscles.
Best Back And Shoulders Exercises
Pullup
The Pullup is a bodyweight exercise that works the arms, shoulders, back, and core muscles. It is an effective way to build upper body strength and can be done with or without additional weight.
How-to Instructions:
1. Start by hanging from a pull-up bar with an overhand grip, hands slightly wider than shoulder width apart.
2. Engage your core and keep your legs straight and together.
3. Pull your body up until your chin is over the bar.
4. Slowly lower your body back down to the starting position.
5. Repeat for the desired number of repetitions.
Lat Pulldowns
The lat pulldown is a great exercise for strengthening the back and developing upper body strength. It is an excellent choice for any fitness regimen.
The lat pulldown targets the latissimus dorsi.
How-To Instructions:
1. Position yourself in the lat pulldown machine, with your feet flat on the floor and knees bent at a 90 degree angle.
2. Grasp the bar with an overhand grip, slightly wider than shoulder-width apart.
3. Keeping your chest up and core tight, pull the bar down to your chest while squeezing your shoulder blades together.
4. Slowly return to the starting position.
5. Repeat the exercise for the desired number of repetitions.
Barbell Row
The barbell row is a compound exercise that targets the back, biceps, and core muscles. It is a great exercise for strengthening and building muscle in these areas.
How-To Instructions:
1. Begin by standing with your feet hip-width apart, toes pointing forward. Hold a barbell with an overhand grip, just wider than shoulder-width apart.
2. Hinge forward at the hips, keeping your back flat and chest up. Allow the barbell to hang in front of you, arms extended.
3. Pull the barbell up towards your mid to lower abdomen, leading with your elbows. Keep your core engaged and squeeze your shoulder blades together at the top of the movement.
4. Slowly lower the barbell back down to the starting position.
5. Repeat for desired number of reps.
Dumbbell row
The dumbbell row is an effective strength-training exercise that targets the back muscles, specifically the lats and rhomboids. It is a great exercise for improving posture, strength, and stability.
How-To Instructions:
1. Start by standing with feet hip-width apart, knees slightly bent.
2. Bend at the hips and lower your torso until it is as parallel as possible to the ground.
3. Keeping your back flat, extend your arms with the dumbbells and pull them up towards your mdi to lower abdomen.
5. Squeeze your shoulder blades together and pause for a moment before slowly lowering the dumbbells back to the starting position.
6. Repeat the motion for the desired number of repetitions.
Shrugs
Shrugs are a simple yet effective exercise that targets the trapezius muscles in the neck and shoulders. The shrug exercise can help build strength in the upper body and improve posture.
How-To Instructions:
1. Stand tall with your feet hip-width apart and your arms resting at your sides.
2. Raise your shoulders up towards your ears, making sure to keep your neck straight.
3. Hold the shrug for a few seconds, then slowly lower your shoulders back to the starting position.
4. Repeat for desired number of reps.
Back Extensions
45 degree back extensions are an exercise that involves stretching and strengthening the muscles in your lower back extensors, glutes, and hamstrings. They require the use of a 45 degree angled bench.
How-To Instructions:
1. Start by positioning yourself on a 45 degree back extension machine. Place your feet on the platform and adjust the height so that your hips are slightly lower than the pad.
2. Cross your arms over your chest, or hold a weight plate to your chest for added resistance.
3. Slowly lower your upper body towards the ground, hinging at the hips and keeping your back straight.
4. Pause briefly at the bottom of the movement, and then exhale as you use your lower back and glutes to lift your upper body back up to the starting position.
5. Repeat for the desired number of repetitions.
Overhead press
The overhead press is a compound strength training exercise which primarily targets the shoulder muscles, as well as the triceps and a bit of the chest muscles.
How-To Instructions:
1. Start by standing upright with your feet shoulder-width apart.
2. Take a deep breath and grip the barbell with an overhand grip, your hands slightly wider than shoulder-width apart.
3. Using your legs, lift the barbell up to your upper chest.
4. Brace your core and press the barbell upwards above your head.
5. Keep your arms close to your ears and elbows pointed slightly outward.
6. Lower the barbell back to your upper chest and repeat.
Dumbbell Lateral Raises
Dumbbell lateral raises are a strength exercise that targets the muscles of the shoulders, specifically the lateral deltoids.
How-To Instructions:
1. Stand with feet shoulder-width apart, holding a pair of dumbbells at your sides.
2. Keeping your elbows slightly bent, raise your arms out to the sides until your elbows are parallel with the ground.
3. Pause for a moment at the top then slowly lower the dumbbells back to the starting position.
4. Repeat for desired number of repetitions.
Seated Cable Rows
Seated cable rows are a great exercise to target the muscles of the upper back and arms as well as an excellent shoulder exercise. This exercise is done using a cable machine and involves you sitting on a bench and pulling a weight towards your chest with both arms.
How-to Instructions:
1. Start by sitting on a bench in front of a cable machine with a weight plate attached to the cable.
2. Grab the handle of the cable with both hands, making sure your palms are facing each other.
3. Sit up straight and keep your back straight throughout the exercise.
4. Begin to pull the weight towards your chest by bending your elbows, squeezing your shoulder blades together.
5. Hold the contraction for a second and then return to the starting position.
6. Repeat for the desired number of repetitions.
One-Arm Dumbbell Rows
One-arm Dumbbell Rows is a great exercise for targeting the back muscles, specifically the lats, traps and rhomboids.
How-to Instructions:
1. Start by standing with your feet hip-width apart and holding a dumbbell in one hand.
2. Bend your knees slightly and hinge forward at the waist, keeping your back straight and core engaged.
3. Allow your free arm to hang down and reach the dumbbell toward the floor.
4. Begin the exercise by driving your elbow up and back, keeping your arm close to your body.
5. As you drive your elbow up and back, squeeze your back muscles and focus on pulling your shoulder blade back and down.
6. Lower the weight back down to the starting position and repeat on the same side for the desired number of repetitions.
7. Once you have finished the desired number of repetitions, switch to the other side and repeat the same steps.
Seated Front Dumbbell Press
Seated Front Dumbbell Press is a great exercise for building strength and size in the shoulders. It is an isolation exercise that focuses on the front deltoids. The exercise is performed while seated on a bench and requires a pair of dumbbells.
How-To Instructions:
1. Begin by sitting on a flat bench with a dumbbell in each hand. The dumbbells should be held at shoulder height, with your palms facing forward.
2. Keeping your back straight, press the dumbbells up towards the ceiling until your arms are fully extended.
3. Lower the dumbbells back to shoulder height and repeat.
4. Make sure to keep your chest up, core engaged, and avoid arching your back during the movement.
5. Repeat for the desired number of repetitions.
Frequently Asked Questions
What Is The Best Way To Track My Progress While Doing Back And Shoulder Exercises?
Staying motivated while building muscle can be a difficult task, especially when you can’t see the progress in the mirror on a day-to-day basis. It’s important to track your progress in order to stay on top of the goals you’ve set for yourself. But how do you go about doing this? How do you measure the success of your hard work?
The best way is to keep a journal and tracking your performance with reps and sets that will give you an idea of where your current fitness level stands compared to earlier sessions. Taking notes during workouts can also help remind you which exercises were most beneficial so that they can be replicated in future training sessions.
These simple steps will provide insight into what works best for your individual fitness journey, allowing you to make adjustments along the way as needed. By keeping detailed records of these measures over time, you’ll have a better understanding of both short-term and long-term gains – giving you the confidence boost necessary to keep working toward achieving those desired results!
How Much Time Should I Spend On Each Exercise?
For those aspiring to build muscles through back and shoulder exercises, it is essential to understand how much time should be dedicated to each workout. Undoubtedly, the amount of time spent on an exercise can make or break results. Therefore, striking a balance between focus and intensity is paramount for success.
Achieving muscle building goals requires dedication and commitment in order to obtain desired outcomes. Depending on individual needs, some may require more intense workouts than others; however, allocating an adequate amount of time during exercise sessions will help ensure progress towards these objectives.
Understanding key concepts such as progressive overloads and periodization so that individuals have access to personalized plans tailored specifically towards their own fitness ambitions.
All these considerations must come together harmoniously in order for individuals to reach peak performance levels both physically and mentally in the most efficient way possible while minimizing wasted time in the gym!
What Specific Exercises Can I Do To Target My Lower Back Muscles?
Do you want to target your lower back muscles? If so, there are a few specific exercises that can help you do just that. Deadlifts, 45 degree back extensions, and glute hip thrusts can be extremely helpful at building up lower back muscles.
Its important to keep in mind that all upper back exercises will involve the lower back to some degree as well.
How Many Days Per Week Should I Dedicate To Back And Shoulder Workouts?
If you want to build strong muscles in your back and shoulders, an important question arises: How many days per week should I dedicate to back and shoulder workouts? The answer may differ depending on the individual’s goals, existing level of fitness, lifestyle factors, and other variables.
To figure out what works best for you, consider these three points:
• Assess how frequently you can commit to a dedicated workout program without compromising recovery time or risking burnout.
• Consider any limitations such as preexisting injuries that might prevent frequent exercises.
• Evaluate whether additional rest days are necessary between sessions if you plan to use heavy weights or high intensity interval training (HIIT).
The frequency of your back and shoulder workouts will determine their effectiveness in building muscle fast. During each session, aim for multiple sets with moderate-to-heavy weight at 8–15 repetitions per set.
With this information in mind, it’s up to you to decide which approach works best for your specific needs. If possible, start by committing to two full-body workouts per week — one focused on upper body muscles including your back and shoulders; the second focusing on lower body strength — then assess how much progress you make after six weeks using this framework.
From there, adjust your schedule accordingly based on results so that you can continue making steady progress toward reaching your goals!
What Can I Do To Prevent Injuries While Exercising My Back And Shoulders?
When it comes to exercising your back and shoulders, safety should always come first. A little preparation can go a long way in helping prevent potential injuries while working out these important muscle groups. But what can you do?
Take time to warm up before getting stuck into any back or shoulder workout routine – this is essential if you want to avoid straining those muscles! Spend 5-10 minutes doing light stretches and dynamic movement such as arm circles, shoulder rolls and trunk rotations.
Not only will this help reduce your chances of injury but it also helps increase blood flow and lubricates joints in order to improve performance during exercise. It’s like revving an engine before hitting the gas pedal; don’t skip this step if you want your body ready to deliver its peak performance!
Equally important is form when performing back or shoulder exercises. Good technique is key – use slow to moderate speeds so that each rep is done correctly rather than rushing through sets with poor posture and form. This helps ensure that you’re targeting the correct muscles, prevents incorrect loading on joints and ligaments and ultimately leads to better results from your training session!
Make sure to listen closely when being guided by a certified trainer who understands which types of exercises are best for building strength safely – a qualified fitness professional can provide invaluable insight here.
To sum up then, warming up prior to exercise, using good form throughout reps and following instructions from knowledgeable trainers are all crucial aspects of keeping safe while working out your back and shoulders. When taken together they create an effective framework that lets you focus on pushing yourself further towards achieving whatever goals you have set out for yourself – while avoiding any unnecessary risks along the way.
Conclusion
Well, there you have it – the ultimate guide to building muscle fast with back and shoulder exercises. Now that you know what to do, don’t forget: progress tracking is essential for seeing results! It’s not enough just to go through the motions; make sure you’re marking your milestones and successes along the way so you can keep up the momentum.