Plantar Fasciitis – How To Tape Your Own Foot At Home

Table of Contents
- - Step 1: Gather the necessary supplies
- - Step 2: Prepare your foot
- - Step 3: Avoid taping too tightly
- - Step 4: Position your foot correctly
- - Step 5: Begin taping with anchor strips
- - Step 6: Create the foundation
- - Step 7: Reinforce the foundation
- - Step 8: Apply cross strips
- - Step 9: Secure the tape
- - Step 10: Add support on the sides and top
- - Step 11: Check for proper support
- - Step 12: Wear socks and shoes
If you’re suffering from plantar fasciitis and looking for an effective way to support your foot and arch, taping can provide much-needed relief. In this step-by-step guide, we’ll walk you through the process of taping your own foot at home using regular athletic tape. Let’s get started!
Step 1: Gather the necessary supplies
To begin, you’ll need the following supplies:
- Regular athletic tape (cloth-based tape is recommended)
Step 2: Prepare your foot
Ensure that your foot is clean and dry before applying the tape. This step is crucial for achieving good adherence and longevity.
Step 3: Avoid taping too tightly
Especially when you’re new to taping, it’s essential to avoid applying the tape too tightly. Overtightening can cause discomfort and may require redoing the taping process. Start with a light application and gradually increase the tightness as you become more familiar with the technique.
Step 4: Position your foot correctly
Maintaining the correct foot and ankle position is key to effective taping. Avoid letting your foot fully relax before applying the tape, as this can lead to excessive tightness when you start walking. Keep your foot and ankle at approximately a 90-degree angle throughout the process.
Step 5: Begin taping with anchor strips
Using the athletic tape, start by creating anchor strips on the bottom and top of your foot. These strips will serve as reference points for the taping process. Place one strip along the bottom just below the knuckles of your toes and another strip on the top.
Step 6: Create the foundation
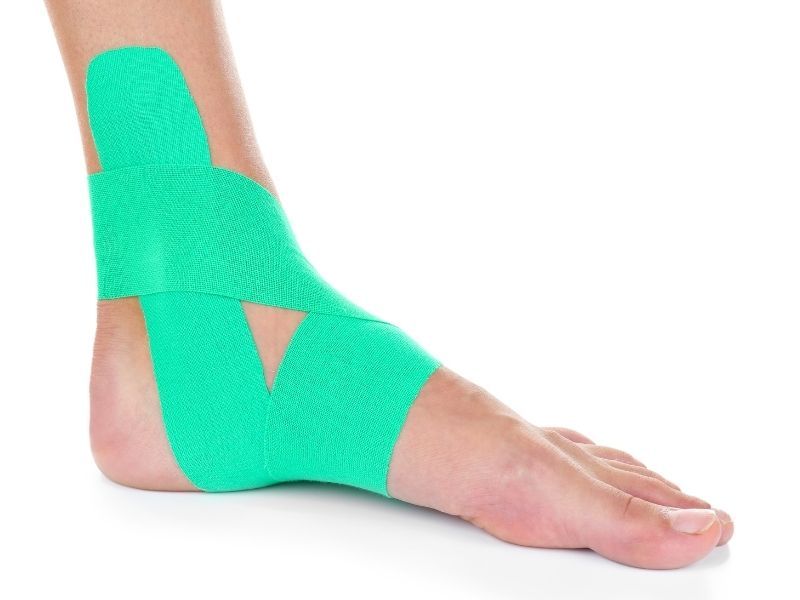
Cut the tape into two sections to avoid getting tangled. Start by wrapping one section from the bottom knuckle on the foot to the backside of the heel. Tear the tape and secure it, ensuring it’s snug but not overly tight. Repeat this process from the top knuckle to the backside of the heel, creating a crisscross pattern.
Step 7: Reinforce the foundation
To provide additional support, reinforce the crisscross pattern by applying another strip of tape on each side. Offset these strips slightly to maximize support and prevent the tape from coming off easily.
Step 8: Apply cross strips
To enhance stability and support, add shorter strips of tape that go across the bottom of your foot. Start from one anchor point and attach the tape to the opposite anchor point. Repeat this process, overlapping the strips as you work your way up the foot.
Step 9: Secure the tape
Ensure that all the tape is firmly pressed down, eliminating any air bubbles or loose edges. This step is crucial for the tape to last longer and provide continuous support.
Step 10: Add support on the sides and top
To prevent the tape from lifting or peeling, add additional support on the sides and top of your foot. Apply strips of tape along the sides, directly over the previous tape strips. For the top, run a strip of tape over the taping pattern, pressing it down firmly.
Step 11: Check for proper support
After completing the taping process, stand and put weight on your taped foot. You should feel the tape preventing excessive pronation and supporting your foot as it bears weight. Adjust the tightness or add extra tape as needed for optimal support.
Step 12: Wear socks and shoes
Once the taping is done, gently put on your sock and shoes. The tape should stay in place and provide ongoing support throughout the day.
Remember, taping your foot for plantar fasciitis is not a substitute for professional medical advice or treatment. If you experience severe pain or your condition worsens, consult a healthcare professional.
Sam Visnic
I’ve spent my life studying the fundamental aspects of human health with a focus on movement and clinical massage therapy. In a world of specialists, surgical procedures, drugs and quick fix remedies, I’m committed to finding and developing strategies that help people stuck at the “gap”. Over the last 20 years I’ve studied dozens of systems and methodologies for uncovering the root cause of aches and pains, along with postural and movement issues. Pain science, the art and science of hands-on soft tissue massage techniques, myofascial release, and coaching movement is essential in my practice. Integrating different methods but above all deciphering WHEN to use different techniques with different people and situations, along with integration of movements that people want to be able to do again is the key to long term success with my incredible track record with clients. Understanding the various elements that contribute to conditions and the power of communication and education makes my Release Muscle Therapy program separate from other hands-on therapy approaches.
Blogs You May Be Interested In
Categories
-
Deep Gluteal Pain Syndrome
-
Deltoids
-
Fallbrook
-
Foam Rolling
-
Glutes
-
Hamstrings
-
Hypnosis For Pain
-
Lats
-
Levator Scapulae
-
Lifestyle
-
Massage Therapy
-
Mobility
-
Movement and Exercise
-
Murrieta
-
Muscles
-
Nutrition
-
Obliques
-
Pain
-
Pectorals
-
Piriformis
-
Plantar Fasciitis
-
Product Review
-
Psoas
-
Quadratus Lumborum
-
Quadriceps
-
Rhomboids
-
Serratus Anterior
-
SI Joint
-
Sternocleidomastoid
-
Stretching
-
Subscapularis
-
Temecula
-
TMJ
-
Trapezius
-
Uncategorized


