Author: Sam Visnic

Tennis Elbow Trigger Points | Locate And Self Treat

If you’re experiencing elbow pain that interferes with your daily activities, understanding and self-treating these trigger points can help alleviate discomfort and improve your quality of life.

Trigger points are hyperirritable knots in the muscles that can generate pain locally or refer it to other areas. In the case of tennis elbow, these trigger points often develop in the muscles of the forearm and contribute to the pain experienced in the elbow.

In this article, we will provide a comprehensive overview of tennis elbow trigger points and how to identify and self-treat them. By locating these trigger points and employing effective techniques, you can reduce pain and regain functionality without relying solely on professional intervention.

To enhance your understanding of tennis elbow trigger points and their impact, we will also explore the underlying causes of tennis elbow and how repetitive activities and muscle overuse can lead to this condition.

tennis elbow trigger points

No one knows your body better than you do, and learning how to identify your specific tennis elbow trigger points is crucial. We will discuss the symptoms and signs of tennis elbow and provide simple tests for self-diagnosis. You’ll also discover techniques for locating trigger points in the forearm muscles and distinguishing them from other types of elbow pain.

To effectively relieve pain caused by tennis elbow trigger points, self-treatment is key. In this article, we will guide you through various self-treatment options, including self-massage and trigger point therapy, that can be easily performed in the comfort of your own home.

We understand that each person is unique and may benefit from complementary treatments and preventive strategies. We will dive into the importance of neuromuscular massage therapy, recommend specific exercises and stretches to aid recovery, discuss reducing activities that aggravate the condition, and explore lifestyle changes that can contribute to long-term improvement.

In conclusion, by equipping yourself with the knowledge of tennis elbow trigger points and understanding how to locate and self-treat them, you can take control of your pain management journey. Remember, self-treatment does have its limitations, so knowing when it’s appropriate to seek professional help is equally important.

Key Takeaways:

  • Locating and self-treating tennis elbow trigger points can alleviate elbow pain and improve daily activities.
  • Trigger points are knots in the muscles that can refer pain to the elbow.
  • Repetitive activities and muscle overuse can lead to tennis elbow.
  • Identify tennis elbow trigger points through symptomsself-diagnosis tests, and locating them in forearm muscles.
  • Relieve pain through self-treatment techniques like self-massage and trigger point therapy.

Understanding Tennis Elbow and Trigger Points

tennis elbow pain during playing

In this section, we will provide an overview of tennis elbow and its association with trigger points. We will define tennis elbow, also known as lateral epicondylitis, and explain the role that trigger points play in causing elbow pain. Additionally, we will explore how repetitive activities and muscle overuse can lead to injury.

What is Tennis Elbow (Lateral Epicondylitis)?

Tennis elbow, or lateral epicondylitis, is a condition characterized by pain and inflammation on the outer part of the elbow. It is a common injury that affects both athletes and individuals performing repetitive motions or activities using their forearms and wrists. Despite its name, tennis elbow can occur in anyone, not just tennis players.

Defining Trigger Points and Their Role in Elbow Pain

Trigger points are tender areas within a muscle that can cause pain locally or refer pain to other areas of the body. In the case of tennis elbow, trigger points in the forearm muscles, such as the extensor carpi radialis brevis, can contribute to elbow pain. These trigger points may develop due to muscle overuse, trauma, or poor ergonomics.

How Repetitive Activities and Muscle Overuse Lead to Injury

Tennis elbow often develops as a result of repetitive activities that involve gripping, twisting, or lifting. These activities can lead to muscle overuse and strain on the tendons that attach to the lateral epicondyle of the elbow. Over time, this repetitive stress can cause microtears in the tendons and result in inflammation, pain, and limited range of motion.

Tennis Elbow Trigger Points Elbow Pain Muscle Overuse Injury
Common condition affecting the outer part of the elbow Tender areas within the muscle that contribute to pain Pain experienced in the elbow Repetitive activities leading to excessive muscle use Tissue damage resulting from continuous strain

Identifying Your Tennis Elbow Trigger Points

Symptoms and Signs of Tennis Elbow

Recognizing the symptoms and signs of tennis elbow is crucial for identifying the presence of trigger points. Common symptoms include:

  • Elbow pain that radiates from the outside of the elbow to the forearm and wrist
  • Pain when lifting, gripping, or twisting objects
  • Weakened grip strength
  • Tenderness or swelling around the elbow

If you experience these symptoms, it is important to consider the possibility of tennis elbow trigger points.

Simple Tests for Self-Diagnosis

You can perform simple tests to self-diagnose tennis elbow and determine if trigger points are contributing to your discomfort:

  1. Wrist extension test: Extend your wrist and fingers while resisting pressure applied by someone else. If you experience pain on the outside of the elbow during this test, trigger points may be present.
  2. Finger test: Press on the tendons located on the outside of your elbow while flexing and extending your fingers. If you feel pain in the elbow, trigger points could be the cause.

These tests can help you identify the presence of tennis elbow and trigger points, but it is always recommended to consult a healthcare professional for an accurate diagnosis.

Locating Trigger Points in Forearm Muscles

Once you suspect the presence of trigger points in your forearm muscles, it is essential to locate them for effective self-treatment. Here are steps to help you locate trigger points:

  1. Identify the tender areas on the outside of your forearm, near the elbow.
  2. Apply gentle pressure with your fingertips to these areas to find the specific points that elicit pain.
  3. Trigger points often feel like small knots or tight bands of muscle tissue.

By pinpointing these trigger points, you can target them during self-treatment to alleviate discomfort and promote healing.

Referred Pain: Distinguishing Trigger Points From Elbow Pain

It is important to distinguish between pain caused by trigger points and pain originating from other factors in the elbow. Referred pain can often mimic the symptoms of tennis elbow, leading to misdiagnosis. Here are some key differences:

Trigger Point Pain Elbow Pain
Pain is concentrated in specific areas of the forearm. Pain is felt directly in the elbow joint.
Pain can be reproduced or intensified by palpating specific trigger points. Pain may worsen with specific movements or activities that stress the elbow joint.
Massage or pressure on trigger points may provide relief. Massage or pressure on the elbow may not alleviate pain.

Understanding and distinguishing the source of pain is crucial for effective self-treatment. If you suspect trigger points are contributing to your elbow pain, target these areas for relief. However, if the pain persists or worsens, consult a healthcare professional for further evaluation and guidance.

Tennis Elbow Trigger Points | How To Relieve Pain Through Self-Treatment

In this section, we will explore effective self-treatment options for relieving pain caused by tennis elbow trigger points. Self-massage and trigger point therapy can be highly beneficial techniques that you can easily perform at home to alleviate discomfort and promote healing.

Self-massage is a simple yet powerful technique that targets the specific trigger points in your forearm muscles. By applying pressure to these trigger points, you can help release tension and reduce pain. Using your fingers or a massage ball, gently apply pressure to the trigger points in a circular motion for a few minutes each day. This can help increase blood flow, relax the muscles, and provide relief from tennis elbow pain.

Trigger point therapy involves identifying and applying pressure to trigger points in your forearm muscles. You can use your fingers or a tool like a foam roller or a tennis ball to apply direct pressure to these points. By doing so, you can release the tight knots and alleviate pain associated with tennis elbow. It’s important to focus on each trigger point and apply pressure for a few seconds, gradually increasing the intensity as tolerated.

In addition to self-massage and trigger point therapy, incorporating specific exercises and stretches into your routine can help strengthen the affected muscles and improve flexibility. The following exercises and stretches can aid in the recovery process:

  1. Forearm extensor stretch: Extend your arm in front of you, palm facing down. With your opposite hand, gently bend your wrist downward until you feel a stretch in your forearm. Hold this stretch for 30 seconds and repeat on both arms.
  2. Wrist curls: Hold a lightweight dumbbell or a resistance band in your hand, palm facing up. Rest your forearm on a table or your thigh, allowing your wrist to hang over the edge. Slowly curl your wrist up towards your body and then back down, focusing on the movement in your forearm muscles. Perform 3 sets of 10-15 repetitions on each arm.
  3. Reverse wrist curls: Similar to wrist curls, but with your palm facing down. Perform 3 sets of 10-15 repetitions on each arm.

It’s also important to identify and avoid activities that aggravate your tennis elbow. Repetitive motions, such as excessive typing or gripping tools too tightly, can worsen the condition. By reducing or modifying these activities, you can provide your elbow with the rest it needs to heal.

Remember, self-treatment for tennis elbow trigger points should only be a part of your overall management plan. If your symptoms persist or worsen despite self-treatment, it’s advisable to seek professional help from a healthcare provider or a licensed massage therapist who specializes in neuromuscular massage therapy. They can provide a more comprehensive assessment and recommend personalized treatment options to address your specific needs.


Self-Treatment Techniques Benefits
Self-massage Relieves muscle tension, improves blood flow, and reduces pain
Trigger point therapy Targets specific trigger points, releases muscle knots, and alleviates pain
Exercises and stretches Strengthens muscles, improves flexibility, and aids in the recovery process

Complementary Treatments and Preventive Strategies for Tennis Elbow

In addition to self-treatment techniques, there are several complementary treatments and preventive strategies that can help manage tennis elbow and promote long-term recovery. These approaches can complement the self-care measures discussed earlier and provide additional relief from pain and discomfort.

Importance of Neuromuscular Massage Therapy

One effective complementary treatment for tennis elbow is neuromuscular massage therapy. This specialized form of massage targets the trigger points and tight muscles associated with tennis elbow. The therapist applies pressure to these areas, promoting relaxation and relieving tension in the muscles and tendons surrounding the elbow. Neuromuscular massage therapy can help reduce pain, improve blood circulation, and enhance the healing process.

Exercises and Stretches to Aid Recovery

Engaging in specific exercises and stretches can also aid in the recovery of tennis elbow. These exercises help strengthen the muscles and tendons in the forearm, reducing the strain on the elbow. Some beneficial exercises include wrist curls, forearm pronation and supination, and eccentric exercises. Stretching exercises, such as wrist flexor and extensor stretches, can improve flexibility and relieve tension in the affected area.

Reducing Aggravating Activities

Another important aspect of managing tennis elbow is identifying and reducing activities that aggravate the condition. It is essential to avoid or modify activities that put excessive strain on the forearm muscles and tendons, worsening the symptoms. This may include adjusting the grip on sports equipment, using ergonomic tools, maintaining proper form during physical activities, and taking regular breaks to rest the affected arm.

Lifestyle Changes for Long-Term Improvement

Implementing certain lifestyle changes can contribute to long-term improvement in tennis elbow. These changes may include maintaining a healthy weight to minimize stress on the joints, practicing proper posture to reduce strain on the arms and shoulders, and adopting ergonomic workstations and tools to minimize repetitive stress injuries. Additionally, incorporating stress management techniques and adequate rest into your daily routine can help support the healing process and prevent further aggravation of the condition.

By combining self-treatment techniques with complementary treatments and making preventive strategies an integral part of your routine, you can improve your tennis elbow symptoms and prevent future flare-ups. Consult with a healthcare professional or a licensed therapist to determine the best course of action for your specific condition and develop an individualized treatment plan.

Conclusion

In conclusion, self-treatment techniques can be highly effective in managing tennis elbow and alleviating discomfort caused by trigger points. By regularly performing self-massage and trigger point therapy, you can target specific areas of tension and promote healing in the affected muscles.

However, it is essential to know when it’s time to seek professional help. If your symptoms persist or worsen despite self-treatment efforts, it’s crucial to consult a healthcare professional specializing in sports medicine or physical therapy. They can provide a more comprehensive evaluation of your condition and offer additional treatment options tailored to your specific needs.

Alongside self-treatment, complementary approaches such as neuromuscular massage therapy can further enhance your recovery from tennis elbow. This specialized massage technique focuses on releasing tension in the muscles, improving circulation, and reducing pain and inflammation. Adding exercises and stretches that target the forearm muscles can also aid in strengthening and rehabilitating the affected area.

Additionally, making lifestyle changes to minimize activities that aggravate your tennis elbow can play a significant role in preventing further injury and allowing your body to heal. Be mindful of repetitive motions, gripping activities, and heavy lifting that strain the muscles around your elbow joint. By adopting a proactive approach to managing your condition and seeking professional guidance when needed, you can regain your strength and resume your daily activities with confidence.

Subscapularis Trigger Point | How To Find And Self-Release

Shoulder pain can be a frustrating obstacle in our daily lives, impacting everything from lifting groceries to swinging a tennis racket. If you’ve been struggling with this kind of discomfort, you may have heard about the elusive subscapularis trigger point—a common yet often overlooked source of shoulder woes.

This tiny spot on one of your rotator cuff muscles might just hold the key to relief.

Interestingly, research has shown that there’s a strong association between subscapularis trigger points and conditions like frozen shoulder or adhesive capsulitis. Our blog will guide you through understanding this muscle’s role, how to detect problematic trigger points yourself, and effective strategies for soothing them away.

Ready to wave goodbye to that stubborn shoulder pain? Let’s dive in and discover how proper care can bring back comfort and mobility!

Key Takeaways

  • The subscapularis muscle is a key component of the rotator cuff that helps in shoulder stability and can develop painful trigger points due to overuse or injury.
  • Identifying subscapularis trigger points involves feeling for tender spots beneath the shoulder blade, which can cause pain that radiates down the arm or to the front of the shoulder.
  • Self – release techniques, such as applying pressure with fingers or a massage tool and using targeted stretches and exercises, can significantly alleviate pain from these trigger points.
  • Neuromuscular massage therapy is an effective treatment that targets deep muscle layers to relieve discomfort and improve movement in shoulders afflicted by subscapularis trigger points.
  • Regular practice of specific stretching and strengthening routines for the subscapularis muscle supports better shoulder function and can prevent future pain issues.


Understanding Subscapularis and its Role in Shoulder Function

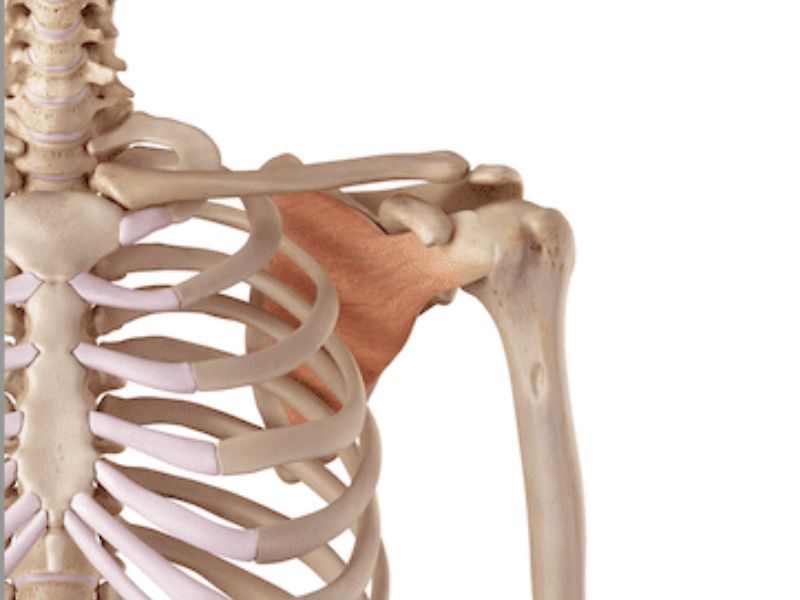
subscapularis Trigger point

Delving deeper into the anatomy of the shoulder, we encounter the subscapularis muscle—a key player in maintaining shoulder stability. This muscle, part of the rotator cuff group, lies beneath the shoulder blade and is crucial for internal rotation of the arm.

It’s an integral component that allows us to perform simple actions like reaching behind our back or throwing a ball.

The subscapularis anchors on the lesser tubercle of the humerus and plays a significant role in how we move our shoulders. It helps keep the head of the humerus securely within its socket and ensures smooth movement against other bones around it, such as when lifting your arm overhead.

As one might expect from such a hardworking muscle, trigger points can develop due to overuse or injury—these tender spots are notorious for causing pain and limiting motion in various directions.

Addressing these problematic areas through targeted therapy can improve mobility and alleviate discomfort significantly.

Identifying Subscapularis Trigger Points


Trigger Point Locations Subscapularis

Identifying subscapularis trigger points is a crucial step towards addressing shoulder pain and restricted movement. These sensitive nodules within the muscle fibers can cause discomfort extending beyond the immediate area, often presenting symptoms that mimic other shoulder conditions, thus making accurate diagnosis key to effective treatment.

Symptoms and referral patterns

Symptoms of subscapularis trigger points may include a dull ache or sharp pain in the shoulder, often misidentified as a problem with other parts of the rotator cuff. This discomfort can extend down the arm or to the front of the shoulder and is frequently accompanied by restricted range of motion, making simple activities like reaching overhead challenging.

Individuals might experience referred pain that radiates toward the back of the shoulder or down to their wrist, which can sometimes be mistaken for neck pain.

Referral patterns for subscapularis trigger points are complex due to their connection with common shoulder conditions like frozen shoulder and myofascial pain syndromes. The muscle’s role in stabilizing and moving the shoulder means active trigger points can seriously disrupt regular activities, emphasizing why proper treatment is essential.

Trigger point therapy aims to address these specific areas within the subscapularis muscle to alleviate pain and restore movement.

Association with shoulder disorders

Subscapularis trigger points can have a significant impact on the health of your shoulder joint. These troublesome spots within the subscapularis muscle contribute to a range of shoulder disorders, often creating pain that may radiate down the arm or to the front of the shoulder.

Stabilization and movement suffer when these trigger points are active, as they directly affect one of the rotator cuff muscles responsible for medial rotation and proper function.

Not only do such trigger points bring discomfort, but they can also be linked with more serious conditions like frozen shoulder. Cross-sectional studies highlight a notable degree of association between myofascial pain in this area and conditions characterized by reduced mobility and persistent muscle pain.

Given their location near vital attachment points for tendons and ligaments around the armpit area, managing these trigger points is crucial for maintaining overall shoulder health and preventing further complications that restrict everyday activities.

Remedies for Subscapularis Trigger Points

To address the discomfort caused by subscapularis trigger points, both self-care measures and professional therapies can be highly effective. Exploring self-release techniques along with specific exercises to stretch and strengthen the muscle can lead to significant relief and improved shoulder mobility.

Self-release techniques

Self-release techniques can be a powerful way to manage and reduce pain from subscapularis trigger points. These methods allow individuals to take control of their discomfort and improve shoulder function.

Self-Release-Subscapularis-Trigger-Point

  • Locate the subscapularis muscle by reaching under the shoulder blade at the back, where it attaches to the humerus bone.
  • Gently press this area with your fingers or a massage tool until you find tender spots indicative of trigger points.
  • Once a trigger point is located, apply steady, moderate pressure for about 30 seconds to 1 minute, or until a noticeable reduction in pain occurs.
  • For areas that are difficult to reach, use a tennis ball or similar object against a wall for leverage and targeted pressure.
  • Include slow and controlled movements of the arm while maintaining pressure on the trigger point to help mobilize and release tension.
  • Combine these techniques with deep breathing, focusing on exhaling as you apply pressure to help relax the muscle further.
  • Repeat these steps several times throughout the day, especially before and after activities that typically aggravate your shoulder pain.


Stretching and exercise recommendations

Stretching and regularly exercising the subscapularis muscle can significantly improve shoulder movement and alleviate pain. These activities help maintain muscle flexibility, which is crucial for shoulder stability and function.


  • Begin with gentle daily stretches to warm up the subscapularis muscle before progressing to exercises. It’s important not to rush and risk additional strain.
  • Practice cross – body arm stretches by pulling your affected arm across the front of your body with your other hand, feeling a stretch in the back of the shoulder.
  • Incorporate doorway stretches: Stand in a doorway with arms on the frame at a 90-degree angle, then step forward to stretch the front of the shoulders and chest.
  • Perform external rotation stretches by holding a towel or band behind your back with both hands and gently lifting upwards with your unaffected arm, stretching the affected side.
  • Gradually introduce strengthening exercises like internal and external rotation movements using resistance bands to build muscular support around the shoulder.
  • Implement scapular stabilization exercises such as wall push-ups or scapular retraction movements to strengthen surrounding muscles like teres major and latissimus dorsi that support the subscapularis.
  • Use foam rollers or tennis balls as self – massage tools to apply pressure on tight areas around the scapula, aiding in releasing tension in trigger points.


Role of Neuromuscular Massage Therapy in Treating Subscapularis Trigger Points

Neuromuscular massage therapy plays a critical role in alleviating the discomfort caused by subscapularis trigger points. This specialized form of massage targets the specific areas of muscle where pain trigger points have formed.

Practitioners use a combination of deep pressure and friction to release these knotted areas, helping to reduce pain and improve mobility in the shoulder. Properly applied neuromuscular techniques can lead to significant relief for those suffering from shoulder pain complaints, which are often linked to myofascial trigger points within the subscapularis.

The effectiveness of this therapy lies in its ability to not only address surface tension but also penetrate deeper layers of muscle tissue where hidden trigger points may reside. By relaxing and lengthening the affected muscle fibers, neuromuscular massage aids in restoring normal function and movement to the shoulder joint.

Patients who receive this type of treatment may find it easier to move their shoulders without experiencing sharp pains that can radiate down the arm or across other parts of the body.

As we delve into remedies for these painful triggers, remember that consistency is key for lasting results.

Conclusion

Taking control of subscapularis muscle pain is key to enhancing shoulder function and comfort. Effective treatments, such as targeted massage therapy and carefully guided self-release techniques, offer relief from the discomfort caused by trigger points.

Incorporating stretching and exercises into your routine can further help in stabilizing the shoulder and preventing future issues. If you’re dealing with persistent pain that radiates down your arm or across your shoulder, exploring trigger point therapy might provide the solution you need.

Empower yourself by understanding how to identify and address subscapularis trigger points for better mobility and well-being.

FAQs

1. What is a subscapularis trigger point?

A subscapularis trigger point is a sensitive area in the muscle that can cause pain and limit movement in the shoulder.

2. Where do I find the subscapularis muscle to check for trigger points?

You’ll find the subscapularis muscle on the front of your body, below your shoulder blade, contributing to movements of the shoulder.

3. Can trigger points in the subscapularis lead to frozen shoulder?

Yes, some studies suggest there’s an association between frozen shoulder and subscapularis trigger points due to adhesions restricting motion.

4. How can releasing these trigger points help my shoulder?

Releasing these trigger points may reduce pain and aid in restoring full range of motion, allowing you to move your shoulders more freely.

5. Is it common for people with wrist pain also have issues with their subscapularis?

It is possible as discomfort from triger points often radiates; if you have wrist pain or back of neck soreness, it could be related to problems with this part of your shoulder.

Low Back Trigger Points – Pain Relief Techniques

If you’ve ever felt a sharp ache or a dull throb in your lower back, you’re not alone. Low back pain can be more than just an annoyance; it often hinders our day-to-day activities and overall quality of life.

But what if the culprit is tiny trigger points hidden within your muscles? These little knots may seem small but have the power to cause significant discomfort.

One intriguing fact about low back trigger points is that they frequently stem from common habits like poor posture—think slouched shoulders or excessive lumbar curvature. By focusing on these pressure points, we can address some of the root causes of back pain.

This article will guide you through understanding and identifying these pesky areas, along with providing effective techniques for relief so you can get back to living comfortably.

Ready to say goodbye to that nagging pain? Let’s dive in!

Key Takeaways

  • Trigger points in the lower back can cause sharp or dull pain and may refer discomfort to other areas of the body.
  • Effective treatments include neuromuscular massage therapytargeted stretching, and exercises specifically designed to relieve pressure from these trigger points.
  • It’s important to identify key muscles such as the quadratus lumborum, spinal extensors, and multifidus that are often affected by trigger points.
  • Certain conditions like blood disorders, recent fractures or surgery, skin infections, severe osteoporosis, advanced diabetes, acute flare-ups of low back conditions, or tumors require caution or prevent individuals from undergoing trigger point therapy.
  • Regular incorporation of therapies and exercises targeting lower back trigger points can greatly improve one’s quality of life by reducing pain and increasing mobility.
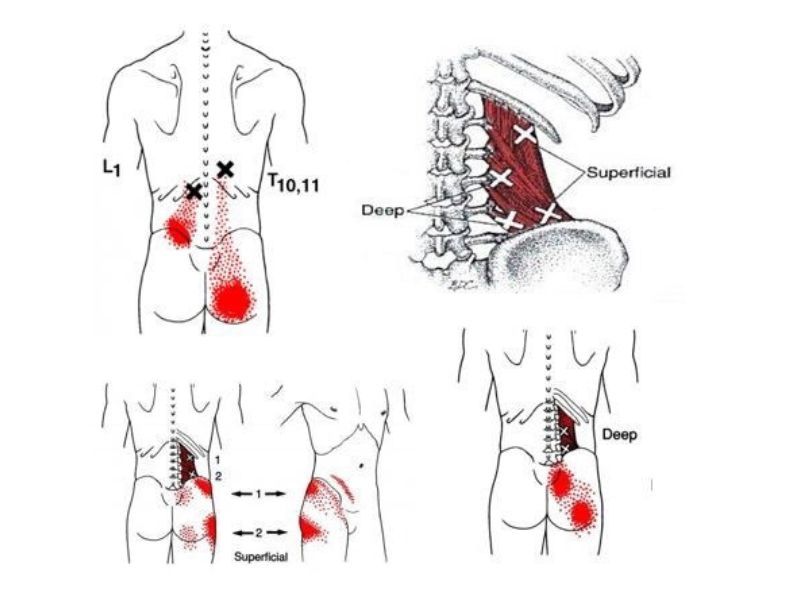
spinal extensors erector spinae trigger points
Image reference: David G. Simons, Janet G. Travell, Lois S. Simons. Myofascial Pain and Dysfunction: The Trigger Point Manual

Understanding Trigger Points and Their Impact on Low Back Pain

Trigger points play a significant role in causing low back pain, and they often develop from daily habits like poor posture. These are tight knots within your muscles that can cause pain right at their location or refer it to other areas of your body.

You might find yourself experiencing discomfort not just in the lower back but possibly also in the hip region because these trigger points have a knack for sending pain signals to different spots, making it tricky to pinpoint the source without proper knowledge.

Effective treatment of low back trigger points involves therapies such as manual pressure, which helps release these stubborn knots. Massage therapists use targeted pressure to ease the muscle tension and provide relief from myofascial pain that stems from these trigger points.

By understanding how they affect your body, you can seek out specific treatments like ischemic compression or self-massage techniques designed to alleviate lower back issues directly related to myofascial trigger points.

Moving on, let’s dive into identifying key lower back muscles affected by trigger points for more focused relief strategies.


quadratus lumborum trigger points
Image reference: David G. Simons, Janet G. Travell, Lois S. Simons. Myofascial Pain and Dysfunction: The Trigger Point Manual

Identifying Key Lower Back Muscles and Their Trigger Points

An anatomical illustration of lower back muscles surrounded by a scientific chart.

In your journey to understand and combat low back pain, it’s vital to recognize the specific muscle groups that commonly harbor trigger points. These often overlooked culprits can significantly contribute to discomfort and limited mobility in the lower back region.

Quadratus Lumborum

The quadratus lumborum, often overlooked, plays a crucial role in stabilizing your lower back and aiding in movements such as bending and twisting. This deeply situated muscle connects the pelvis to the spine and lower ribs.

Due to its importance in maintaining posture, it’s not uncommon for trigger points here to cause significant discomfort that radiates through the low back area. By targeting these trigger points through therapy for low back pain, you can achieve substantial relief.

Engaging in targeted exercises and stretches designed for the quadratus lumborum helps maintain a healthy range of motion and reduces discomfort. Techniques like neuromuscular massage therapy can effectively release trigger points within this muscle group, addressing both pain locally around the buttock area and referred pain patterns that spread from these central points.

Managing this muscle’s health is key to alleviating ongoing issues with lower back pain caused by active trigger points.

Spinal Extensors

Spinal extensors play a crucial role in maintaining proper posture and allowing you to stand up straight. These muscles run along your back, from the base of your spine all the way up to your neck.

When trigger points develop in these muscles, they can cause pain that radiates across your back or even down into your hips. It’s important to treat these trigger points because they often contribute to chronic lower back pain.

To tackle the discomfort caused by spinal extensor trigger points, therapists may use techniques such as manual pressure release or myofascial release. Applying sustained pressure helps relax muscle fibers and alleviate pain.

Regular treatment can reduce tightness in the lower back and improve range of motion, helping you feel more comfortable during daily activities. Remember that taking care of your spinal extensors is vital for overall back health and mobility.

multifidus trigger points
Image reference: David G. Simons, Janet G. Travell, Lois S. Simons. Myofascial Pain and Dysfunction: The Trigger Point Manual

Multifidus

The multifidus muscle plays a crucial role in stabilizing the joints within the spine. Often overlooked, this deep back muscle supports posture and spinal alignment, which is key to preventing low back pain.

If your multifidus isn’t working properly, it can become a source of lower back trigger points that refer pain to surrounding areas.

Effective management of these trigger points involves therapies like neuromuscular massage or targeted exercises designed to strengthen this core muscle. Strengthening and maintaining the health of the multifidus can lead to significant improvements in back function and reduction in discomfort.

Next up, let’s explore some hands-on techniques for achieving relief from those pesky lower back trigger points.

Techniques for Pain Relief from Lower Back Trigger Points

Discover a variety of hands-on techniques and targeted movements designed to address your lower back trigger points, providing the relief necessary for an improved quality of life—explore these methods further to find out how you can alleviate your discomfort.

psoas trigger points
Image reference: David G. Simons, Janet G. Travell, Lois S. Simons. Myofascial Pain and Dysfunction: The Trigger Point Manual

Neuromuscular Massage Therapy

Neuromuscular massage therapy is a specialized form of manual pressure release that targets painful trigger points in your muscles. This technique helps to alleviate the pain and discomfort you may feel in your lower back area.

A trained massage therapist applies specific pressures to these sensitive areas, seeking to reduce pain and improve muscle function. By using methods such as ischemic compression, therapists can identify and deactivate triggers points contributing to low back pain.

During a neuromuscular therapy session, you’ll find the experience goes beyond typical massage techniques. It focuses on releasing contracted muscles, which often refer pain to other parts of your body like the hip or mid-back.

This approach not only works for immediate relief but also aims at tackling underlying problems caused by poor posture habits or chronic muscle tension. Using this therapy can help restore normal movement and provide lasting solutions for those experiencing myofascial-related lower back issues.

Stretching Techniques

Stretching is essential for relieving pain from trigger points in the lower back. It promotes flexibility, increases blood flow, and helps release muscle tightness.


  • Gentle Yoga Poses: Engage in yoga positions like Child’s Pose or Cat-Cow stretch to gently work the muscles of the lower back and hips. These movements encourage circulation and can ease muscle tension.
  • Pelvic Tilts: Perform pelvic tilts to strengthen your core and stabilize your lower spine. Lie on your back with knees bent and slowly arch your lower back, pressing it into the floor to activate those deep muscles.
  • Knee-to-Chest Stretch: While lying down, bring one knee at a time toward your chest. This action stretches the gluteus medius muscle and helps relieve pressure on low back trigger points.
  • Hamstring Stretch: Lengthen your hamstring muscles by sitting or standing and reaching forward toward your toes. Keeping these large leg muscles flexible reduces strain on the lower back.
  • Piriformis Muscle Stretch: Target the piriformis, a small muscle that can affect sciatic pain when tight, by crossing one ankle over the opposite knee while sitting and leaning forward.
  • Hip Flexor Stretch: Counteract extended periods of sitting which can shorten hip flexors leading to low back pain. Lunge forward with one foot while keeping the other leg extended behind you.
  • Spinal Twist: Gently twist your torso while seated or lying down to create rotational mobility in the spine. This type of stretching can alleviate trigger point discomfort within spinal extensors.

Targeted Exercises

Targeted exercises play a crucial role in relieving low back pain associated with trigger points. Engaging in specific movements can help alleviate discomfort by working the affected muscles.

  1. Begin with pelvic tilts to warm up your lower back. Lie on your back with knees bent, flatten your spine against the floor by gently contracting your abdominal muscles, and hold for five seconds before releasing.
  2. Progress to knee-to-chest stretches which target the gluteus maximus muscle and relieve pressure on sciatica-related trigger points. Pull one knee towards your chest while keeping the other foot flat on the ground, holding for 15-30 seconds.
  3. Perform the quadratus lumborum stretch by lying on your side and pulling your top knee toward your chest, reaching overhead with your top arm to create a gentle stretch along the side of your torso.
  4. Strengthen core muscles using the bird – dog exercise; stabilize yourself on all fours and extend one arm forward while stretching the opposite leg back, keeping your spine neutral.
  5. Try bridges to reinforce spinal extensors: lie on your back with knees bent and feet flat, then lift hips upward, forming a straight line from shoulders to knees.
  6. Work on iliopsoas muscle flexibility through lunges; step forward with one leg and lower hips until both knees are at 90-degree angles, ensuring you keep upper body straight.
  7. Use self-massage techniques post-exercise to ease trigger points that cause referred pain; apply consistent pressure using a massage tool or hands to tender spots within lower back muscles for about 30 seconds.
  8. Incorporate hamstring stretches since tight hamstrings often contribute to lower back issues; place one foot in front of you and bend forward from hips while keeping your back straight.


Symptoms and Diagnosis of Lower Back Trigger Points

Lower back trigger points can sneak up on you, presenting with a dull ache or even sharp pain in your lower back and hips. Often, these painful spots might refer sensations to other areas of your body, tricking you into thinking the problem lies elsewhere.

You may find certain movements exacerbate the discomfort, making daily tasks feel tougher than usual. Frequent signs include muscle stiffness, tenderness at specific points on your lower back, and sometimes even radiating pain down your legs.

Diagnosing these elusive culprits requires a keen understanding of myofascial patterns and often involves physical examination by a healthcare professional trained in trigger point therapy.

Using ischemic compression techniques or applying pressure to suspected areas helps pinpoint the exact locations that are causing trouble. Relief comes when these identified trigger points are treated with methods like manual pressure release or self-massage—bringing much needed comfort to those tight muscular knots within your lower back muscles.

Contraindications of Lower Back Trigger Point Therapy

Lower back trigger point therapy can be an effective treatment for muscle pain, but it is not right for everyone. Certain conditions may prevent you from safely receiving this type of therapy.

– If you are taking blood thinners or have a bleeding disorder, pressure applied during the therapy could cause bruising or more serious complications.

– A recent fracture in your lower back area might worsen with the added pressure and manipulation associated with trigger point release techniques.

– Skin infections or open wounds near the treatment area pose a risk of spreading infection when undergoing manual therapies.

– Severe osteoporosis creates vulnerability to fractures; intense treatments like trigger point therapy could potentially lead to bone injury.

– Patients with advanced diabetes may have a reduced sensation leading to an increased risk of injury from treatments that involve deep tissue work.

– Individuals who have had recent surgery in the lower back region need time to heal before engaging in any form of physical manipulation such as trigger point therapy.

– People experiencing acute flare-ups of low back conditions should avoid this therapy as it could exacerbate pain and inflammation in affected areas.

– Those diagnosed with malignant tumors within their musculoskeletal system must refrain from receiving massage-based treatments on areas close to tumors.

Conclusion

Understanding your lower back’s trigger points empowers you to manage pain more effectively. Techniques like neuromuscular massage therapy, stretching, and targeted exercises offer relief for many suffering from this common discomfort.

With the right approach, pinpointing and treating these nagging spots within the muscle can lead to significant improvements in your daily life. Remember, persistent pain should not be overlooked; professional guidance ensures safe and appropriate treatment of low back issues.

Embrace these strategies as tools for a stronger, more comfortable back.

Here is an example of one my personal NMT protocols for lower back:


Sciatica Trigger Points | Can Treating Them Help?

If you’re feeling a sharp pain that radiates from your lower back down into your leg, you may be among the many people who suffer from sciatica. This type of discomfort can make even simple tasks feel daunting and leave you searching for relief.

But did you know that trigger points might play a role in this condition? A crucial fact to consider is that these knots of tension, commonly located in muscles like the piriformis, can refer pain along the sciatic nerve’s path.

In our upcoming article, we delve into how addressing these pesky trigger points through various therapies could offer much-needed ease from sciatic pain. Whether it’s professional neuromuscular massage or self-massage techniques at home, there are ways to target those areas contributing to your distress.

We will explore easy-to-follow methods and discuss why treating trigger points could be the key to diminishing your sciatica symptoms. Ready to find out more? Let’s dive into some soothing solutions!

Key Takeaways

  • Trigger points in muscles like the piriformis can cause pain that mimics sciatica, often leading to discomfort extending from the lower back through the leg.
  • Addressing these trigger points through therapies such as neuromuscular massage or self-massage with a ball can provide significant relief from sciatic pain.
  • Treatments focused on muscle tension aim to improve blood flow and reduce inflammation, which may alleviate pressure on the sciatic nerve for better mobility and less pain.
  • Pseudosciatica is caused by muscular trigger points rather than actual nerve compression but presents similar symptoms; treating these can resolve what feels like sciatic discomfort without invasive procedures.
  • Consistent treatment of trigger points, both professionally through therapy and at home with self-care routines, can help prevent future occurrences of sciatica-related pain.

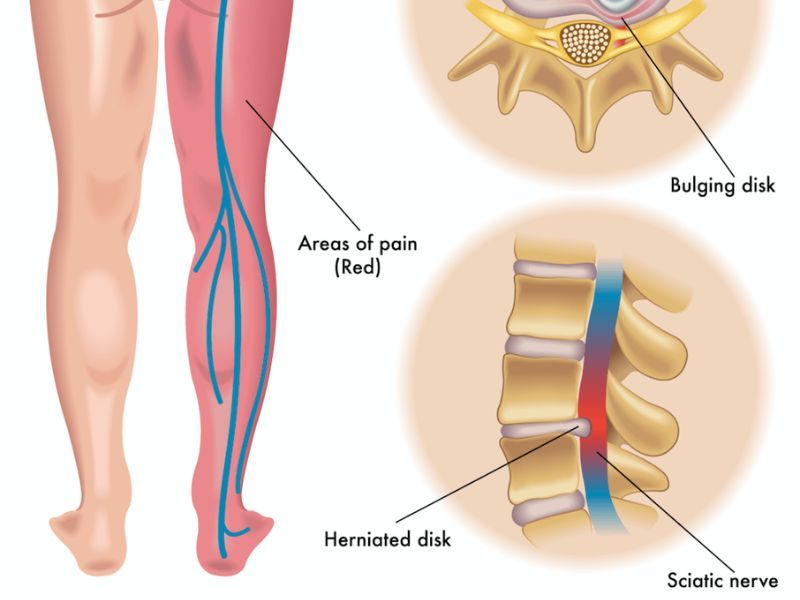
sciatica

Understanding Sciatica and Its Common Causes

Sciatica is often described as a sharp pain that starts in your lower back and shoots through the buttock down to the back of your leg. This discomfort comes from pressure on the sciatic nerve, which is the longest and widest nerve in your body.

Common causes for this condition include herniated discslumbar spinal stenosispiriformis syndrome, and other conditions that compress or irritate this critical nerve. These issues can lead to inflammation, pain, and sometimes numbness in the affected leg.

Sometimes activities like heavy lifting or sitting for extended periods can trigger sciatica symptoms. In many cases, muscle imbalances or spasms contribute to these triggers by putting extra stress on your lower spine and surrounding tissues.

Frequent spots where trigger points develop are within muscles such as the gluteus minimus, medius , quadratus lumborum, and especially around the piriformis muscle when it becomes too tight or inflamed.

Accurately identifying what’s causing you discomfort is key for finding effective treatment options like massage therapy or acupuncture that target these areas for sciatica pain relief.

The Role of Sciatic Nerve and Its Trigger Points

The sciatic nerve plays a crucial role in your mobility and sensation in the legs. It is the longest nerve in your body, running from the lower back, through your hips and buttocks, down each leg.

Trigger points along this pathway can create intense discomfort resembling sciatica symptoms. These sensitive spots in muscles can compress or irritate the sciatic nerve, leading to sharp pain, numbness, or tingling sensations that may travel down your leg.

In particular, trigger points found within the piriformis and gluteal muscles have a notorious reputation for causing sciatica-like pain. Treating these areas with therapies such as massage or acupuncture often delivers relief by directly addressing muscle tension and improving blood flow.

With careful attention to these trigger points for sciatica relief—found not just near the lumbar spine but also potentially even behind the knee—you might find a significant reduction in radiating pain and an improvement in overall function of the affected limb.

Pseudosciatica: A Result of Trigger Point Referral

glute medius and minimus trigger points
Image reference: David G. Simons, Janet G. Travell, Lois S. Simons. Myofascial Pain and Dysfunction: The Trigger Point Manual

Pseudosciatica may feel like regular sciatica, but it’s caused by trigger points in muscles rather than compression of the sciatic nerve root. These trigger points are sensitive areas within your muscle tissue that can cause pain to spread or refer to other parts of your body.

For example, a common trigger point found in the piriformis muscle might send shooting pains down your leg, mimicking the telltale symptoms of true sciatica.

You might experience this referred pain along the pathway of the sciatic nerve, even though there’s no actual nerve impingement. This type of pain often originates from trigger points in the lower back and gluteal region that can develop due to factors like poor posture or muscle imbalances.

Addressing these knots through methods such as neuromuscular therapy or acupuncture could alleviate what feels very much like sciatic nerve pain without addressing any issues with the spine itself.

With effective treatment focused on these muscular culprits, relief from pseudosciatica is possible without invasive procedures targeting nerves directly.

Treating Sciatica through Trigger Point Therapy

Exploring the potential relief from sciatica by addressing trigger points, you might find that therapies targeting these specific areas can significantly reduce your symptoms. Trigger point therapy is a non-invasive treatment focusing on relieving tension in muscles that are contributing to nerve pain, providing an alternative approach to managing discomfort in your lower back and legs.

Neuromuscular Therapy Massage

Neuromuscular therapy massage targets your muscles and nervous system to relieve pain. This specific kind of treatment is tailored for those suffering from sciatica.

  • It focuses on identifying and releasing trigger points in the muscles, which are often the cause of your pain.
  • The therapy applies concentrated pressure to these points to alleviate tension and improve muscular function.
  • A therapist skilled in neuromuscular techniques can pinpoint the piriformis trigger point, which is frequently associated with sciatica.
  • Techniques such as gliding strokes and deep pressure may be used along the lower back, gluteal muscles, and down the leg to target areas causing discomfort.
  • Regular sessions can lead to reduced inflammation and increased range of motion in affected areas.
  • Treatment aims to restore normal nerve signaling by relieving the pressure on nerves, particularly where the sciatic nerve is compressed.
  • Many find that this method provides notable relief from chronic pain, even beyond what traditional massages offer.
  • Applying neuromuscular therapy massage can also help prevent future episodes of sciatica by maintaining muscle health around the lower back and pelvis region.
  • Sessions should be done by a professional therapist experienced in treating conditions like sciatica for safe and effective care.

Using a Ball to Self Massage

If you’re dealing with the discomfort of sciatica, you might find relief in simple self-massage techniques. Using a ball to target sciatica trigger points could be your first step toward reducing pain.

  • Choose an appropriate ball: Begin by selecting a tennis or lacrosse ball that’s firm enough to press into your muscles.
  • Find the right spot: Position the ball under your gluteal muscles, where trigger points commonly develop.
  • Apply pressure gently: Start by applying a small amount of pressure and gradually increase as needed for comfort.
  • Roll slowly: Move your body slowly to allow the ball to roll over the muscle, focusing on areas that feel especially tight.
  • Breathe deeply: Ensure you breathe deeply throughout this process to help relax your muscles and reduce tension.
  • Spend time on each point: Hold the ball in place for 30 to 60 seconds on each trigger point you identify.
  • Listen to your body: If you experience increased pain or discomfort, adjust your position or decrease the pressure.
  • Be consistent: For best results, incorporate this self-massage routine into your daily schedule.


Conclusion

Exploring the treatment of sciatica through trigger point therapy opens up a pathway for relief and comfort. This method targets specific areas that can be the source of your intense pain.

Implementing techniques such as neuromuscular massage or using self-massage tools, could significantly reduce discomfort. Remember, taking control of sciatica symptoms starts with addressing these troublesome trigger points.

Your journey towards a life with less pain might just begin here, with informed steps towards managing those hidden culprits behind sciatica’s sting.

FAQs

1. What are sciatica trigger points?

Sciatica trigger points are sensitive spots in muscles that can cause pain in the lower back, gluteus medius, or down the leg when they compress the nerve.

2. Can treating trigger points help with sciatica symptoms?

Yes, massage treatment and therapy aimed at these trigger points can reduce pain associated with sciatica by releasing tension that contributes to discomfort.

3. Where are common places for sciatica-related trigger points to develop?

Common areas include the piriformis muscle, which is near your buttock and hip area; if it becomes too tight, it can create pressure on the sciatic nerve and cause severe pain.

4. How does one know if their back pain is due to a sciatic nerve issue?

If you have sharp pain originating from your low back traveling through your buttock and down the back of your thigh or leg, you might be experiencing symptoms of sciatica caused by a compressed nerve.

5. What might cause my piriformis muscle to tighten up and irritate my sciatic nerve?

Several causes of such irritation include prolonged sitting, an injury, or not getting enough stretching exercise which leads to tightness that aggravates nearby nerves like the longest nerve in your body – the sciatic.

6. Is there one side of my body more likely to be affected by sciatic pain than another?

Sciatica usually affects only one side of your body where a triggering event has caused issues along this particular path creating unilateral (one-sided) buttlock pain down through the side of your hip or back of your leg.

Deltoids Stretch – Best Stretches For Tight Delts

Have you ever felt tightness in your shoulders after a long day or intense workout? Tight deltoids can limit your range of motion and lead to discomfort. But, stretching these key shoulder muscles is an easy way to alleviate tension and improve flexibility.

Recent studies highlight the importance of maintaining good shoulder health, with statistics showing that up to 67% of people may experience shoulder troubles at some point in their lives.

Our blog will guide you through the best deltoid stretches to keep your shoulders limber and pain-free. Get ready for relief that’s just a stretch away!

Deltoids Stretch

Key Takeaways

  • Stretching the deltoids helps improve shoulder flexibility and range of motion, making everyday activities and exercises easier and less painful.
  • Regularly performing targeted deltoid stretches like the Overhead Deltoid Stretch, Cross – Body Deltoid Stretch, and Wall Deltoid Stretch can reduce the risk of shoulder injuries from tight muscles.
  • A proper warm – up before stretching increases blood flow to the muscles, reducing the chance of strain and allowing for a deeper stretch without injury.
  • Holding each stretch for 20 – 30 seconds allows muscle fibers enough time to relax fully, which aids in increasing flexibility and relieving tightness effectively.
  • Listening to your body is important when doing stretches; avoid pushing into pain to prevent causing damage to your muscles.

Deltoids Stretching Techniques

Exploring different deltoids stretching techniques can vastly improve your shoulder’s flexibility and health. These targeted stretches are designed to relieve tightness, enhance range of motion, and support the intricate functions of the shoulder joint.

Overhead Deltoid Stretch

The Overhead Deltoid Stretch targets your shoulder muscles effectively. It’s perfect for relieving tightness in the anterior, lateral, and posterior deltoids. Here’s how to do it:

overhead deltoid stretch

  • Stand straight with good posture, feet shoulder-width apart.
  • Lift your right arm straight above your head, reaching towards the ceiling.
  • Bend your elbow so that your right forearm drops behind your head.
  • Place your left hand on top of your right elbow.
  • Gently push down on your right elbow with your left hand until you feel a stretch at the back of your shoulder.
  • Ensure that you keep your head up and spine straight to avoid any strain on your neck.
  • Hold the stretch without pain for 20 – 30 seconds as this helps improve flexibility and mobility in the shoulder joint.
  • Release the stretch slowly and lower your right arm down to shoulder height.
  • Repeat the process with the left arm to maintain balance in stretching both deltoids.

Cross-Body Deltoid Stretch

Moving on from the overhead stretch, the Cross-Body Deltoid Stretch targets your deltoids differently and helps increase shoulder mobility. This stretch is fantastic for loosening up the posterior deltoid muscles and can be easily done anywhere.

cross body deltoid stretch

  • Stand straight or sit in a comfortable chair if you prefer not to stand. Your feet should be about shoulder-width apart for stability.
  • Extend your right arm across your body. Keep it straight but without locking your elbow.
  • Use your left hand to gently pull your right arm closer to your chest. You should feel a good stretch across the back of your shoulder.
  • Hold this position for 20 – 30 seconds, maintaining even breathing throughout.
  • Ensure that you don’t elevate your shoulders as you pull. They should remain relaxed and down, away from your ears.
  • Release the stretch slowly and switch arms. Now bring your left arm across your body using the same technique.
  • Repeat the stretch on each side two to three times for maximum benefit.

Wall Deltoid Stretch

The Wall Deltoid Stretch helps free up your shoulder joint and reduce tension in the anterior delt and chest. It’s a simple move that can open up the front of your shoulder and reduce tightness.

  • Stand facing a wall with your feet shoulder – width apart.
  • Extend your right arm and place the palm of your hand flat against the wall at shoulder height.
  • Keep your arm straight as you slowly turn your body away from the wall.
  • You should feel a stretch across the chest and front of your right shoulder.
  • Gently hold this position for 20 to 30 seconds, making sure to breathe normally.
  • Carefully return to the starting position and prepare to switch arms.
  • Repeat the process with your left arm, ensuring an equal stretch on both sides.
  • Perform this stretch two to three times per arm for maximum benefit.

Tips for Effective Deltoid Stretching

Mastering the art of deltoid stretching can significantly enhance your shoulder health and flexibility. Explore these strategies to maximize the benefits from each stretch, ensuring a safer and more effective way to loosen up those tight delts.

Warm up before stretching

Jumping straight into stretching your deltoids without proper preparation can lead to muscle strain or injury. Always begin with a warm-up to get blood flowing through your shoulders and upper arms.

Simple arm circles, swinging your arms gently, or even a brisk walk can raise muscle temperature and make the tissues more pliable for stretching.

Dynamic stretches like the dynamic bear hug stretch help loosen up your tight deltoids before you move on to more static exercises. Dynamic movements effectively prepare the muscles for the range of motion required in deltoid stretches.

Engaging in these light activities helps ensure that when you do start to stretch, you’ll be doing so safely, reducing the risk of shoulder injuries while promoting better flexibility and mobility.

Hold each stretch for 20-30 seconds

After warming up your muscles, it’s time to focus on the duration of each shoulder stretch. Holding a deltoid stretch for an adequate amount of time is crucial in achieving the best results.

Aim to maintain each position for 20-30 seconds. This allows the muscle fibers time to relax fully and extend without causing any harm. Consistency with this timing helps increase flexibility and can relieve tightness effectively.

Gently ease into each deltoid stretch and pay attention to how your body feels during those 20-30 seconds. If you’re stretching your left shoulder, ensure that you’re breathing normally and keeping your right side relaxed as well.

Avoid bouncing or jerking movements while holding the pose; steady pressure will encourage the safe lengthening of muscle tissues within your comfort zone. Remember, proper technique is more important than overexerting yourself—gradually let tension release from across your chest as you stabilize your shoulder joint in a controlled manner.

Listen to your body and don’t push too hard

Paying close attention to your body’s signals during deltoid stretches is crucial. If you experience any sharp pain or discomfort that doesn’t feel right, it’s important to stop immediately.

Stretching should create a gentle pull on your muscles, not sharp pains. Pushing beyond your comfort zone can cause injury and set back your progress, so keep the stretch at a level where you feel tension but no pain.

Ease into each movement and give yourself time to adjust to the stretch. A smooth transition from one pose to another helps prevent overexertion of the deltoids. Remember, improving flexibility takes time; there are no shortcuts when it comes to safely stretching these muscles.

With this in mind, let’s explore how consistent deltoid stretching can benefit you in more ways than just increased mobility.

Improved flexibility and range of motion

Stretching the deltoids improves flexibility in the shoulder joints, making it easier for you to reach, lift, and perform daily tasks without discomfort. By engaging in regular deltoid stretches like pulling an arm across your chest or using a resistance band to target these muscles, you can experience a fuller range of motion.

This means your arms can move more freely and fluidly in all directions.

Enhanced shoulder mobility also stabilizes the shoulder joint and supports rotator cuff muscles, which are essential for upper body strength and injury prevention. With consistent practice, stretching your deltoids is a great way to not only alleviate tightness and pain but also promote better overall shoulder function.

It helps prepare your muscles for activities ranging from sports to simple chores around the house, ensuring that movements are smooth and less restricted by muscle stiffness.

Reduced risk of shoulder injuries

Maintaining flexibility through deltoid stretches not only increases the range of motion but also plays a crucial role in preventing shoulder injuries. By ensuring that your anterior delts, middle deltoid, and posterior deltoid are limber, you help stabilize the shoulder joint which is pivotal for daily activities involving shoulder movements.

Regularly stretching these muscles can prevent common issues like frozen shoulder or other complications that may arise from tightness or overuse.

Engaging in consistent stretching routines helps to keep your shoulders relaxed and less prone to strain during physical activity. This proactive approach reduces stress on ligaments and tendons around the shoulders, decreasing the likelihood of tears or sprains.

As you gently pull across the body towards the opposite shoulder during a stretch, you support better shoulder health by fortifying against potential damage that could come from sudden movements or heavy lifting.


Alleviation of shoulder tension and pain

Focusing on deltoid stretches not only diminishes the chance of injury but also offers immediate relief for shoulder tension and discomfort. Regular stretching encourages blood flow, which eases tight muscles and facilitates a quicker recovery from soreness.

By incorporating movements like bringing the left arm across your body or gently pulling your right arm with your opposite hand, you target the front of the shoulder and posterior deltoid.

These actions help to release excessive muscle tension and enhance overall mobility.

Stretches performed correctly can transform how your shoulders feel daily. If you sit at a desk or perform repetitive tasks that strain these areas, simple yet effective stretches can greatly improve comfort levels.

Stretching helps reset muscle length and teaches them to relax, significantly reducing neck pain associated with stiff shoulders. Consistent practice ensures that shoulder blades glide smoothly, mitigating tension headaches stemming from poor upper body posture.

Conclusion

Stretching your deltoids can unlock the door to better shoulder health and enhanced daily movement. By incorporating simple stretches like the overhead, cross-body, and wall stretch into your routine, you take a proactive step towards preventing injuries.

These exercises are designed for anyone looking to improve their upper body mobility and alleviate discomfort. Remember that consistency is key; regular stretching leads to lasting benefits for both flexibility and strength in the shoulders.

Make deltoid stretches a part of your life to keep those important muscles working smoothly.

Muscle Energy Technique (MET) For Effective Pain Relief And Rehabilitation

If you’re seeking relief from stubborn pain or looking to enhance your rehabilitation efforts, you may have encountered various treatment options, each promising results. Muscle Energy Technique (MET) stands out as a highly regarded manual therapy approach that addresses musculoskeletal discomfort and mobility issues effectively.

Developed by Fred Mitchell, Sr, D.O., in 1948, MET utilizes the body’s natural healing mechanisms to alleviate pain and improve function. This blog aims to demystify MET for you by providing insights into its origins, mechanisms of action, and practical applications.

You’ll learn how this technique can be employed both by therapists and in self-care routines for pain relief and recovery from injuries. Ready to explore how MET can benefit your health journey? Let’s dive in!

Muscle energy technique

Key Takeaways

  • Muscle Energy Technique (MET) is a manual therapy approach that uses controlled muscle contractions to alleviate pain and improve joint mobility, developed by Fred Mitchell, Sr, D.O., in 1948.
  • MET relies on the principles of autogenic inhibition (tension within a muscle triggering its own relaxation) and reciprocal inhibition (contraction of one muscle leading to relaxation of an opposing muscle), which help lengthen shortened tissues and enhance blood circulation.
  • Osteopaths and physical therapists are trained professionals who perform MET; they tailor each session to individual needs for conditions like low back pain, neck discomfort, myofascial pain syndrome, and muscular hypertonicity.
  • Self – administered MET can be used for managing personal discomfort with techniques involving contracting muscles against an immovable surface followed by stretching. Regular practice is recommended for effectiveness.
  • Clinical evidence supports the role of Muscle Energy Techniques as a beneficial treatment option in physiotherapy for conditions such as acute neck pain and chronic lower back pain.

The Origin of Muscle Energy Technique

Muscle Energy Technique (MET) has its roots in the innovative work of Fred Mitchell, Sr, D.O., who introduced this therapeutic approach back in 1948. This technique was a groundbreaking addition to osteopathic medicine and physiotherapy, laying the foundation for what would become a staple method for pain relief and rehabilitation.

Developed by Fred Mitchell, Sr, D.O. in 1948

Fred Mitchell, Sr., D.O. saw potential in using the body’s own muscles as a way to correct dysfunction. His innovative approach leveraged isometric contractions provided by the patient to bring about desired changes in musculoskeletal conditions.

Through precise positioning and controlled force application, MET targets specific muscle groups to improve motion and manage pain.

In 1948, his method transformed physiotherapy practices by offering an active technique that involves both the therapist and patient working together. The process uses gentle stretches and muscle contractions to lengthen shortened tissues and strengthen weakened areas, addressing issues such as low back pain or neck discomfort effectively.

Understanding Muscle Energy Techniques

Understanding Muscle Energy Techniques means reading into an innovative approach to pain relief and rehabilitation, where you learn how your own muscle contractions can be harnessed in a precise way to improve mobility and alleviate discomfort—keep reading to unlock the potential of this therapeutic method.

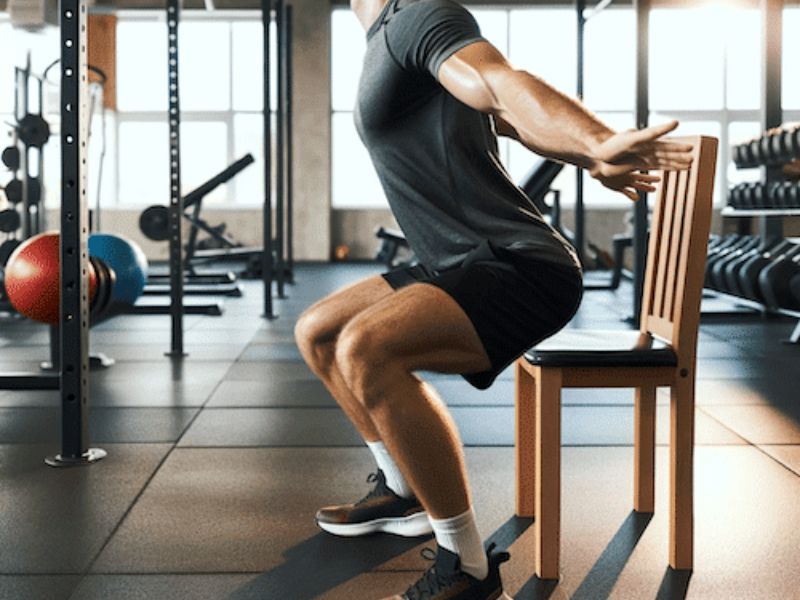
MET Muscle Energy Techniques Quads

Definition and Basic Principles

Muscle Energy Technique, or MET, is a gentle form of manual therapy that taps into the body’s natural healing process by using controlled muscle contractions to promote relaxation and improve mobility.

This therapeutic technique relies on your active participation; you contract specific muscles against a precise counterforce applied by a therapist. These contractions are usually held for several seconds and repeated, often with changes in positioning to target different muscle groups.

The basic principles of MET revolve around key physiological responses such as autogenic inhibition—where tension within a muscle triggers its own relaxation—and reciprocal inhibition—which uses the contraction of one muscle to reduce tension in an opposing muscle.

By utilizing these innate reflexes, MET can effectively lengthen shortened tissues, enhance blood circulation, reduce pain effectively and increase range of motion without causing discomfort.

Through careful guidance from qualified practitioners like osteopaths or physical therapists, these techniques help re-educate muscles and joints towards healthier patterns of movement.

Autogenic and Reciprocal Inhibition

Autogenic and reciprocal inhibition techniques harness your body’s natural responses to enhance muscle relaxation. When you use muscle energy techniques, you’re tapping into a process where the contraction of a muscle leads to its own relaxation – that’s autogenic inhibition.

Take tension in your neck muscles, for example; when these tight muscles are contracted slightly and then released, they tend to relax more than before, helping reduce neck pain.

Reciprocal inhibition works by targeting opposing muscles. If one muscle is contracting, its opposite will naturally relax and lengthen. This practical principle means that when therapists apply METs for shoulder pain or low-back discomfort, they can help increase range of motion by focusing on the relationship between agonist and antagonist muscles.

Next up, we’ll delve into how this mechanism operates behind the scenes with Muscle Energy Techniques to bring about healing and restoration in musculoskeletal conditions.


How MET Facilitates Musculoskeletal Healing

Muscle Energy Technique works wonders in healing aches and pains in your body’s framework. You actively participate by contracting your muscles as directed by the therapist, kickstarting the muscle’s own energy to initiate relaxation and lengthening.

This action triggers not just immediate comfort but also contributes to an increased range of motion over time, allowing you to move more freely and with less discomfort.

MET is all about restoring balance and ensuring muscles work together smoothly. By gently encouraging targeted muscle contractions, MET helps normalize joint mechanics without forcing or causing additional pain.

It taps into the body’s natural repair mechanisms—utilizing precise movements that match ATP resynthesis with muscular energy demands—promoting efficient healing from within.

Next up, let’s explore how MET is applied clinically across various conditions in need of its therapeutic touch.


Clinical Applications of MET

Muscle Energy Technique (MET) finds its place in a diverse range of therapeutic settings, from easing your low-back pain to addressing myofascial and hypertonic disorders. Its precise applications are tailored to meet individual patient needs, suggesting that whether you’re an athlete or someone managing chronic discomfort, MET might offer you a new avenue for recovery and relief.

Indications for Using Muscle Energy Techniques

Muscle Energy Techniques (MET) serve as a versatile tool in managing various musculoskeletal issues. They can help restore motion, alleviate pain, and enhance overall function.

  • Restoring Joint Mobility: MET is effective for increasing mobility in joints that have become restricted. These restrictions could result from injury, repetitive use, or even after periods of immobility.
  • Reducing Muscle Tension and Spasms: For muscles that are tight or in spasm, MET can provide relief by encouraging relaxation and reducing hypertonicity.
  • Improving Muscle Length: If you have short, tight muscles limiting your movement, MET can gently stretch these muscles to improve your flexibility.
  • Alleviating Low-Back Pain: Many individuals experience relief from low-back pain through the application of MET due to its ability to target the lumbopelvic region effectively.
  • Pain Relief for Chronic Conditions: People suffering from chronic pain conditions often find MET a safe technique to manage their discomfort and improve quality of life.
  • Post-Injury Rehabilitation: After an injury, MET can speed up recovery by promoting muscle balance and proper joint alignment.
  • Preventive Care for Athletes: Athletes may use MET to prevent potential injuries by maintaining optimal muscle tone and joint range of motion.
  • Supporting Spinal Health: Given its common application around the spine, MET plays a role in addressing somatic dysfunctions related to neck and back areas.

Common Conditions Addressed by MET

Muscle Energy Technique (MET) stands as a versatile player in the field of pain relief and rehabilitation. Its effectiveness spans across various conditions, significantly easing discomfort and enhancing functional capabilities.

  • Acute and Chronic Neck Pain: MET has shown promising results in alleviating both immediate and persistent neck pain. Studies suggest that this technique can notably decrease discomfort in cases of acute neck discomfort.
  • Lower Back Pain: Among the most common complaints, lower back pain benefits greatly from MET, which targets the root of the pain for lasting relief. Research indicates that MET’s impact on chronic and acute lower back pain is especially profound.
  • Myofascial Pain Syndrome: By focusing on trigger points within the muscle tissue, MET helps release tension and reduce the referral of pain associated with myofascial pain syndrome.
  • Reduced Range of Motion: Stiffness and limited movement often accompany musculoskeletal issues. Here, MET assists by stretching tight muscles to restore flexibility and range of motion.
  • Muscular Hypertonicity: Excessively tense muscles receive significant respite through MET applications, promoting relaxation and reducing muscle spasm incidences.

Therapist-Administered MET

Muscle Energy Technique, commonly known as MET, is a form of manual therapy that physical therapists, massage therapists, and osteopaths often perform. This technique plays a critical role in pain relief and rehabilitation by actively involving the patient’s movements.


  • A therapist guides you through precise movements: During a session of therapist-administered MET, your therapist will instruct you to move your muscles in specific ways. This guidance helps target the areas that need relief or strengthening.
  • You’ll engage muscles against a controlled force: Your therapist will apply a gentle force while you use your muscle energy to push against it. The resistance helps improve muscle function and reduces pain.
  • Movements are tailored to your individual needs: Each MET session is customized based on your condition and recovery goals. Your therapist will adjust the technique for optimal results.
  • Autogenic inhibition is utilized: The technique leverages the body’s natural reflexes to facilitate relaxation of the tightened muscles. When you contract a muscle, this process sends signals to relax, effectively releasing tension.
  • Reciprocal inhibition also comes into play: MET involves stretching one muscle while simultaneously contracting its opposite counterpart. This helps increase flexibility and range of motion in the targeted area.
  • Sessions focus on restoring balance: By working on both sides of your body, MET can help correct imbalances that may be contributing to discomfort or functional limitations.
  • It encourages self-awareness and participation: As you participate actively in the treatment, you’ll become more aware of your body’s mechanics and how different muscle groups work together, promoting long-term health benefits.

Self-Administered MET

Self-administered Muscle Energy Technique empowers you to manage pain and enhance your rehabilitation process. It involves using your own muscle contractions to improve flexibility and reduce discomfort.

  • Choose a quiet, comfortable space where you can focus on the technique without interruptions.
  • Start by identifying the muscle or area of your body that is experiencing stiffness or pain.
  • Position yourself so that the targeted muscle is gently stretched to a point where there’s mild tension but no pain.
  • Apply gentle pressure against an immovable surface, like the floor or a wall, creating a controlled contraction of the tight muscle for about 5 seconds.
  • Breathe deeply during this contraction phase; focus on exhaling as you apply force, which helps to increase relaxation.
  • After contracting, relax the muscle completely for a few seconds. This allows a moment of rest before moving into a deeper stretch.
  • Slowly stretch the muscle further than before, taking advantage of the temporary decrease in muscle tone due to post-isometric relaxation.
  • Repeat this contract and relax cycle three to five times, gradually easing into greater ranges of motion with each repetition.
  • Ensure not to overstretch or force the movement; listen to your body’s signals and respect its limits.
  • Incorporate regular sessions into your routine, ideally two or three times per day, to consistently aid in recovery and manage discomfort.

The Effectiveness of Muscle Energy Techniques

Clinical evidence underscores the significance of Muscle Energy Techniques as a potent ally in physiotherapy. Reviews in prominent medical journals reflect MET’s credibility for its role in improving outcomes and enhancing patient recovery.

Evidence Supporting MET in Physiotherapy

Recent studies have provided strong evidence that Muscle Energy Techniques (MET) can significantly reduce neck pain for those dealing with acute conditions. This technique, which involves gentle muscle contractions followed by stretching, helps patients not only manage their discomfort but also regain mobility in the neck region.

The process of engaging specific muscles through MET allows you to directly address the source of pain and encourages healing without relying on medication or more invasive procedures.

In addition to improving neck issues, research has shown MET’s effectiveness extends to treating lower back pain. Patients experiencing chronic low back discomfort have reported noticeable relief after undergoing this form of manual therapy treatment.

By comparing MET to other therapeutic interventions, it is clear that this approach plays a vital role in therapy by helping individuals recover from musculoskeletal ailments effectively and enhance their overall function.

Role of MET in Managing Chronic Pain

Muscle Energy Techniques (MET) stand as a pillar in the battleground against chronic pain, targeting discomfort at its source. These hands-on methods encourage muscles to relax through precise movements and counterforces applied by therapists or taught for self-care.

Studies have shown that utilization of MET can significantly reduce the nagging aches of conditions like non-specific acute and chronic neck pain, offering patients an effective tool for managing their long-term symptoms.

With each precisely controlled position and specific muscle force, MET prompts your body’s natural healing mechanisms. This personalized treatment not just alleviates pain but may also prevent it from returning.

For individuals suffering from lower back woes, incorporating MET into their recovery program proves to be particularly beneficial, as evidenced by clinical trials highlighting its success in treating acute low back distress.

The technique’s focus on patient involvement empowers you to actively participate in your own path toward wellness.

MET for Improving Range of Motion and Reducing Hypertonicity

Muscle Energy Technique (MET) serves as a powerful tool for enhancing flexibility and movement. By utilizing a patient’s force in controlled, isometric contractions, MET targets the stiffened muscles that limit your motion.

These gentle yet precise applications foster relaxation and elongation of the muscle fibers. Consequently, this enhances muscular function and promotes better joint mobility.

If you struggle with tightness or find certain movements restricted due to hypertonic muscles, MET could be particularly beneficial. It harnesses reflex inhibition to dampen excessive muscle tone through targeted contractions followed by stretching phases.

This not only improves your range but can significantly reduce discomfort linked with chronic muscular tension. Next, let’s explore who is qualified to perform these restorative techniques on patients like you seeking relief and improved physical performance.

Conclusion

Muscle Energy Techniques provide a specialized approach to pain relief and rehabilitation. These techniques leverage the body’s natural movements for healing, making them a go-to method for many practitioners.

Whether you’re tackling chronic back pain or seeking improved mobility, MET offers a promising solution. It stands as an effective and widely respected practice in the field of manual therapy.

Embracing MET could mean taking a significant step towards better health and comfort.

FAQs

1. What is the Muscle Energy Technique (MET)?

The Muscle Energy Technique, or MET, is a manual therapy technique used to treat shortened muscles by having patients use gentle muscle contractions to relax and stretch their muscles.

2. How does MET work for pain relief?

MET works for pain relief by using a maximum, controlled contraction of the muscle against a therapist-applied force. After the patient relaxes, they move into a new barrier where stretching of the opposite muscle can happen.

3. Can MET improve rehabilitation for chronic pain patients?

Yes, studies in journals like J Orthop Sports Phys Ther suggest that using MET can significantly reduce pain and functional disability in patients with chronic conditions.

4. Is there any research on the effectiveness of MET?

There has been systematic review research accessible through sources like Physiopedia as well as articles in Cochrane Database of Systematic Reviews that show evidence about the positive effect of Muscle Energy Techniques on reducing pain.

5. Are there other benefits to using MET besides treating painful muscles?

Absolutely! In addition to providing immediate effects on relieving muscle discomfort, MET often improves overall joint mobility and helps retrain muscles so they are actively used correctly during movements.

6. Do I need special equipment to perform Muscle Energy Techniques?

No special equipment is needed! This passive technique mainly involves guidance from therapists trained in osteopathic manipulative diagnosis and treatment methods such as those found described by Churchill Livingstone and Fryer G in Journal of Osteopathic Medicine.

Deltoid Trigger Points: Causes, Symptoms, And Treatment Options

If you’ve felt a nagging pain in your shoulder that just won’t go away, you might be dealing with a deltoid trigger point. These pesky knots can cause discomfort and make simple tasks like lifting your arm feel like an uphill battle.

Whether you’re an athlete or someone who spends hours at a desk, deltoid muscle pain is more common than you’d think.

Did you know the deltoid muscle is involved every time you move your arm? When it’s not working right because of trigger points, it can disrupt your whole day. In this article, we’ll guide you through understanding these trigger points, spotting the symptoms they cause, and exploring effective treatments to get your shoulder back on track and avoid the potential of chronic pain.

Get ready for trigger point pain relief – let’s dive into solutions for soothing those stubborn spots!

Deltoid Trigger Points

Key Takeaways

  • Deltoid trigger points can cause pain, tenderness, and limited movement in the shoulder area; they are often confused with conditions like bursitis or rotator cuff issues.
  • Common causes of deltoid trigger points include repetitive motions, poor posture, injury or trauma, stress and tension, overuse during exercise, imbalanced muscle use, weakness in surrounding muscles, age-related wear and tear, inadequate warm-up before activity and lack of mobility.
  • Symptoms may include sharp or aching pains that radiate down to the elbow and difficulties performing daily tasks due to reduced range of motion in the shoulder.
  • Treatment options range from self – myofascial release techniques using foam rollers or massage balls to professional therapies such as dry needling and massage. Stretching exercises also offer relief by improving flexibility.
  • Preventative measures for avoiding the development of deltoid trigger points include maintaining good posture, warming up properly before activities that strain the shoulders, taking regular breaks from repetitive movements, using ergonomic equipment when sitting for long periods of time-strengthening shoulder muscles gradually increasing workout intensity staying hydrated managing stress effectively.

Understanding Deltoid Trigger Points

Trigger-Points-In-The-Deltoids

Diving into the intricacies of deltoid trigger points reveals a complex interplay between muscle tension and discomfort that can impede daily life. Recognizing the signs and sources behind these sensitive spots is pivotal for effective management and treatment.

Location and Identification

Identifying deltoid trigger points begins by pinpointing the exact areas of tenderness and pain in your shoulder muscles. The deltoid muscle, a large triangular-shaped muscle that covers the shoulder joint, consists of three separate parts: anterior, lateral, and posterior deltoids.

Trigger points in the deltoid are located mainly in these regions. To locate an anterior deltoid trigger point, search for sensitive spots along the front edge of your shoulder. If you’re looking toward the outside or back of your shoulder, you may be dealing with lateral or posterior deltoid trigger points.

As you press on different sections of your deltoid muscle, notice any sharp pains or aches that mimic common symptoms like neck pain or upper arm discomfort—these could indicate active myofascial trigger points.

It’s essential to differentiate between referred pain from other sources such as bursitis or rotator cuff issues and direct pain caused by tight muscle fibers within the deltoids themselves.

Movement tests can also help identify problematic areas; increased pain upon contracting the affected shoulder or lifting your arm beyond 90 degrees often signals a trigger point’s presence.

Consulting with a healthcare professional experienced in myofascial pain is advisable for accurate diagnosis and to determine if what seems like chronic shoulder pain stems indeed from these localized constrictions within your muscles.

Common Causes and Contributing Factors

Once you’ve located the deltoid trigger points, it’s important to understand what might have caused them. This knowledge can help you address the underlying issues and find effective pain relief. Here are some common causes and contributing factors:

  1. Repetitive motions: Frequent and repetitive activities that involve the shoulder, such as throwing or lifting overhead, can overwork the deltoid and rotator cuff muscles, leading to trigger points.
  2. Poor posture: Slouching or consistently holding your shoulders in an awkward position can strain the deltoids, especially if you sit at a desk for long hours without proper ergonomic support.
  3. Injury or trauma: A direct blow to the shoulder, a fall on an outstretched arm, or a dislocation can damage the soft tissue and activate trigger points in the deltoid muscle.
  4. Stress and tension: Chronic stress often results in tense muscles across the entire body, including the shoulder girdle; this tension may further exacerbate existing trigger points.
  5. Overuse during exercise: Exercising without adequate rest or not using proper form can overstress the shoulder muscles and increase pain on contraction of these areas.
  6. Imbalanced muscle use: Relying too much on certain muscles while neglecting others may lead to imbalances in the shoulder area, causing compensatory patterns that strain deltoids.
  7. Weakness in surrounding muscles: If stabilizing muscles like infraspinatus or supraspinatus are weak, more pressure is put on deltoids during movements like flexion and extension of the arm.
  8. Age-related wear and tear: As you grow older, muscles naturally lose elasticity and are more prone to injury which includes developing active trigger points within them.
  9. Inadequate warm-up before activity: Jumping into strenuous activities without properly warming up can shock your muscles into a state where they’re more susceptible to developing trigger points.
  10. Lack of mobility: Restricted movement in other parts of your body such as back or neck might force your deltoids to overcompensate during arm movements leading to localized discomfort.

Symptoms Associated with Deltoid Trigger Points

Trigger point shoulder pain lifting overhead

When deltoid trigger points take hold, they can manifest through a variety of symptoms that may not only cause discomfort but also interfere with your daily routine. You might experience sharp or aching pains in the shoulder and upper arm regions, reflecting the complex ways these knots affect the surrounding tissues and nerve pathways.

Referred Pain Patterns

Referred pain patterns can be complex and surprising due to the way our nervous system is wired. If you have deltoid trigger points, you might feel discomfort in areas that seem unrelated to your shoulder.

For instance, pain could radiate down your arm or even as far as your elbow. This type of pain often gets mistaken for other conditions like bursitis or a problem with the pectoralis major because it doesn’t always stay put where the trigger point is located.

Recognizing these patterns plays a crucial role in effective treatment. You may notice increased pain on contraction of the deltoid muscle, especially when trying to lift your arm or extend your shoulder.

The referred pain isn’t limited; it can affect both the anterior and posterior parts of your shoulder and upper arm area. Knowing this helps target therapy more accurately, ensuring that relief isn’t just temporary but part of a lasting solution for easing the discomfort associated with these perplexing yet common musculoskeletal issues.

Impact on Mobility and Daily Activities

Moving beyond the discomfort, deltoid trigger points significantly restrict your ability to perform everyday tasks and enjoy activities that require upper body movement. Simple actions like reaching for a high shelf or brushing your hair can become challenging and painful.

The restriction in mobility often stems from an inability to fully raise the arm or rotate the shoulder joint, which is essential for countless daily functions.

Trigger points in the deltoid muscle can lead to stiffness and reduced range of motion, making it hard to move freely without discomfort. This limitation not only affects physical activity but can also disrupt sleep if lying on the affected side causes pain.

Engaging in sports, carrying groceries, or even driving might worsen symptoms as these activities demand fluid shoulder movement that’s often compromised with active trigger points.

Treatment Options for Deltoid Trigger Points

When managing deltoid trigger points, a multifaceted approach is often most effective. Exploring both self-care techniques and professional interventions can significantly reduce pain and improve shoulder function.

Self-Myofascial Release Techniques

Self-myofascial release is a technique you can use to relieve muscle tension and improve flexibility. It acts as a form of trigger point therapy by targeting areas of tightness in the deltoid muscle.

  • Begin with a foam roller or a firm massage ball. Position it under the most sensitive area of your shoulder and gradually apply pressure.
  • Move slowly over the ball or roller, letting your body weight do the work. If you find a particularly tender spot, hold there for 30 to 60 seconds.
  • Breathe deeply during this process to help relax the shoulder muscles. Deep breaths encourage oxygen flow to the sore spots, enhancing recovery.
  • Make sure not to roll directly on bones or joints; keep the focus on the soft tissue where trigger points are located.
  • Incorporate different angles by adjusting your arm’s position. This reaches all three separate muscles making up the deltoid group.
  • Use self-myofascial release before and after exercises to maintain mobility in your shoulder joint. It helps prepare your muscles for activity and aids in recovery post-workout.
  • Consistency is key; regularly practice these techniques for best results. Aim to incorporate it into your routine two to three times per week.

Professional Therapies: Dry Needling and Massage

Dry needling is a therapy used by skilled professionals to ease the pain and dysfunction associated with trigger points in the deltoid muscle. During this treatment, thin needles are carefully inserted into specific parts of the muscle, offering relief from shoulder pain as well as improving movement of the shoulder joint.

Patients often experience an immediate reduction in discomfort and an increase in range of motion.

Massage therapy complements dry needling by targeting the soft tissues around the deltoid and supraspinatus muscles. A massage therapist applies various techniques to relax tight muscles, improve blood flow, and facilitate recovery from elbow pain or any discomfort related to arm and shoulder movements.

Together, these professional therapies can significantly relieve pain and help restore full function.

Next on our list is ‘Stretches and Exercises for Relief’, where we will explore how certain movements can further alleviate symptoms of deltoid trigger points.

Stretches and Exercises for Relief

Moving from professional therapies, incorporating stretches and exercises into your routine can provide significant relief from deltoid trigger points. These movements aim to improve flexibility and strengthen the shoulder muscles to prevent future discomfort.

  • Pendulum stretch: Lean over slightly, letting your affected arm hang down. Swing the arm gently in small circles, gradually widening the circles over a minute or two—this aids in reducing tension within the deltoid muscle.
  • Cross-body reach: Stand or sit comfortably, then bring your affected arm across your body. Use the opposite hand to hold your elbow and gently pull it further across until you feel a stretch in the back of your shoulder.
  • Doorway stretch: Position yourself in an open doorway. With elbows bent at 90 degrees, place palms on either side of the door frame at shoulder height. Step forward with one foot while leaning into the doorway until you feel a stretch at the front of your shoulders.
  • Shoulder blade squeeze: Sit or stand with arms at your sides. Squeeze your shoulder blades together as if trying to hold a pencil between them; hold for five seconds before releasing. Repeat this movement several times to help strengthen postural muscles and reduce strain on the deltoids.
  • Arm raises: Sitting or standing with arms by your side, lift them forward and upward slowly until they are at shoulder level. Lower them back down steadily. This exercise increases range of motion and builds strength in parts of the muscle prone to developing trigger points.
  • Wall push-ups: Face a wall, placing hands flat against it slightly wider than shoulder-width apart. Slowly bend your elbows, bringing your chest closer to the wall before pushing back out—ideal for strengthening without excessive strain on the deltoids.

Preventative Measures and Maintenance

Ensuring the long-term health of your deltoid muscles requires consistent attention to both body mechanics and strength. Embrace a proactive stance by integrating specific strategies into your routine that safeguard against the development of trigger points, keeping your shoulders supple and ready for action.

Best Practices for Avoiding Trigger Point Development

Developing trigger points in your deltoid muscle can lead to discomfort and affect your shoulder function. It’s important to take steps to prevent these painful spots from forming.

  • Maintain good posture: Slouching or hunching over for prolonged periods puts undue stress on the shoulder muscles, increasing the likelihood of trigger point development.
  • Warm-up before activity: Engaging in dynamic stretches and light exercises prepares your deltoid muscles for more intense physical activity and reduces injury risk.
  • Take regular breaks: If you have a job or hobby that involves repetitive shoulder use, taking breaks every hour helps relieve muscle tension.
  • Use ergonomic equipment: Chairs with proper back support and adjustable armrests, along with appropriately positioned desks, can decrease strain on the shoulders during work.
  • Strengthen shoulder muscles: Incorporating exercises targeting the deltoids and surrounding muscles improves overall stability and resilience against trigger points.
  • Gradually increase workout intensity: Avoid sudden jumps in exercise weights or repetitions; instead, progressively challenge your muscles to adapt safely.
  • Stay hydrated: Proper hydration is vital for maintaining healthy muscle tissue and facilitating recovery after exertion.
  • Manage stress effectively: High-stress levels can cause muscle tightening; activities like yoga, meditation, or deep breathing exercises help keep stress in check.

Conclusion

You now understand the basics of deltoid trigger points—from their causes to symptoms, and most importantly, the variety of treatments available. Whether you’re considering self-care strategies or seeking professional help, remember that consistent action is key to relief.

Embrace preventative practices to ensure your shoulders remain strong and flexible. Your path to a pain-free life starts with applying this knowledge and taking control of your shoulder health today.

Chair Sit Squats – How To Perform The Exercise

Are you searching for a straightforward and effective exercise to enhance your lower body strength? Maybe you’re feeling overwhelmed by complex routines, or perhaps gym equipment seems intimidating.

Chair sit squats are a simple yet powerful way to work out your muscles without needing any fancy gear.

According to the American Council on Exercise, incorporating squats into your fitness regimen can significantly improve leg strength and tone up your glutes. In this article, we’ll guide you through the process of performing chair sit squats correctly—targeting key muscle groups and ensuring safety along the way.

You’ll learn about variations that suit different fitness levels and understand why they’re an essential addition to any workout routine. Ready for stronger legs and a firmer backside? Let’s dive in!

Chair Sits Exercise

Key Takeaways

  • Chair sit squats help build strength in the lower body, targeting muscles like quadriceps, hamstrings, glutes, and core. By squatting down to a chair and standing back up, you work on essential muscle groups for stability and everyday movements.
  • Proper form is crucial when performing chair sit squats: feet should be shoulder-width apart, knees aligned with feet, chest upright while lowering slowly to touch the seat without fully sitting. Stand by pressing through heels and engaging glutes.
  • There are many variations of chair sit squats to suit different fitness levels or add challenge; beginners can start with shallow squats while advanced exercisers might add weights or try one-legged squats for increased difficulty.
  • This exercise also improves posture by encouraging proper spinal alignment and offers a low-impact cardiovascular workout that can benefit those with joint concerns or mobility issues.
  • Squatting exercises like these aid in enhancing functional movements such as sitting down and standing up which translates to better performance in daily tasks.


Proper form and technique

After learning what chair sit squats are, let’s dive into the correct way to perform this exercise. Mastering the proper form and technique ensures you work the right muscles safely.


  • Stand in front of a sturdy chair with your feet shoulder – width apart and your toes pointing straight ahead.
  • Engage your core as you bend at the knees and slowly lower your butt towards the seat of the chair.
  • Keep your chest upright and your spine straight as if you were sliding down a wall.
  • Make sure your knees stay in line with your feet during the descent.
  • Lower yourself until you slightly touch the seat, keeping tension in your quads and hamstrings.
  • Pause for a moment with your butt just touching the chair without fully sitting down to maintain muscle engagement.
  • Press through your heels to stand back up, returning to the starting position.
  • As you rise, squeeze through your glute muscles to boost their strength.
  • Throughout each squat, keep breathing steadily; inhale on the way down and exhale as you stand up.
  • Repeat this movement for a set number of repetitions


Muscles targeted

Chair Sits Muscles

Once you’ve mastered the proper form and technique, it’s time to focus on the muscles that chair sit squats work. This exercise is great for building strength primarily in your lower body.

Your quadriceps, which are the large muscles on the front of your thigh, do most of the heavy lifting as you lower into a squat and push back up to standing position. The hamstrings at the back of your thighs help as well, along with your glutes—those are the muscles in your butt.

Chair sit squats also engage your core muscles to keep your torso stable throughout the movement. With every squat, you’re working on keeping those abdominal and back muscles tight to support your spine.

And let’s not forget about muscle groups like hip abductors and calves; they play supporting roles by helping stabilize legs while bending knees lowering down or rising from a 90-degree angle stance near parallel to floor level ensuring balance control during this effective chair exercise routine.

Benefits of chair sit squats

Chair sit squats are a fantastic way to build strength in your lower body. As you bend your knees and lower yourself onto the chair, you engage muscles like your glutes, hamstrings, and quadriceps.

This exercise helps with mobility too; by practicing sitting down and standing up, you improve the range of motion in your hips and knees. They’re also a safe option for beginners because the chair provides stability and can prevent falls.

You’ll find that this type of squat is great for working on posture as well. Keeping your back straight while lowering yourself forces those shoulder blades together, helping to strengthen the upper back muscles which contribute to better alignment throughout the day.

Additionally, it’s an effective low-impact workout that increases heart rate without straining joints – making it ideal for people with mobility issues or those who are looking for gentle cardio options.

Next up: Variations and modifications of chair sit squats – let’s explore how to keep this exercise fresh!

Variations and modifications

Having learned the benefits of chair sit squats, you might be eager to try different styles to keep your workouts fresh and challenging. Chair sit squats can be varied in several ways to cater to different fitness levels and goals.

  • Modify for beginners: Start by reducing the depth of your squat. Instead of sitting all the way down, touch your butt to the chair lightly and then stand up again. This will make it easier and help build strength over time.
  • Add weights: Once comfortable with the basic movement, hold a dumbbell in each hand or wear a weighted vest to increase resistance, which in turn helps in building muscle strength.
  • Play with tempo: Change how fast you perform each squat. Try a slow descent followed by an explosive rise to activate different muscle fibers.
  • One-legged variation: Lift one leg slightly off the floor while performing the squat with the other leg. This not only challenges your balance but also strengthens your muscles asymmetrically.
  • Integrate stretches: Between sets, perform a stretch like yoga’s downward dog or a wall sit for added flexibility and endurance training.
  • Include upper body movements: As you squat down, reach overhead with both arms extended towards the ceiling to engage your upper body and add an overhead press when standing up.
  • Work on abduction: Place a resistance band around your thighs just above your knees; as you squat down, push your knees outward against the band’s tension for extra work on your outer thighs and glute medius.
  • Rotate through angles: Face away from or sideways to the back of the chair occasionally, which changes how gravity affects your body during the exercise and targets muscles differently.


Conclusion

Chair sit squats offer a solid workout for anyone looking to strengthen their lower body using just their body weight. With each squat, you’re helping your muscles work better and increasing your stability.

Remember the step-by-step instruction to maintain proper form and protect your joints. Embrace the variations to keep challenging yourself as you get stronger. Incorporate this exercise into your routine, and experience the rewards of improved strength and endurance in everyday activities.

External Oblique Trigger Points | How To Locate And Self Release

The external abdominal oblique muscles play a key role in core stabilization and rotational movement.  Trigger points in the external obliques can potentially create inhibition of these crucial muscles, and also contribute to specific types of abdominal region discomfort.

In my experience as a clinical massage therapist, trigger points in the obliques are relatively common, but don’t seem to be a major factor in many pain issues, but that doesn’t mean they shouldn’t be addressed.

In this guide, we’ll cover how to locate and resolve these tender points.

Intro to the External Oblique Muscles

The external obliques are a pair of muscles that form the outermost abdominal wall layer. These external oblique muscles are located on each side of the rectus abdominis, running diagonally downward and inward from the lower ribs to the pelvis. 

These large fan-like muscles stabilize the trunk and allow side-bending and rotational motions. They also compress the abdomen, supporting your core strength. Your external oblique health is vital for movement and stability.

The action of these muscles is simple.  Imagine swinging a baseball bat.  If you’re right handed, the RIGHT external obliques will shorten to assist with rotation, while the LEFT external oblique will be lengthening to decelerate the rotation.  (The internal obliques are doing the opposite.)

When both sides contract simultaneously, they assist when flexing the spine, and also posteriorly rotating the pelvis.

Trigger-Points-External-Obliques (1)

What are Trigger Points?

A trigger point is a hyperirritable spot within muscles that causes pain. Trigger points can form when muscles are stressed through overuse, poor posture, or trauma. 

These sensitive, taut bands of muscle fiber can create local discomfort or refer pain to other areas. For example, foot trigger points can radiate pain up to the head. Trigger points will limit the range of motion and lead to reduced function.

Identifying External Oblique Trigger Points

Here are some of the potential reasons to look for trigger points in the external obliques: 

  • Tenderness in the muscle, especially along the diagonal waistline region.
  • Aching pain when bending sideways at the waist.
  • Difficulty fully rotating the torso.
  • Referral pain downward into the hip or groin region.

Applying direct pressure to recreate the discomfort can help isolate trigger points—note areas of sensitivity.

External-Oblique-Trigger-Points
External Obliques Simons, D. G., Travell, J. G., Simons, L. S., & Travell, J. G. (1999)

Potential Causes of External Oblique Trigger Points

While no one knows the exact reason why trigger points exist, they appear to be related to repetitive activities, strain, etc.  here are some reasons for oblique trigger points:

  • Repetitive rotational motions in sports like golf, tennis or baseball
  • Side bending while lifting heavy objects incorrectly 
  • Sitting for prolonged periods with poor posture
  • High-impact falls directly onto the torso
  • Stubborn coughs that strain intercostal muscles between the ribs
  • Training obliques heavily without rest and recovery  

In many cases, it appears muscle overuse and imbalances underlie the development of trigger points.

Finding Trigger Points in the External Obliques

Self-Assessment and Massage Techniques

Use self-massage to locate trigger points based on the image above. 

Lay on your side when performing this technique.  This makes it easy to minimize muscle activity in the oblique and allow you to access the fibers accurately.  Place your finger tips together so that you can use a sort of “scraping” technique.

Place your hand between your ribs and pelvic bone.  The space between these points is the location of the external oblique.  While using a sweeping motion, gently press down into the fibers and scroll across them to feel for tender spots.  Emphasize a variety of areas around the muscle.

You will often find simple tender spots to work on, but be on the lookout for ones that refer sensations to other areas.  These are the active trigger points we are looking for.  You can perform this sweeping massage technique 5-10 times over the region, OR hold on the tender spot for up to 60 seconds until you feel it reduce sensitivity.

Finally, massage the attachments of the oblique on the ribs.  Start from the sternum (at midline) and using the same sweeping technique, massage outward to scroll over the attachments and assess for tender spots.


VIDEO

Stretching and Strengthening Exercises for the External Obliques

Trigger point resolution is not done completely by manual therapy techniques.  To maximize results and prevent re-occurence, its important to normalize soft tissue range of motion, endurance, and finally strength to these muscles.  Here are a few simple exercises for the external obliques:

Lower Abdominal Leg Slide

The lower abdominal leg slide targets the external obliques in their function of controlling the pelvis during leg movement.  Remember when the obliques contract on both sides, it produces posterior rotation of the pelvis.

This simple movement can be done for 30 seconds up to 2 minutes.


VIDEO

Side Bend Stretch Over Ball

The swiss ball side stretch is my go-to for stretching the obliques.  This can be done for 2-3 repetitions on each side, holding for 30 seconds each rep.

VIDEO

Professional Intervention

For recurrent or severe cases of abdominal muscles trigger points, consult a physiotherapist or licensed massage therapist. They can use techniques like soft tissue therapy and muscle energy techniques to fully deactivate trigger points.

Lifestyle Modifications for Pain-Free Living

Specific lifestyle measures promote external oblique health. These are such as

  • Take frequent movement breaks when sitting to avoid hunching sideways.
  • Limit asymmetric activities that overload one side of the body.
  • Maintain good conditioning with cardio, strength training, and stretching.
  • Use proper form when lifting, bending, or rotating. Don’t twist lifting heavy weights.

A holistic approach combining self-care, exercise, and posture habits provides the best results. Be patient – over time, the obliques regain flexibility and function.

Preventing Recurrence

You can keep external oblique trigger points at bay. Here is how you can prevent abdominal pain recurrence.

  • Stretch the torso muscles before and after strain – don’t just target the legs and arms.
  • Strengthen the core musculature evenly on both sides with balanced training. 
  • Maintain proper form during rotational sports like golf or tennis.
  • Stay vigilant to prevent trigger points from sneaking back and disrupting your active lifestyle.

Conclusion

External oblique trigger points can develop over time, like any other muscle group, but understanding the causes and implementing self-care strategies helps regain pain-free mobility. 

Be attentive to posture and exercise form while regularly releasing tension through massage and stretching. With a proactive approach, you can keep your body and lifestyle moving comfortably.

What Does Psoas Release Feel Like? – What Most People Experience

The psoas muscle is the most powerful hip flexor muscle, and is essential to stability of the hips, pelvis, and spine. It is commonly found to be short and tight on testing (the Thomas Test), but not always.

Just because the muscle isn’t found to be tight on testing, doesn’t mean that it doesn’t FEEL tight.

I frequently have this type of discussion with my personal clients, and it is very often very enlightening for them to understand what a muscle release feels like.

What does a psoas release feel like?

We all know what it feels like to stretch a muscle.  For example the hamstrings, or the calves.  Its a fairly sharp, pin-point type of feeling at the end of the available range of motion that the muscle has.  As we stay in that position, it’s as almost the muscle starts to let go and give way a bit.

This is the same feeling you will feel when stretching your psoas.  The easiest position to feel this stretch is in the Thomas Test position.  As the upper thigh is allowed to hang, the psoas is put into a lengthened position. As gravity does the work, the upper thigh will descend as the muscle stretches and lets go.

This feeling is a bit different when hands-on techniques are used to release the psoas muscle.

In the following video, I demonstrate a massage technique technique for the psoas.

First of all, its not possible to make direct contact with the psoas without making contact with the tissues on top of it, so the pressure is super gentle, and whatever tissue/s are sensitive will be the target of the technique.  You certainly won’t feel a stretch in the muscle, or much tenderness like you would when working another muscle such as the TFL or quadricep.

At the tendon attachment of the psoas on the femur, there is much more of a chance of making contact with it.  The insertion point will be much more tender and often sharp.

When working that attachment (as well as many other areas), I usually only press to a 4/10 max intensity on the point.  This is confirmed by the client’s input on how sensitive it is.  This stimulation is sufficient to bring the person’s awareness to the muscle, but very comfortably.

At that point, I ask them to take a nice deep but comfortable breath in, hold it for a movement, then sigh and exhale fully to relax.

The psoas “release” occurs at this point.  What it will feel like is that I have lessened my pressure on that point, but I have not.  So, what happened?

My theory here is that the very low level of “threat” or guarding that occurred on pressing the tender spot was essentially discharged or diminished as a result of the deep breath followed by the exhalation.  It allows the nervous system to be reminded of safety.  The context of being in the therapist’s office, performing low-threat, comfortable techniques for the purpose of relief, helps make the release possible.

After the technique is repeated for a number of repetitions, re-testing is done to check for improvements.  This can be done by repeating the Thomas Test, testing the performance of the muscle, or simple standing and walking around to note any differences in the person’s experience.

That is how a psoas muscle release feels like!